@w460461339
2019-02-20T10:10:43.000000Z
字数 9879
阅读 1990
Tensorflow Day6:FasterRCNN(训练+推断,NMS,回归,SmoothL1)
Tensorflow
1、基本原理
这个讲的不错:https://blog.csdn.net/zziahgf/article/details/79311275
Faster-rcnn回归目标:https://zhuanlan.zhihu.com/p/24916624?refer=xiaoleimlnote
Faster_RCNN就是将region_proposal和分类任务全部放到网络中来了。
基本过程:
1、对于输入图片,通过vgg得到其特征图图f_m_1.
2、通过RPN网络,处理f_m_1,得到:
    2.1 和f_m_1尺寸一样的rpn_class前/背分类结果。
    2.2 和f_m_1尺寸一样的rpn_reg 边框回归结果。
3、将rpn_class和rpn_reg送入ROI_pooling和NMS,过滤anchors,提取特征向量。
4、送入后续的类似fast-rcnn的网络,进行分类和边框回归
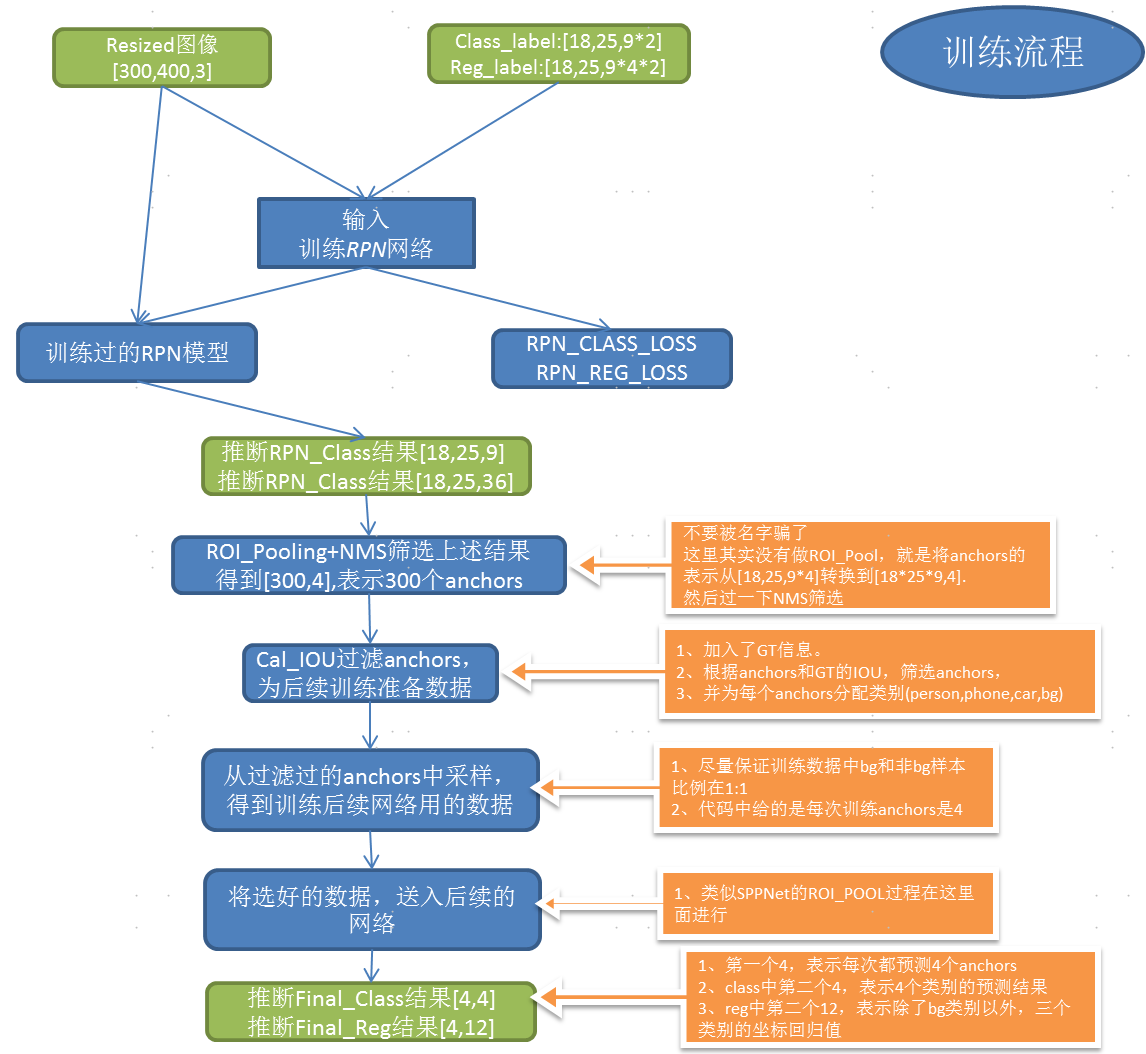
2、训练一般流程

那么从two_stage的角度来看,其实挺明显的:
1、RPN网络:
    1.1 前期数据准备。(主要是满足shape要求,以及通过gt来作为每个anchor的目标)
    1.2 训练RPN模型。
2、后续网络:
    2.1 筛选经过RPN调整过的anchors。(两步筛选:NMS+GT with IoU)
    2.2 训练后续网络。
3、RPN网络训练
RPN网络在训练阶段有两个任务:
1、被训练。
2、为后续网络的训练提供数据。
3.1 RPN数据获取
这个数据其实是一个很复杂的模块…
我们要完成的任务有:
1、将原始图像进行resize,增强。
2、获得可以rpn需要的label信息。
3.1.1 图像修改,增强
这里比较简单,主要涉及:
1、将图像统一resize到(300,400,3)的尺寸。
2、将图像进行增强,具体操作有:
    2.1 上下左右翻转。
    2.2 颜色通道修改等等。
3.1.2 获得RPN需要的Label
虽然理了代码之后觉得还行……但还是觉得好麻烦
先想想,获取RPN需要的label我们需要做什么。
1、RPN的输出结果是基于anchors的,我们首先需要找到anchors。

2、RPN的有分类结果,我们需要对anchors做分类:
    2.1 要求:分类还不能太不均匀。

3、RPN有回归结果,我们希望预测框相对于anchors的偏移,和gt相对于anchors的偏移尽可能的靠近,,那么我们要计算这个偏移,并把它作为label给RPN。
超烦…
1)首先,获取anchors。我们获取anchors需要个元素:anchors的面积,anchors的长宽比,anchors在原图上的中心点位置。
1、anchors的面积是预先定义的。
2、anchors的长宽比是预先定义的。
3、anchors在原图上的中心点是,VGG16提取完的特征图(18,25,512)映射回原图上的点。
好的,完了。2)分类结果。回想RPN只需要前景背景分类就行,因此:
1、对某一个anchors,判断它和每一个GT的IOU。
2、按照IOU的高低,将其分为neg,neural,pos三类。
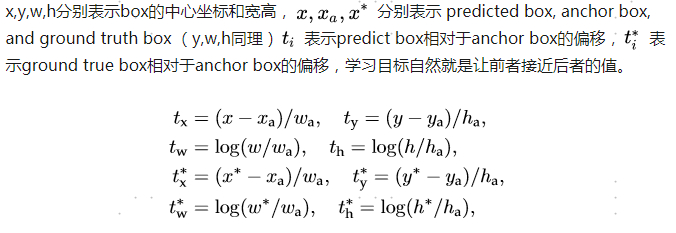
3、同时为了考虑到正负样本平衡以及重复性,我们限制数量,neg<=128,pos<=1283)回归结果。我们有的是anchors的坐标,和gt的坐标,偏移量可以按照下面公式计算:
这里注意:
1、在计算下图中的放缩比例前,anchors的坐标都是基于原图的。
2、但是在计算偏移的过程中,涉及到除法,从而使得这个偏移和尺寸无关,在原图还是特征图上都可以使用。

4)最终的返回结果,以原始图像是(300,400,3),特征提取网络是VGG16。
4.1 rpn_label_class:[18,25,18];其中,[18,25,:9]表示每个anchors是否是invalid;[18,25,9:]表示每个anchors是前景的概率。
4.2 rpn_label_reg:[18,25,72];其中,[18,25,:36]表示每个anchors4个位置和gt是否overlap;[18,25,36:]表示每个anchors的坐标。
3.2 RPN网络结构
RPN网络结构很简单。
VGG输入图像尺寸为[300,400,3]
我们明确目标,我们希望RPN网络,根据VGG16的特征提取结果,输出以下内容:
1、每个anchors属于前背景的概率。维度是【18,25,9】
2、每个anchors的坐标偏移量。维度是【18,25,36】
3.2.1 RPN网络主体结构
首先,RPN网络和后续网络共用一个特征提取网络(这里是VGG16),原始输入图像是[300,400,3],vgg16提取的结果是[18,25,512]。
然后,RPN网络会将特征提取网络的输出过一个
x=conv2d(padding='SAME',kernel_size=3,stride=1,output_dim=512)卷积。
最后,我们通过两个1*1卷积,来得到我们想要的结果。
x_class = conv2d(output_dim=9,kernel_size=1,stride=1)(x)x_reg = conv2d(output_dim=9*4,kernel_size=1,stride=1)(x)
编写的代码
x = Conv2D(512, (3, 3), padding='same', activation='relu', kernel_initializer='normal', name='rpn_conv1')(base_layers)x_class = Conv2D(num_anchors, (1, 1), activation='sigmoid', kernel_initializer='uniform',name='rpn_out_class')(x)x_regr = Conv2D(num_anchors * 4, (1, 1), activation='linear', kernel_initializer='zero',name='rpn_out_regress')(x)return [x_class, x_regr, base_layers]
3.2.2 RPN网络losses
loss设计很有意思,这里还涉及到数据的提供部分
回顾一下我们输入的label:
4.1 rpn_label_class:[18,25,18];其中,[18,25,:9]表示每个anchors是否是invalid;[18,25,9:]表示每个anchors是前景的概率。
4.2 rpn_label_reg:[18,25,72];其中,[18,25,:36]表示每个anchors4个位置和gt是否overlap;[18,25,36:]表示每个anchors的坐标。
- 1)先来看class_loss:
lambda * sum(is_Valid*(binary_crossentropy(y_pred,y_true))) / N
大致思想是,在anchor有效的情况下(is_Valid),计算binary_cross_entropy即可,
def rpn_loss_cls(self,num_anchors):"""Loss function for rpn classificationArgs:num_anchors: number of anchors (9 in here)y_true[:, :, :, :9]: [0,1,0,0,0,0,0,1,0] means only the second and the eighth box is valid which contains pos or neg anchor => isValidy_true[:, :, :, 9:]: [0,1,0,0,0,0,0,0,0] means the second box is pos and eighth box is negativeReturns:lambda * sum((binary_crossentropy(isValid*y_pred,y_true))) / N"""def rpn_loss_cls_fixed_num(y_true, y_pred):temp_bc = K.binary_crossentropy(y_pred[:, :, :, :],y_true[:, :, :,num_anchors:])fen_Mu = self.epsilon + y_true[:, :, :, :num_anchors]is_Valid = y_true[:, :, :, :num_anchors]return self.lambda_rpn_class * K.sum( is_Valid * temp_bc) / K.sum(fen_Mu)return rpn_loss_cls_fixed_num
- 2)再来看看reg_loss:
Smooth L1 loss function0.5*x*x (if x_abs < 1)x_abx - 0.5 (otherwise)
思想就是,计算真值和预测值之差的绝对值:
1、绝对值小于1,那么计算0.5*绝对值的平方。
2、绝对值大于1,计算绝对值减去0.5
def rpn_loss_regr(self,num_anchors):"""Loss function for rpn regressionArgs:num_anchors: number of anchors (9 in here)Returns:Smooth L1 loss function0.5*x*x (if x_abs < 1)x_abx - 0.5 (otherwise)"""def rpn_loss_regr_fixed_num(y_true, y_pred):# x is the difference between true value and predicted vauex = y_true[:, :, :, 4 * num_anchors:] - y_pred# absolute value of xx_abs = K.abs(x)# If x_abs <= 1.0, x_bool = 1x_bool = K.cast(K.less_equal(x_abs, 1.0), tf.float32)is_Valid = y_true[:, :, :, :4 * num_anchors]abs_larger_1 = x_bool * (0.5 * x * x)abs_smaller_1 = (1 - x_bool) * (x_abs - 0.5)fen_Mu = self.epsilon + y_true[:, :, :, :4 * num_anchors]return self.lambda_rpn_regr * K.sum(is_Valid * ( abs_larger_1 + abs_smaller_1 )) / K.sum(fen_Mu)return rpn_loss_regr_fixed_num
4、中间过滤(训练)
在经过RPN网络后,我们获得了两种数据:
1、【18,25,9】,每个预测框的前背景概率。
2、【18,25,9*4】,每个预测框相对于anchors的偏移量。
那么过滤主要分两部分:
1、基于NMS的过滤。
2、基于IOU的过滤。
4.1 基于NMS的过滤
这部分过滤主要是去除一些重复的框。
1)根据anchors的长宽比,面积,以及缩放尺寸(VGG是16),来得到anchors在这个feature_map上的位置。
2)根据【18,25,4*9】的回归值,以及anchors的位置,计算得到每个预测框在feature-map上的位置A【4,18,25,9】。
3)长宽小于1的,将长宽设置为1;偏移之后超出范围的,规范一下。
4)将规范后的A和输入的【18,25,9】的概率值输入NMS,进行过滤,得到300个剩下的预测框。
5)输出就是一个【300,4】的矩阵。
4.2 基于IoU的过滤
别忘了我们还有一个classifier没有训练,那么这里就是为它来准备训练数据的。
1)计算GT在feature_map上的坐标。
2)对【300,4】中的每个预测框,计算他和每个GT之间的IOU,选择一个最高IOU最高的gt,和这个预测框对应。
3)根据IOU的值,来为每个预测框进行分类('bg'【背景】,'neural'【无效】,'person','car','phone')
4)做一下one-hot之类的,处理完维度就搞定了。
5)输出是:
5.1 【None,4】的坐标矩阵,表示每个预测框的位置【在feature-map上】;
5.2 【None,one-hot向量】,表示每个预测框的one-hot值,用于分类;
5.3 【None,3*[is_bg,is_bg,is_bg,is_bg]+3*[tx,ty,tw,th]】,每个预测框是否是bg,以及对应的gt,相对于anchors的偏移量。就是一个【None, 24】维度的向量
4.3 总结
全部看下来,其实对于回归值【tx,ty,tw,th】是原图还是特征图的讨论是没意义的,只要计算的时候用的是基于同一个图的数据就行了。
另外,在需要计算IOU的场合,也要注意需要用同一套数据才行。
5、Classifier(训练)
终于到了Classifier了…
5.1 基本流程
1)拿到输入的预测框数据(当前RPN预测框坐标【在feature-map上】,类别数据,对应gt坐标)以及VGG输出的特征图。
2)根据RPN预测框坐标以及VGG输出的特征图,进行RoI_Pooling,得到统一尺寸的特征图(7,7,256)。
3)拉平,接全连接,得到4096维的向量out;将out接到两个不同的全连接上,进行分类和回归。
5.2 输入数据
在过滤环节,我们NMS筛选选完毕了…得到了:
1、【None,4】的坐标矩阵,表示筛选后每个预测框的位置【在feature-map上】;
2、【None,one-hot向量】,表示筛选后每个预测框的one-hot值,用于分类;
3、【None,[tx,ty,tw,th]】,表示筛选后,每个预测框对应的gt,相对于anchors的偏移量。
当然,上述那些作为classifier的输入还是不够的,还需要将VGG的特征图作为输入,才行。
综上,训练过程中,classifier的输入有:
0、VGG16的特征图。
1、【None,4】的坐标矩阵,表示筛选后每个预测框的位置【在feature-map上】;
2、【None,one-hot向量】,表示筛选后每个预测框的one-hot值,用于分类;【仅训练用】
3、【None,[tx,ty,tw,th]】,表示筛选后,每个预测框对应的gt,相对于anchors的偏移量。【仅训练用】
5.3 网络结构
Classifier网络结构算是比较简单的:
'''pooling_regions:区域池化大小base_layer:vgg输出特征图input_rois:RPN输出的预测框位置'''pooling_regions = 7# base_layer:[18,25,512]# our_roi_pool : [1,4,7,7,512];这个是4,是因为num_rois = 4out_roi_pool = RoiPoolingConv(pooling_regions, num_rois)([base_layers, input_rois])# out : [1,4,7*7*512]out = TimeDistributed(Flatten(name='flatten'))(out_roi_pool)# out: [1,4,4096]out = TimeDistributed(Dense(4096, activation='relu', name='fc1'))(out)out = TimeDistributed(Dropout(0.5))(out)# out: [1,4,4096]out = TimeDistributed(Dense(4096, activation='relu', name='fc2'))(out)out = TimeDistributed(Dropout(0.5))(out)# out_class:[1,4,4]out_class = TimeDistributed(Dense(nb_classes, activation='softmax', kernel_initializer='zero'),name='dense_class_{}'.format(nb_classes))(out)# out_reg:[1,4,12]out_regr = TimeDistributed(Dense(4 * (nb_classes - 1), activation='linear', kernel_initializer='zero'),name='dense_regress_{}'.format(nb_classes))(out)
这里可能会好奇为什么用TimeDistributed,是因为,我们希望,classifier不要一个一个的处理预测框,而是可以一下处理多个。
因此,input_rois的是一个[None,4]的张量,None表征的就是位置的处理预测框的个数。个数由num_rois来确认。
我们取num_rois = 4,表示,最终我们对于一张原始图,仅取两张pos,两张neg,来训练最后的classifier…
(这个训练的好少啊………………)
ROI_Pooling
关于什么是RoI_Pooling这里就不说了,只说说它是怎么实现的。
对于输入的feature_map,【18,25,512】,我们是想找到预测框对应的一块区域【x:x+w,y:y+h,512】,然后将其转化成[7,7,512]的特征图。【这个就是基本的Roi_Pool的思路】
这个就很简单,用resize实现:
# 对于每一个预测框 (一共四个)for roi_idx in range(self.num_rois):x = rois[0, roi_idx, 0]y = rois[0, roi_idx, 1]w = rois[0, roi_idx, 2]h = rois[0, roi_idx, 3]x = K.cast(x, 'int32')y = K.cast(y, 'int32')w = K.cast(w, 'int32')h = K.cast(h, 'int32')# Resized roi of the image to pooling size (7x7)# img:[1,18,25,512],1是batch_sizers = tf.image.resize_images(img[:, y:y + h, x:x + w, :], (self.pool_size, self.pool_size))outputs.append(rs)
TimeDistributed
这里采用TimeDistributed的唯一意义,就是为了同时处理num_rois个预测框。
5.4 Losses
分类loss:就采用简单的多分类的cross_entropy
self.lambda_cls_class * K.mean(categorical_crossentropy(y_true[0, :, :], y_pred[0, :, :]))
回归Loss:
def class_loss_regr(self,num_classes):"""Loss function for rpn regressionArgs:num_anchors: number of anchors (9 in here)Returns:Smooth L1 loss function0.5*x*x (if x_abs < 1)x_abx - 0.5 (otherwise)"""def class_loss_regr_fixed_num(y_true, y_pred):# 这里y_true是分两部分,前面的 0~4*3 表示是否是bg,每四位一组,用0和1表示# y_true 4*3:end为第二部分,表示预测框坐标x = y_true[:, :, 4 * num_classes:] - y_predx_abs = K.abs(x)x_bool = K.cast(K.less_equal(x_abs, 1.0), 'float32')return self.lambda_cls_regr * K.sum(y_true[:, :, :4 * num_classes] * (x_bool * (0.5 * x * x) + (1 - x_bool) * (x_abs - 0.5))) / K.sum(self.epsilon + y_true[:, :, :4 * num_classes])return class_loss_regr_fixed_num
5.5 总结
classifier训练部分就到此结束了,比较需要注意的点有:
1、Roi_Pooling的实现方式。
2、Reg_loss的具体处理方法&Reg_loss所需要的label的格式。
另外,这个一直都是一张图片一张图片的训练的…,batch_size = 1
6、推断过程
推断过程没有看的很细,但基本是这样的。
1)输入图片,是否resize无所谓吧…最好resize一下,【300,400,3】
2)图片进入RPN过程,得到:
Y1:rpn_class结果;
Y2:rpn_reg结果;【偏移量】
F:VGG输出的feature_map3)将Y1,Y2输入到rpn_to_roi函数中,进行偏移量-》坐标值的转换以及NSM,得到:
R:【300,4】300个预测框。
4)300个预测框,每4个一组,不满4个一组的用0补齐,【每组预测框,VGG特征图】,送入classifier网络进行后续分类预测,得到:
P_cls:分类的one_hot结果
P_regr:回归的偏移结果5)将回归的偏移结果转换为坐标值;将所有结果送入NMS,进行过滤,得到最终筛选完成的预测框。
6)总结:
相比来看,推断过程就是少了计算IoU过滤/分类预测框的过程。
7、其他问题(NMS,回归目标,SmoothL1)
- 1)NMS的原理,有没有更好的办法?
参考我之前写的文章:https://www.zybuluo.com/w460461339/note/1160411
NMS原理:
对于单二分类问题(是否是前景):
    1、根据置信度排序,从大到小,A,B,C,D,E。并设置IoU的threshold。
    2、对于置信度最大的A,从B,C,D,E中找到和A的IoU大于等于threshold的框,删除(这里选C,E)
    3、那么就只剩下B,D没操作过,用B,D重复以上过程。
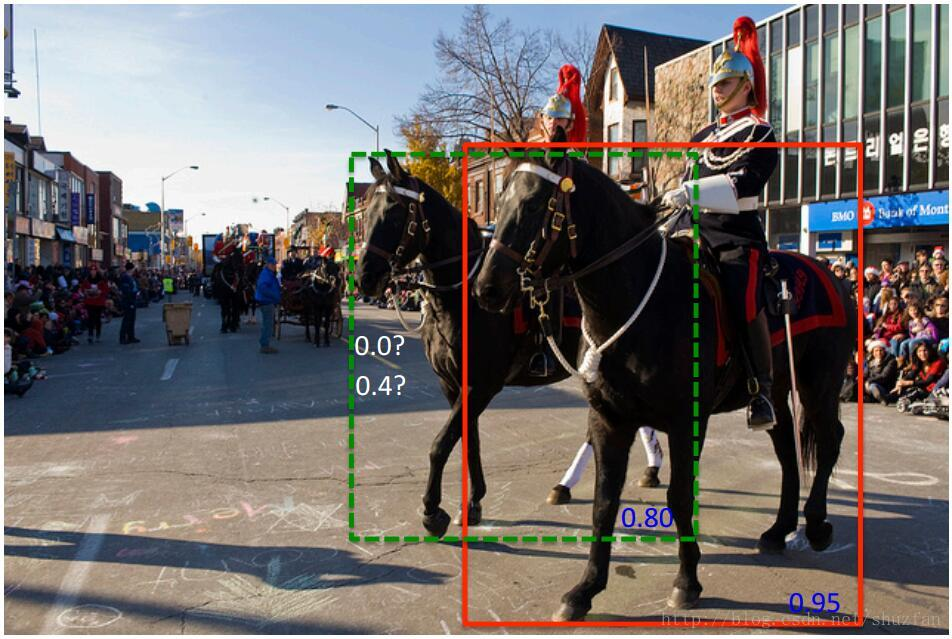
NMS存在问题:
1、对于多个相同类别的物体,效果不好。
2、详见下图:

我们可以从这个角度来理解NMS存在的问题:
1、在之前的A,B,C,D,E例子中,由于C,E和A的IOU超过的阈值,所以被‘删除’。
2、那么删除的定义,在我们这里,可以理解为是置信度设置为0.
3、但是这样就无法解决上图的问题。
soft-NMS解决思路:
    4.1 找到C,E这样IOU超过阈值的框。
    4.2 不将它的置信度设为0,而是通过某种方案,减小它的置信度。(加权,高斯)
    4.3 在处理完成之后,通过设定一个置信度阈值,过滤掉置信度较小的框。
- 2)为什么要这么选择回归目标?

这里需要分类:
1、当预测框和gt很远的时候,就不用来训练了(没意义)。
2、当预测框和gt比较近的时候,就可以用来训练。
3、思考在情况二时,如何将预测框转换成gt框:
    3.1 中心平移。
    3.2 尺度缩放。
中心平移:
尺度缩放:
回归的目标:
这里其实都存在了尺度不变形,即无论gt和预测框在原图还是特征图上,都可以使用这个,而且,对于同一对数据,在特征图和原图上,计算结果是一样的。
- 3)SmoothL1的优缺点,什么时候可以用?
L1,L2不是那个正则化啊…
L1:绝对值回归loss。
L2:平方回归loss(就是那个MSE)。
这里简单介绍了L1,L2,Smooth_L1 https://zhuanlan.zhihu.com/p/48426076
简单来说,L1-loss在0点处导数不唯一。L1的导数是(±f(x),在0点值不同)。
因此就,采用Smmoth_L1的策略:

