@w460461339
2019-02-20T10:14:35.000000Z
字数 5167
阅读 2421
Tensorflow Day3.2: GoogleNet-Finetune,模型的加载与保存,ops&tensor
Tensorflow
1、GoogleNet模型的Finetune
以GoogleNet为例子
理论参考:https://www.cnblogs.com/andre-ma/p/8676186.html
https://www.zhihu.com/question/41631631?sort=created
代码:https://blog.csdn.net/White_Idiot/article/details/78816850
目标
1、googlenet是在imagenet上训练的1000类分类器。
2、我们希望利用googlenet在一个5分类问题上。
实现策略
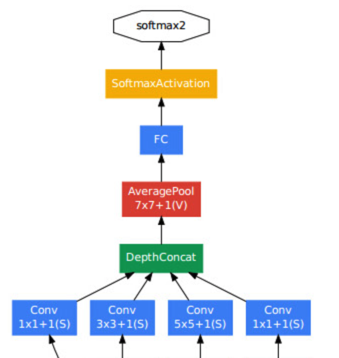
1、下图是googlenet最后几层。
2、5分类的实现策略就是,将FC层替换掉,替换成输出类别个数为5的FC层。
3、具体实现步骤如下:
    3.1 拿到Inception-v3的FC层前一层的输出张量编号。‘pool_3/_reshape:0’
    3.2 将每一张图片利用Inception-v3跑一遍,并获得‘pool_3/_reshape:0’这个张量。
    3.3 那么上述‘pool_3/_reshape:0’张量即作为每张图片的特征向量。
    3.4 之后,自己随便搭一个输入尺寸等于张量大小,输出尺寸等于5的FC层,利用图片的特征向量和label进行训练即可。

总结:
1、思路就是将Inception的CNN层当成特征提取器。
2、以及完全替换掉FC层,变成自己想要的层数即可。
问题:
1、模型的保存和再读取怎么办?
    1.1 相当于inception和新训练的FC层分开保存?
    1.2 加载的时候自己把它连起来?
2、PB格式的模型文件和.meta格式的模型文件有什么不同?
 答:https://zhuanlan.zhihu.com/p/32887066
     大意就是pb是一个跨框架/语言的模型文件,支持更好。
     ckpt之类的只能在tensorflow下用。
3、另外,我到底要怎么样才能够方便的找到我要的那一个Tensor名字?
   一个简单的办法是,先加载模型,然后启动tensorboard,在tensorboard里面的graph来找。
fine-tune模型预测
尝试使用fine-tune的模型进行预测。
之前以为自己训练的FC层和Inceptionv3的特征提取部分需要分开加载。但是后来看代码,发现fine-tune的时候,Inception层和自定义FC层是在一个Graph下的,因此保存的时候就一起保存了。
因此加载的时候,只需要加载fine-tune过的模型就好。
另外关于tensorboard如何查看网络图:
with tf.Session(graph=graph) as sess:tf.summary.FileWriter(dir_path,sess.graph)
执行上述语句,然后跑tensorboard启动语句:
tensorboard --logdir=
即可
2、Tensorflow模型保存&加载
以自己训练的VGG模型为例子
参考:
最好的科普:https://cv-tricks.com/tensorflow-tutorial/save-restore-tensorflow-models-quick-complete-tutorial/
代码比较丰富:https://blog.csdn.net/liuxiao214/article/details/79048136
表格总结类型:https://www.cnblogs.com/hellcat/p/6925757.html#_label3_1
2.1 基本的保存模型方法
基本保存模型的方法很简单:
1、定义一个saver对象。
2、调用saver对象的save方法,保存模型。
# 第一步:定义Saver对象saver = tf.train.Saver(max_to_keep=3)tf.add_to_collection('predict',dense_2)with tf.Session() as sess:# 初始化sess.run(init)for i in range(20000):# 拿到数据batch_x,batch_y=mnist.train.next_batch(50)# 每100步保存一下if i%100==0:summary_res,result=sess.run([merged,accuracy],feed_dict={x_input:batch_x,y_input:batch_y,keep_prob:1.0})test_writer.add_summary(summary_res, i)# 第二部,调用save方法,保存模型saver.save(sess,'./Day2_Saved_Model/my_easy_cnn_'+str(result),global_step=i)print(int(i/100),result)summary_train,_=sess.run([merged,trainer],feed_dict={x_input:batch_x,y_input:batch_y,keep_prob:0.5})train_writer.add_summary(summary_train, i)
Saver定义时的参数:
1、max_to_keep: 表示最多保存几个模型
2、keep_checkpoint_every_n_hours:每几个小时保存一个模型
Saver.save参数:
1、第一个:sess,表示保存对象
2、第二个:'....',表示保存模型的名字
3、global_step:表示将第几个迭代的信息也保存到模型名称中
4、write_meta_graph:表示是否每次都需要保存meta文件。
保存之后得到的文件:

1、checkpoint:简单的检查点,不包含模型信息。
2、参数文件:
    2.1 .index:保存当前参数名
    2.2 .dataxxx:保存了当前参数值
3、.meta:保存了模型的网络结构
2.2 读取预训练模型
读取预训练模型其实也很简单,就三步:
1、加载模型网络结构。
2、加载模型参数。
3、拿到当前的图对象(为了后续做准备)
# 保存模型的文件夹model_dir='./Day2_Saved_Model/'with tf.Session() as sess:# 加载模型的网络结构new_saver = tf.train.import_meta_graph(os.path.join(model_dir,'my_easy_cnn_0.96-400.meta'))# 利用网络结构加载模型参数new_saver.restore(sess,tf.train.latest_checkpoint(model_dir))# 拿到图graph=tf.get_default_graph()
难点是,或者说比较麻烦的地方是,如何使用模型呢?
2.2.1 使用与训练模型进行预测
相对比较简单的操作了。
其实和训练时候一样,我们要找到网络的入口和出口。
由于整个网络是通过Tensor来进行联通的,所以我们要找到:
1、入口的Tensor
2、出口的Tensor
关于Tensor和ops的关系,看 section-6。
找到Tensor的方法也分两步:
1、找到目标Tensor对应的那个operation。
2、通过operation拿到想要的tensor。
首先回答为什么要找到operation:
1、因为代码中 tf.placeholder(....,name='xxx'),这是给operation命名。
2、保存的文件中,只保存网络结构,网络训练参数,没有流动的tensor名字。
3、因此,需要通过operation拿到我们要的内容。
1)拿到输入Tensor。
1、输入Tensor对应的operation是tf.placeholder(shape=(None,784),dtype=tf.float32,name='x_input')
2、因此,可以通过graph.get_tensor_by_name('x_input:0')来获取输入Tensor。
3、其中,x_input:0,其中x_input表示ops的名字,':0'表示该ops输出的第一个Tensor。2)拿到输出Tensor
1、输出Tensor对应的operation是dense=tf.nn.softmax(dense,name=name+'_softmax')
2、因此,可以通过graph.get_tensor_by_name('dense_2/softmax:0')来获取输入Tensor。
当然,还有其他办法,不通过ops来获得目标tensor。
- 1)在定义网络阶段,通过collections存储目标tensor。
x_input=tf.placeholder(shape=(None,784),dtype=tf.float32,name='x_input').....dense=tf.nn.softmax(dense,name=name+'_softmax')# 将tensor保存起来tf.add_to_collection('input',x_input)tf.add_to_collection('predict',dense)
通过add_to_collection将tensor保存起来,那么他们就会像op一样,被保存在graph中,那么,再次读取模型的时候,就可以通过这两个名字直接获得。
- 2)通过graph.get_collection()来获取指定tensor
tf.reset_default_graph()model_dir='./Day2_Saved_Model/'with tf.Session() as sess:new_saver = tf.train.import_meta_graph(os.path.join(model_dir,'my_easy_cnn_0.96-400.meta'))new_saver.restore(sess,tf.train.latest_checkpoint(model_dir))# 拿到此时的graphgraph = tf.get_default_graph()# 通过graph的get_collection方法来拿到对应的tensor。restore_input = graph.get_collection('input')restore_output = graph.get_collection('predict')
2.2.2 通过预训练模型来进行fine-tune
参考:https://blog.csdn.net/White_Idiot/article/details/78816850
实验完成了,见Section 1.0
2.3 问题
1、为什么需要get_tensor_byname
答:
因为sess.run的对象是tensor
2、为什么不能直接通过get_operations_byname拿到op,然后run这个op,得到结果
答:
1、这个反映了对tensorflow工作机制的不熟悉。
2、在训练的时候,sess.run的对象也是tensor,而不是ops
3、Tensorflow中Operations,Tensor以及Collection概念
1)operations:操作,输入的是0个或者多个tensor,输出的是0个或者多个tensor
tf.matul()
tf.add()
tf.Variable()
tf.placeholder()
tf.constant()
这些,都是operations!!!
另外,注意,我们通过tf.Variable(name='xxx')进行命名的时候,是对operations进行命名,而不是对它的输出结果tensor进行命名。2)tensor。
说实话,我们一般不会再代码中显示的定义tensor。
比如placeholder,会将我们传入的np.array转化为tensorflow中的tensor类型。
比如我们定义的:x_input = tf.placeholder(shape=(None,784),dtype=tf.float32,name='x_input'),x_input表示的就是placeholder这个operations传回的一个tensor。3)collections:
将某些tensor保存起来,并赋予一个名字。
tf.add_to_collection('predcit',dense_2),将名为dense_2的tensor变量保存起来
