@frank-shaw
2019-11-30T02:17:31.000000Z
字数 3988
阅读 1718
vue源码阅读(五):虚拟DOM的引入
vue 源码 VNode
接着前文,我们详细研究了数据初始化的过程,也了解了数据更新的几个步骤。现在进入到详细的update过程,这个过程涉及到虚拟DOM与更新DOM操作的patch算法。
虚拟DOM
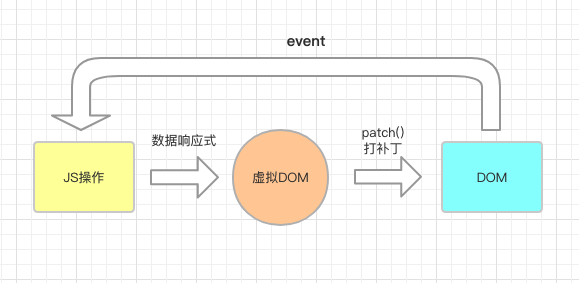
在现代UI结构设计中(统称MV*框架,V是现代的标记语言),数据驱动已经成为一个核心。而引入虚拟DOM,则是数据驱动的一种实现方式。虚拟DOM(Virtual DOM)是对DOM的JS抽象表示,它们是JS对象,能够描述DOM结构和关系。应用 的各种状态变化会作用于虚拟DOM,最终映射到DOM上。工作流程图如下:

优点
- 虚拟DOM轻量、快速:当数据发生变化时,引发虚拟DOM的变化。通过新旧虚拟DOM比对可以得到最小DOM操作量(真实DOM操作非常昂贵),从而提升性能和用户体验。
- 跨平台:将虚拟dom更新转换为不同运行时特殊操作实现跨平台(Vue的源码结构中就区分了Web平台与Platform平台)。
- 兼容性:还可以加入兼容性代码增强操作的兼容性。
Vue引入虚拟DOM的必要性
Vue 1.x中有细粒度的数据变化侦测,它是不需要虚拟DOM的,但是细粒度造成了大量开销,这对于大 型项目来说是不可接受的。因此,Vue 2.x选择了中等粒度的解决方案,每一个组件一个Watcher实例, 这样状态变化时只能通知到组件,再通过引入虚拟DOM去进行比对和渲染。
可以说,Vue2.x中引入虚拟DOM是必然的。设计结构发生了变化:组件与Watcher之间一一对应。这就要求必须引入虚拟DOM来应对该变化。
源码
我们先来看看Vue2.x中的虚拟DOM长啥样。它的名字叫VNode:
export default class VNode {tag: string | void;data: VNodeData | void;children: ?Array<VNode>;text: string | void;elm: Node | void;ns: string | void;context: Component | void; // rendered in this component's scopekey: string | number | void;componentOptions: VNodeComponentOptions | void;componentInstance: Component | void; // component instanceparent: VNode | void; // component placeholder node// strictly internalraw: boolean; // contains raw HTML? (server only)isStatic: boolean; // hoisted static nodeisRootInsert: boolean; // necessary for enter transition checkisComment: boolean; // empty comment placeholder?isCloned: boolean; // is a cloned node?isOnce: boolean; // is a v-once node?asyncFactory: Function | void; // async component factory functionasyncMeta: Object | void;isAsyncPlaceholder: boolean;ssrContext: Object | void;fnContext: Component | void; // real context vm for functional nodesfnOptions: ?ComponentOptions; // for SSR cachingdevtoolsMeta: ?Object; // used to store functional render context for devtoolsfnScopeId: ?string; // functional scope id support
里面的变量很多。可知这是一颗树结构,children里面是Array<VNode>。这是怎么生成的呢?我们回忆之前解读源码中的$mount过程,找一个切入点。
从core/instance/lifecycle.js中的mountComponent()开始:
export function mountComponent (vm: Component,el: ?Element,hydrating?: boolean): Component {...//省略let updateComponent = () => {//更新 Component的定义,主要做了两个事情:render(生成vdom)、update(转换vdom为dom)vm._update(vm._render(), hydrating)}new Watcher(vm, updateComponent, noop, {before () {if (vm._isMounted && !vm._isDestroyed) {callHook(vm, 'beforeUpdate')}}}, true /* isRenderWatcher */)...//省略}
看到在new Watcher实例时,与updateComponent创建了关联。重点关注vm._render()。
在core/instance/render.js内:
import { createElement } from '../vdom/create-element'export function initRender (vm: Component) {...//省略//编译器使用的rendervm._c = (a, b, c, d) => createElement(vm, a, b, c, d, false)//用户编写的render,典型的柯里化vm.$createElement = (a, b, c, d) => createElement(vm, a, b, c, d, true)...//省略}Vue.prototype._render = function (): VNode {const vm: Component = this...//省略//从选项中获取render函数const { render, _parentVnode } = vm.$options// 最终计算出的虚拟DOMlet vnode// 执行render函数,传入参数是$createElement (常用的render()方法中的h参数)let vnode = render.call(vm._renderProxy, vm.$createElement)...//省略return vnode}
看到了VNode。这个过程执行了render函数,用到了createElement()方法。看来创建VNode的核心在这个方法里面。关联到core/vdom/create-element.js:
//返回VNode或者由VNode构成的数组export function createElement (context: Component,tag: any,data: any,children: any,normalizationType: any,alwaysNormalize: boolean): VNode | Array<VNode> {...//省略return _createElement(context, tag, data, children, normalizationType)}export function _createElement (context: Component,tag?: string | Class<Component> | Function | Object,data?: VNodeData,children?: any,normalizationType?: number): VNode | Array<VNode> {...//省略//核心: vnode的生成过程//传入tag可能是原生的HTML标签,也可能是用户自定义标签let vnode, nsif (typeof tag === 'string') {let Ctorns = (context.$vnode && context.$vnode.ns) || config.getTagNamespace(tag)//是原生保留标签,直接创建VNodeif (config.isReservedTag(tag)) {vnode = new VNode(config.parsePlatformTagName(tag), data, children,undefined, undefined, context)}else if((!data||!data.pre)&&isDef(Ctor=resolveAsset(context.$options, 'components',tag))) {// 自定义组件,区别对待,需要先创建组件,再创建VNodevnode = createComponent(Ctor, data, context, children, tag)} else {//vnode = new VNode(tag, data, children,undefined, undefined, context)}} else {// direct component options / constructorvnode = createComponent(tag, data, context, children)}...//省略}
汇总
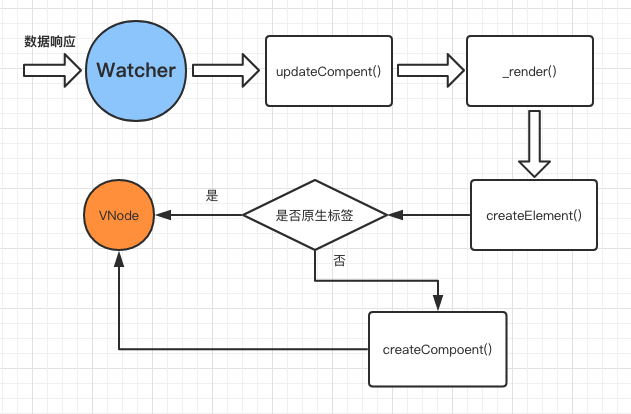
整个流程串起来,我们看到:render函数通过调用createElement()方法,对不同传入的参数类型进行加工,最终得到了VNode树。流程图如下:

那么新旧VNode之间如何比较变化,进而以最小代价执行真实DOM的更新呢?我们下节的patch算法将会讲到。
