@rg070836rg
2017-10-20T02:15:52.000000Z
字数 4627
阅读 3928
安装cuda8+cudnn5.1+tensorflowgpu+keras
毕业设计 GPU并行计算课程实验与报告
0.由于对centos不熟悉,以及超算中心的centos版本比较低,实在没法装有些库,于是先换成了ubuntu16.04server。
一 创建用户
1.1 创建用户
adduser dluser01
passwd xxxxxxxx
dluser01~10
1.2 增加root权限
vim /etc/sudoers
## Allow root to run any commands anywhere
root ALL=(ALL) ALL
ubuntu ALL=(ALL) ALL
dluser01 ALL=(ALL) ALL
dluser02 ALL=(ALL) ALL
二 修改源
参见 http://mirrors.ustc.edu.cn/help/ubuntu.html
三 安装python2.7
换成ubuntu16.04后自带
四 安装pip
4.0 网速够,ubuntu16.04下 直接sudo apt-get install python-pip python-dev
4.1 安装easyinstall
wget -q http://peak.telecommunity.com/dist/ez_setup.pypython ez_setup.py
4.2 编译安装python
下载 https://github.com/pypa/pip/releases
tar zvxf pip-9.0.1.tar.gz #解压文件cd pip-9.0.1/python setup.py install
4.3 修改pip源(阿里源)
cd ~mkdir .pipvim ~/.pip/pip.conf[global]index-url = http://mirrors.aliyun.com/pypi/simple/[install]trusted-host=mirrors.aliyun.com
五 安装NVIDIA驱动
5.1 查找对应驱动
下载并传至服务器,进入root
sudo init 3sudo sh NVIDIA-Linux-x86_64-375.39.runsudo reboot
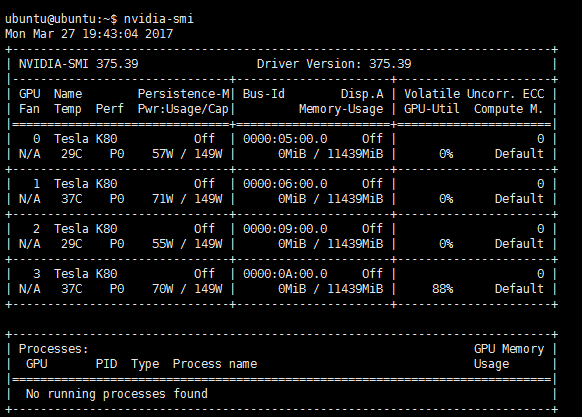
装好了用nvidia-smi,检查一下:
六 安装cuda
6.1 下载
下载地址
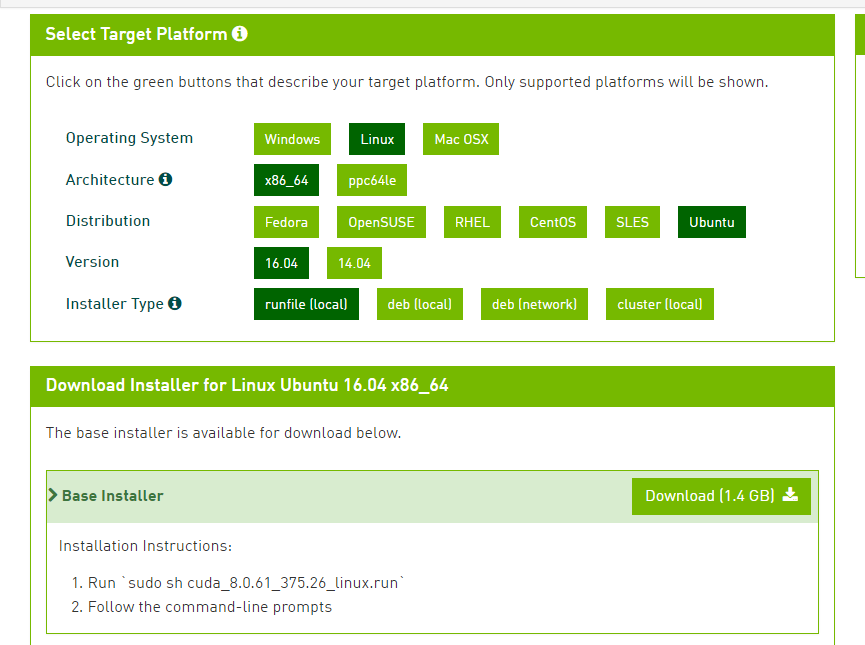
下载runfile。。
6.2安装
sudo sh xxxxx.run刷屏漫长的EULA条文,接下来这么选:accept/decline/quit: acceptInstall NVIDIA Accelerated Graphics Driver for Linux-x86_64 367.48?(y)es/(n)o/(q)uit: yDo you want to install the OpenGL libraries?(y)es/(n)o/(q)uit [ default is yes ]: yDo you want to run nvidia-xconfig?This will update the system X configuration file so that the NVIDIA X driveris used. The pre-existing X configuration file will be backed up.This option should not be used on systems that require a customX configuration, such as systems with multiple GPU vendors.(y)es/(n)o/(q)uit [ default is no ]: nInstall the CUDA 8.0 Toolkit?(y)es/(n)o/(q)uit: yEnter Toolkit Location[ default is /usr/local/cuda-8.0 ]:Do you want to install a symbolic link at /usr/local/cuda?(y)es/(n)o/(q)uit: yInstall the CUDA 8.0 Samples?(y)es/(n)o/(q)uit: yEnter CUDA Samples Location[ default is /home/ubuntu ]:Installing the NVIDIA display driver...Installing the CUDA Toolkit in /usr/local/cuda-8.0 ...Missing recommended library: libGLU.soMissing recommended library: libX11.soMissing recommended library: libXi.soMissing recommended library: libXmu.soInstalling the CUDA Samples in /home/ubuntu ...Copying samples to /home/ubuntu/NVIDIA_CUDA-8.0_Samples now...Finished copying samples.============ Summary ============Driver: InstalledToolkit: Installed in /usr/local/cuda-8.0Samples: Installed in /home/ubuntu, but missing recommended librariesPlease make sure that- PATH includes /usr/local/cuda-8.0/bin- LD_LIBRARY_PATH includes /usr/local/cuda-8.0/lib64, or, add /usr/local/cuda-8.0/lib64 to /etc/ld.so.conf and run ldconfig as rootTo uninstall the CUDA Toolkit, run the uninstall script in /usr/local/cuda-8.0/binTo uninstall the NVIDIA Driver, run nvidia-uninstallPlease see CUDA_Installation_Guide_Linux.pdf in /usr/local/cuda-8.0/doc/pdf for detailed information on setting up CUDA.
6.3 配置环境变量(当前用户)
sudo vim ~/.bashrc最后加入export LD_LIBRARY_PATH="$LD_LIBRARY_PATH:/usr/local/cuda-8.0/lib64:/usr/local/cuda-8.0/extras/CUPTI/lib64"export CUDA_HOME=/usr/local/cuda-8.0source ~/.bashrc 刷新文件
七 安装cudnn
与8匹配的是cudnn5.1,下载地址
首先需要注册,填一个问卷。
然后下载这个cuDNN v5.1 Runtime Library for Ubuntu14.04 (Deb)
16.06的那个不是amd64平台的。。下载14.04的
sudo dpkg -i libcudnn5_5.1.10-1+cuda8.0_amd64.deb
八 安装tensorflow gpu
为了保证稳定,不在root配置tensorflow,转而在各个用户下配置,所以需要每个用户配置下pip源(参照上文),配置好之后,执行
pip install tensorflow-gpu
注意,环境变量也是随着用户的,所以每增加一个用户,需要重新配一下这个用户的环境变量,打开python测试一下:
dluser02@ubuntu:~$ pythonPython 2.7.12 (default, Nov 19 2016, 06:48:10)[GCC 5.4.0 20160609] on linux2Type "help", "copyright", "credits" or "license" for more information.>>> import tensorflowI tensorflow/stream_executor/dso_loader.cc:135] successfully opened CUDA library libcublas.so.8.0 locallyI tensorflow/stream_executor/dso_loader.cc:135] successfully opened CUDA library libcudnn.so.5 locallyI tensorflow/stream_executor/dso_loader.cc:135] successfully opened CUDA library libcufft.so.8.0 locallyI tensorflow/stream_executor/dso_loader.cc:135] successfully opened CUDA library libcuda.so.1 locallyI tensorflow/stream_executor/dso_loader.cc:135] successfully opened CUDA library libcurand.so.8.0 locally>>>
注意,安装版本过低,建议按照官网推荐的方法,找到gpu字样
sudo pip install https://storage.googleapis.com/tensorflow/linux/gpu/tensorflow_gpu-1.0.1-cp27-none-linux_x86_64.whl
九 安装keras
装好前面的前提下,直接pip install keras,等待安装好即可,测试如下:
dluser02@ubuntu:~$ pythonPython 2.7.12 (default, Nov 19 2016, 06:48:10)[GCC 5.4.0 20160609] on linux2Type "help", "copyright", "credits" or "license" for more information.>>> import kerasUsing TensorFlow backend.I tensorflow/stream_executor/dso_loader.cc:135] successfully opened CUDA library libcublas.so.8.0 locallyI tensorflow/stream_executor/dso_loader.cc:135] successfully opened CUDA library libcudnn.so.5 locallyI tensorflow/stream_executor/dso_loader.cc:135] successfully opened CUDA library libcufft.so.8.0 locallyI tensorflow/stream_executor/dso_loader.cc:135] successfully opened CUDA library libcuda.so.1 locallyI tensorflow/stream_executor/dso_loader.cc:135] successfully opened CUDA library libcurand.so.8.0 locally>>>
注意如果版本过低,去github上面下载源码安装
