@richey
2021-09-30T03:14:46.000000Z
字数 24113
阅读 5643
第三章 物联网创新设计综合实践
物联网创新设计实践 讲义
3 物联网创新设计实践
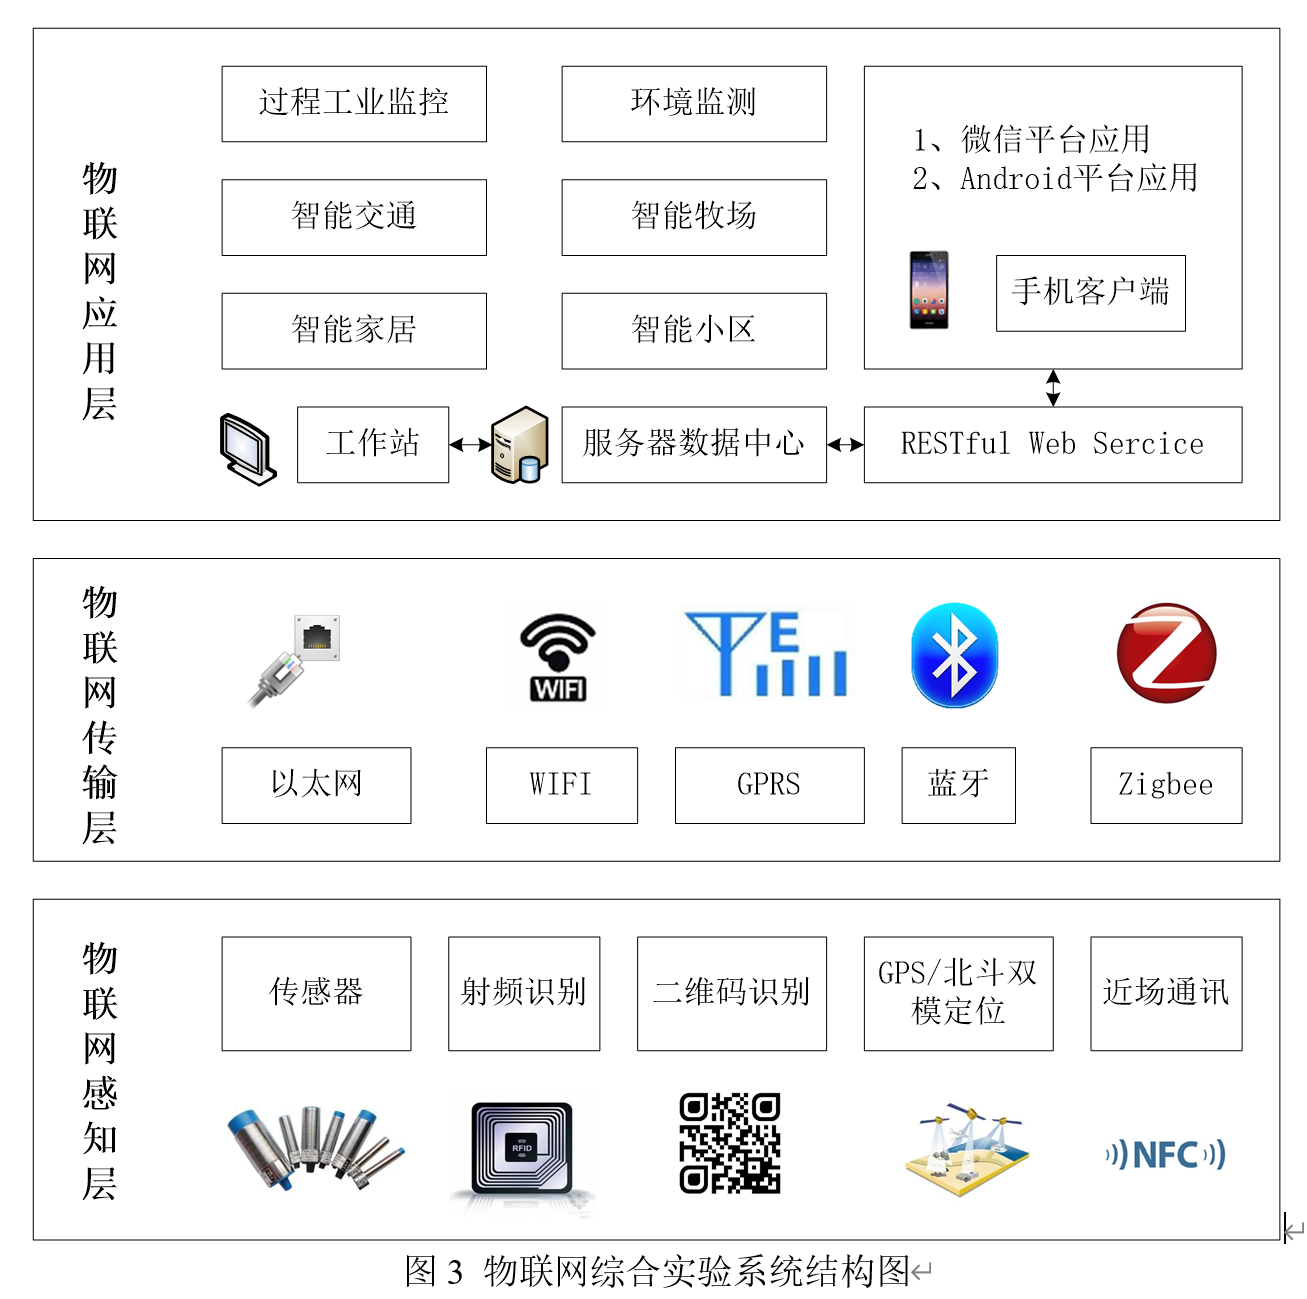
- 物联网的架构
3.1 物联网创新实践综合项目
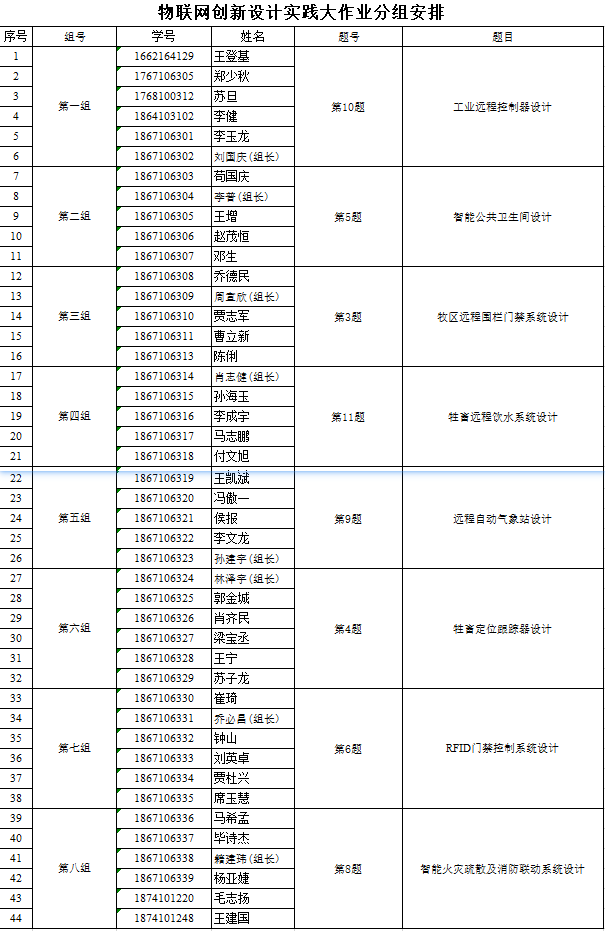
3.1.1 分组安排

3.1.2 题目串讲
- 需求分析
从用户角度而不是技术人员角度理解和定义系统实现的功能和技术参数。
各个题目不同,可以课余时间与老师约时间单独辅导 - 单片机选型
- 需要几个串口?
- 是否需要AD?
- STC15单片机 http://www.stcmcudata.com/ 可以考虑STC15W系列单片机
- STM32单片机 学有余力的同学可以选择
- 通信模块选型
- 有线通信模块:以太网模块
- 无线通信模块
- GPRS模块:山东有人公司GPRS透传模块、上海合宙电子Air202系列。
- WiFi模块:有人WiFi透传模块
- 4G模块:山东有人公司4G透传模块、上海合宙电子4G模块。
- 传感器及其接口电路设计
- 传感器选型
- 接口类型:单总线、串口、SPI、IIC、模拟信号
- 二维码扫描枪:RS-232接口电路(max232芯片)
- 输入输出接口电路设计
- 开关量输入:光耦隔离
- 开关量输出:驱动能力、继电器驱动
- 模拟量输入:AD转换、I/V变换
- 注意接插件的选择:传感器及开入开出接口一般布置在板子边缘。
3.2 python语言基础
3.2.1 python3语言基础及其开发环境安装
- https://www.python.org/downloads/windows/
- 建议安装python3.7.9,兼容性较好
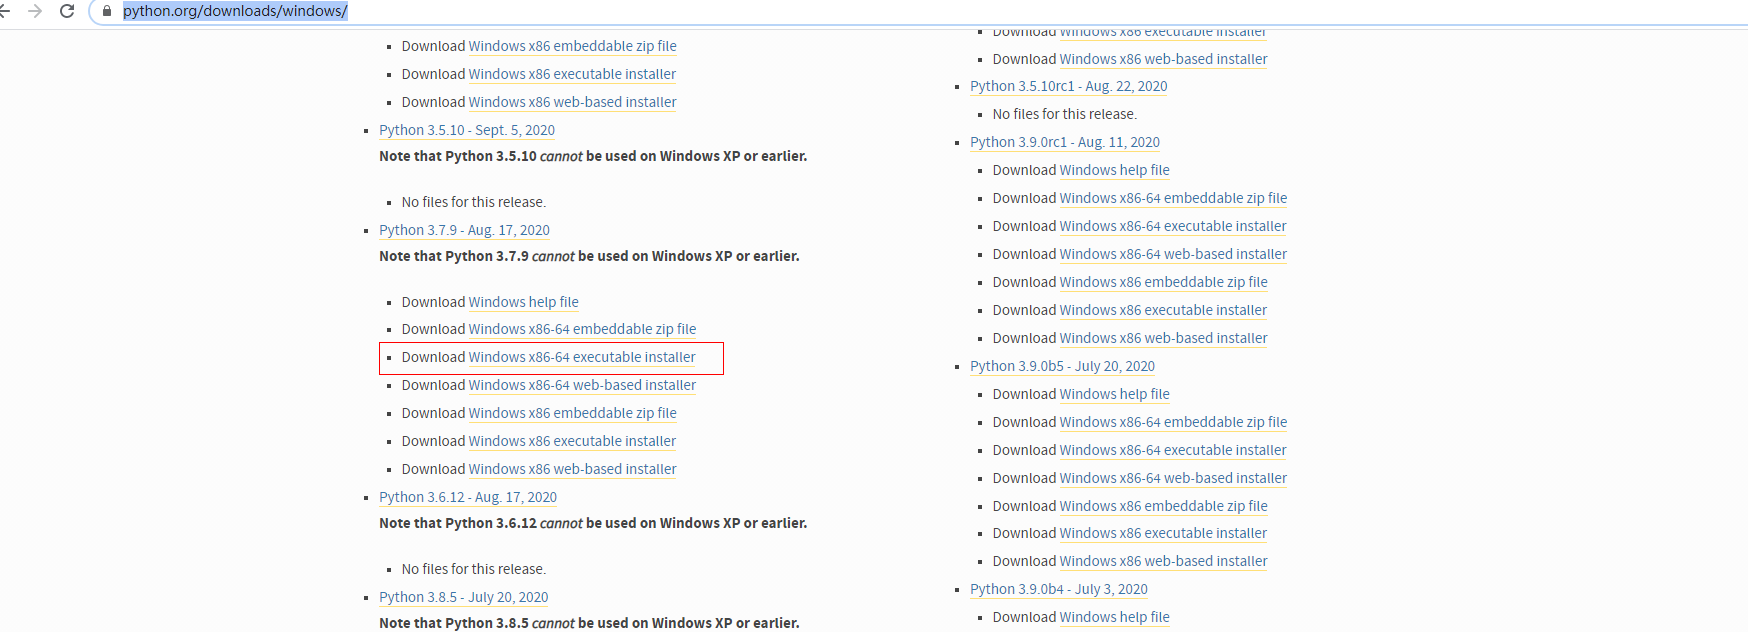
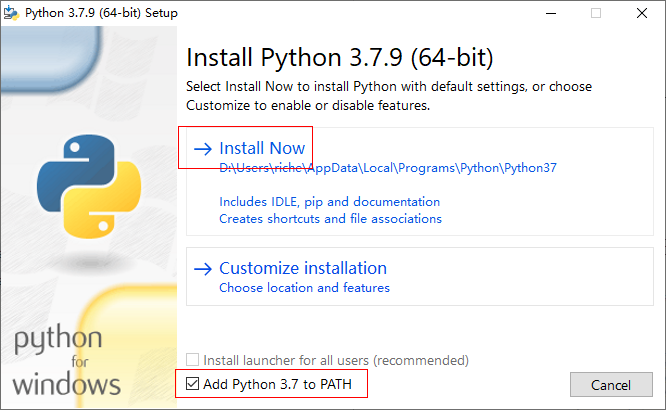
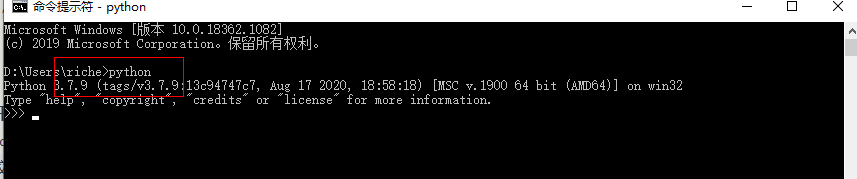

如图,证明python3.7已经安装完成。
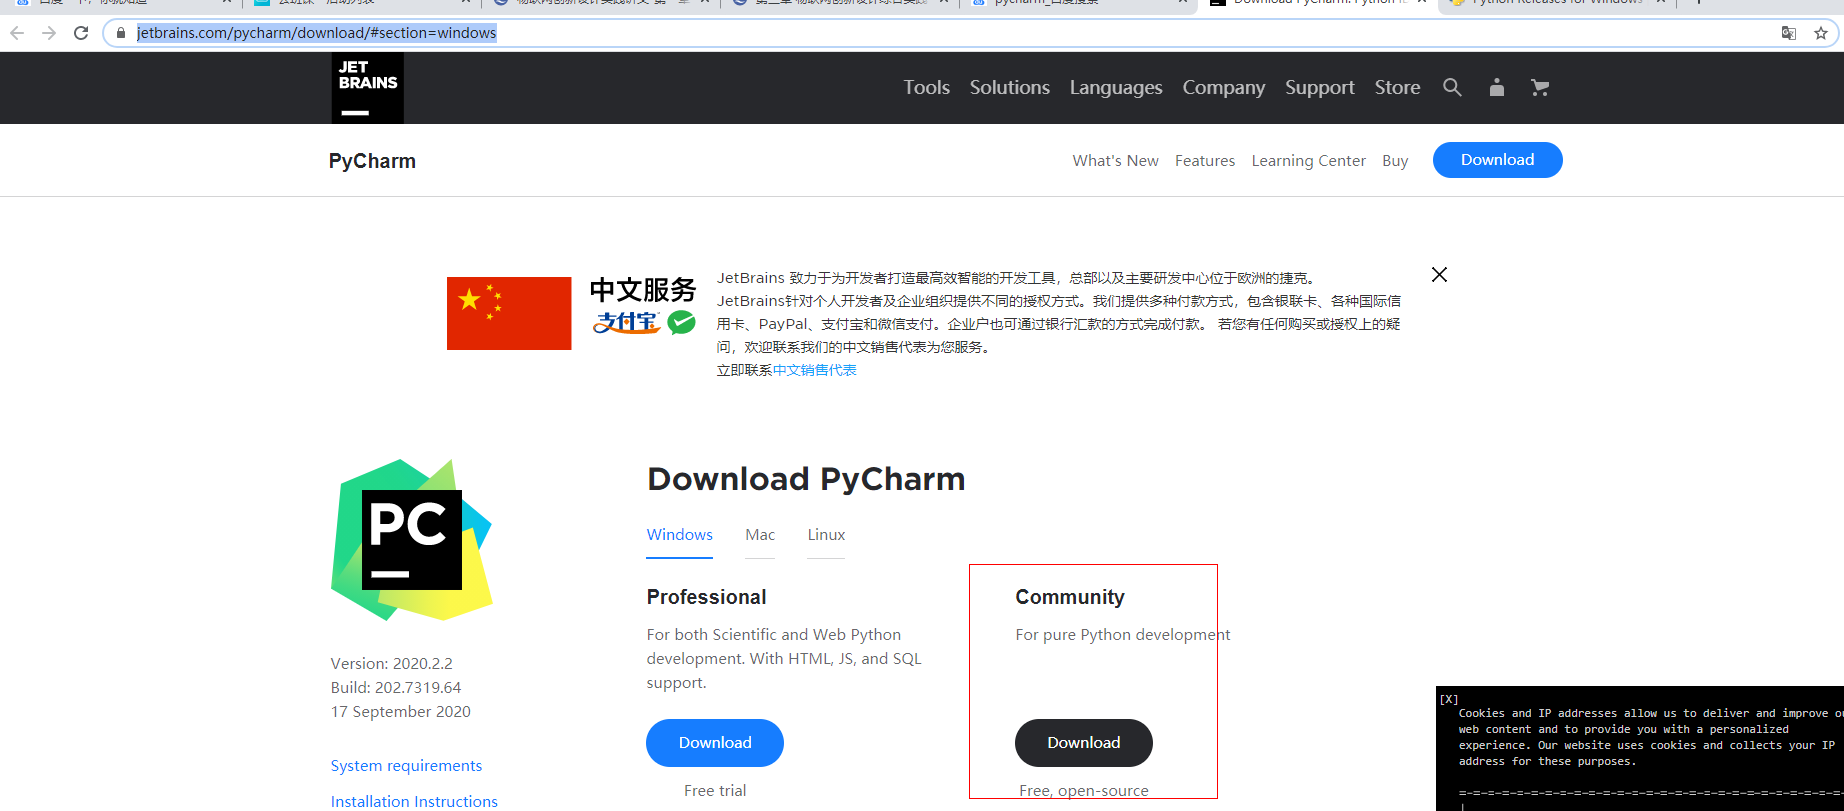
- 下载并安装pycharm 社区版
https://www.jetbrains.com/pycharm/download/#section=windows
- 最简单的python程序
# coding=utf8print "hello world!\r\n"
- 安装常用库
- 安装web框架flask :pip install flask
- 安装网络异步通信库twisted :pip install twisted
- 安装数据库对象关系模型库flask_sqlalchemy:
pip install flask_sqlalchemy - 安装redis数据库: pip install redis
- 安装串口驱动 pyserial:pip install pyserial
- 安装windows串口驱动依赖 pip install pypiwin32
- 安装mysql驱动
pip install mysqlclient
pip install pymysql - 安装flask跨域访问组件 pip install flask_cors
- 安装数据库查询组件 pip install flask_restless
3.2.2 语法
3.2.2.1 缩进(严格缩进4个空格)
def fun1():print("你好!\r\n")fun1()
3.2.2.2 数据结构及数据类型
-list列表
def fun1():print ("你好!\r\n")fun1()l=[1,2,5,6,8]print(l)print (l[3])for item in l:print (item)
-元组
ython的元组与列表类似,不同之处在于元组的元素不能修改。元组使用小括号,列表使用方括号。
tup1 = ('physics', 'chemistry', 1997, 2000);tup2 = (1, 2, 3, 4, 5 );tup3 = "a", "b", "c", "d";print (tup1)print (tup2)print (tup3)
-字典dict
bdict = {'name':'allen', 'age':'40'}for key in bdict.keys():print (key)print (bdict[key])
3.2.2.3 if、for、while、break
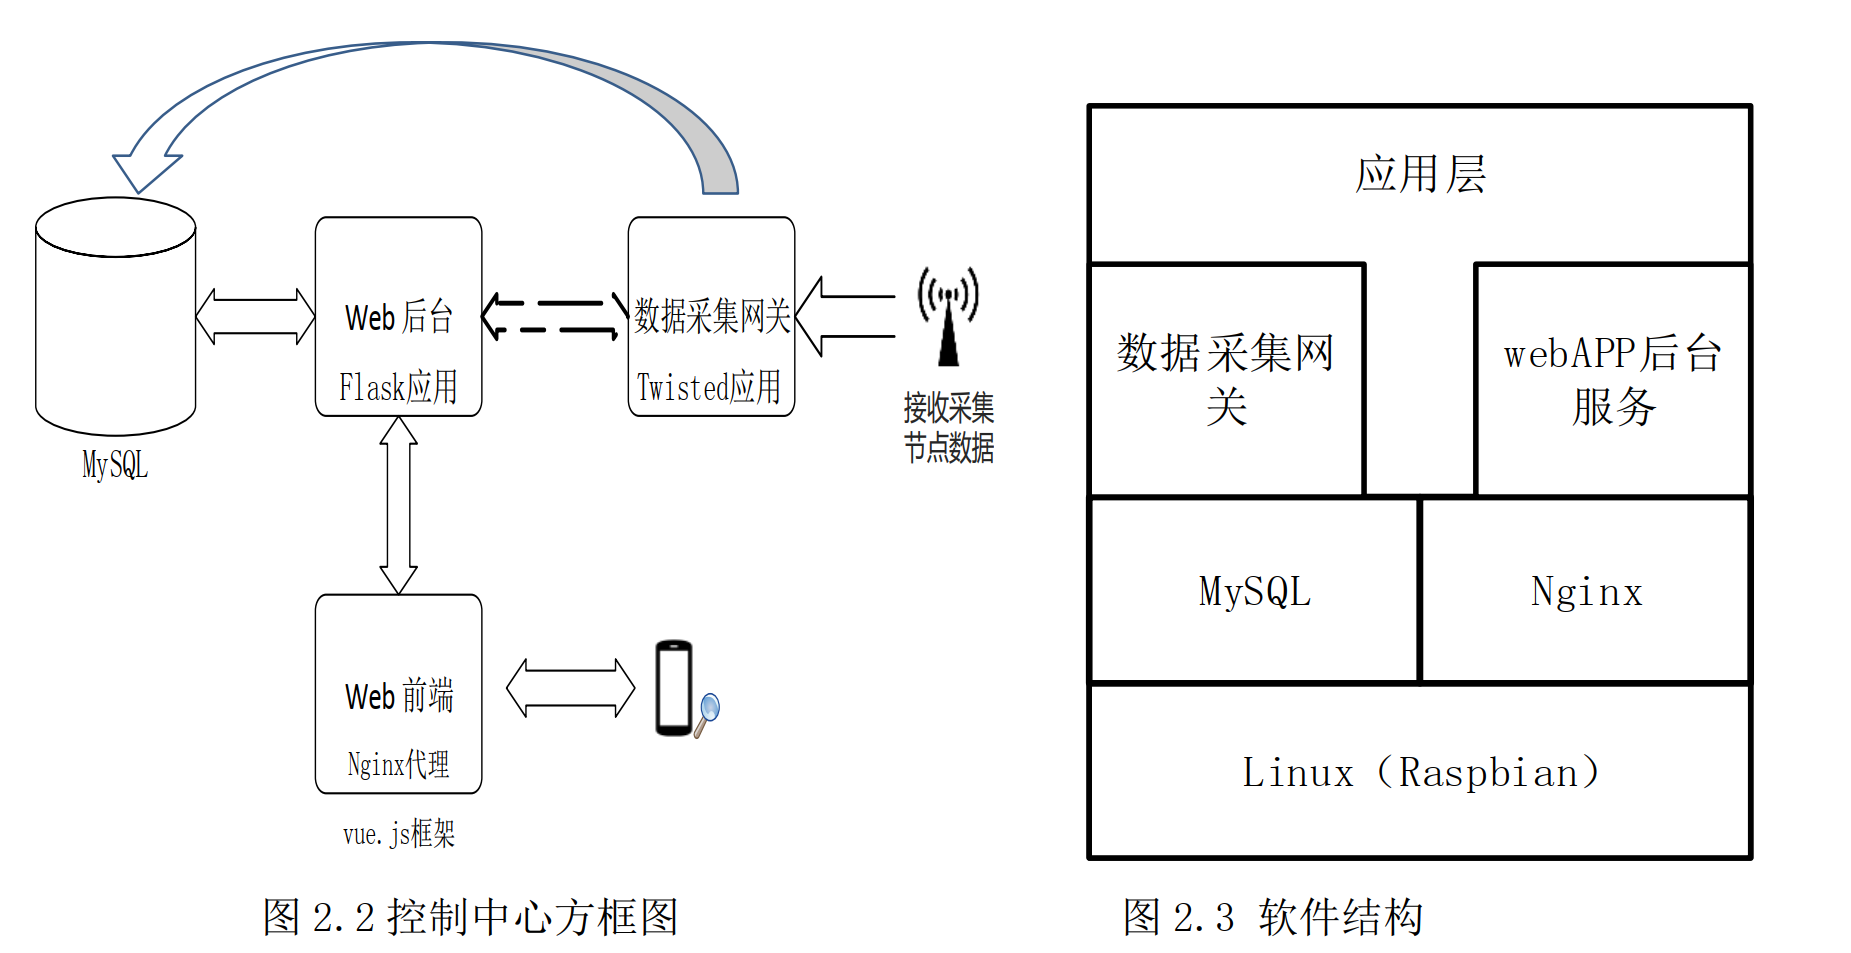
3.3 物联网应用服务器端软件设计
- 关于异步编程的一些概念
- https://blog.csdn.net/lu8000/article/details/45025987
- twisted异步框架及网络通信软件设计
- mysql关系数据库;
- redis数据库。
3.3.1 twisted异步网络通信库
3.3.1.1 介绍
参考:http://blog.csdn.net/hanhuili/article/details/9389433
Twisted是用Python实现的基于事件驱动的网络引擎框架。Twisted支持许多常见的传输及应用层协议,包括TCP、UDP、SSL/TLS、HTTP、IMAP、SSH、IRC以及FTP。Twisted对于其支持的所有协议都带有客户端和服务器实现,同时附带有基于命令行的工具,使得配置和部署产品级的Twisted应用变得非常方便。
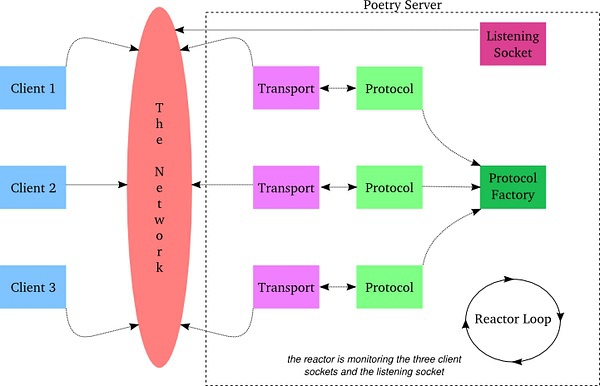
3.3.1.2 Reactor
Reactor是事件管理器,用于注册、注销事件,运行事件循环,当事件发生时调用回调函数处理。Reactor可以感知网络、文件系统以及定时器事件。它等待然后处理这些事件,从特定于平台的行为中抽象出来,并提供统一的接口,使得在网络协议栈的任何位置对事件做出响应都变得简单。
关于reactor有下面几个结论:
Twisted的reactor只有通过调用reactor.run()来启动。
reactor循环是在其开始的进程中运行,也就是运行在主进程中。
一旦启动,就会一直运行下去。reactor就会在程序的控制下(或者具体在一个启动它的线程的控制下)。reactor循环并不会消耗任何CPU的资源。并不需要显式的创建reactor,只需要引入就OK了。
3.3.1.3 Transports
Transports代表网络中两个通信结点之间的连接。Transports负责描述连接的细节,比如连接是面向流式的还是面向数据报的,流控以及可靠性。TCP、UDP和Unix套接字可作为transports的例子。它们被设计为“满足最小功能单元,同时具有最大程度的可复用性”,而且从协议实现中分离出来,这让许多协议可以采用相同类型的传输。Transports实现了ITransports接口,它包含如下的方法:
write 以非阻塞的方式按顺序依次将数据写到物理连接上
writeSequence 将一个字符串列表写到物理连接上
loseConnection 将所有挂起的数据写入,然后关闭连接
getPeer 取得连接中对端的地址信息
getHost 取得连接中本端的地址信息
将transports从协议中分离出来也使得对这两个层次的测试变得更加简单。可以通过简单地写入一个字符串来模拟传输,用这种方式来检查。
3.3.1.4 Protocols
Protocols描述了如何以异步的方式处理网络中的事件。HTTP、DNS以及IMAP是应用层协议中的例子。Protocols实现了IProtocol接口,它包含如下的方法:
makeConnection 在transport对象和服务器之间建立一条连接
connectionMade 连接建立起来后调用
dataReceived 接收数据时调用
connectionLost 关闭连接时调用
3.3.1.5 Factory
切确的说,它取名不太好,应该叫做FactoryOfProtocals,即协议工厂(也就是工厂模式),用来管理协议对象实例的。
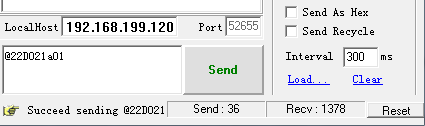
3.3.2 串口收发数据范例
# coding=utf8import sysimport reif sys.platform == 'win32':from twisted.internet import win32eventreactorwin32eventreactor.install()from twisted.internet import defer, threadsfrom twisted.internet.serialport import SerialPortfrom twisted.internet import protocol,task, reactor, errorfrom twisted.protocols.basic import LineReceiverfrom twisted.python import log, usageclass GasSim(LineReceiver):def __init__(self):self._lc1 = task.LoopingCall(self.sendCmd)self._lc1.start(3,False)def sendCmd(self):self.sendLine("@01c100001".encode('utf-8'))def lineReceived(self, line):line = line.decode('utf-8')print(line)if(re.match('@\d{2}\D\w{4}\d{2}',line)):if(line[3] == 'D'):print (u'接收到1条命令!\r\n')tmpstr = "当前电压值=%.3f" % (int(line[4:8],16)/1000.0)print (tmpstr)if __name__ == '__main__':s = SerialPort(GasSim(), 'COM5', reactor, baudrate=9600)reactor.run()
3.3.3 socket网络数据通信基础
本小节已经合并到下一小节
3.3.4 网络通信程序及数据库读写
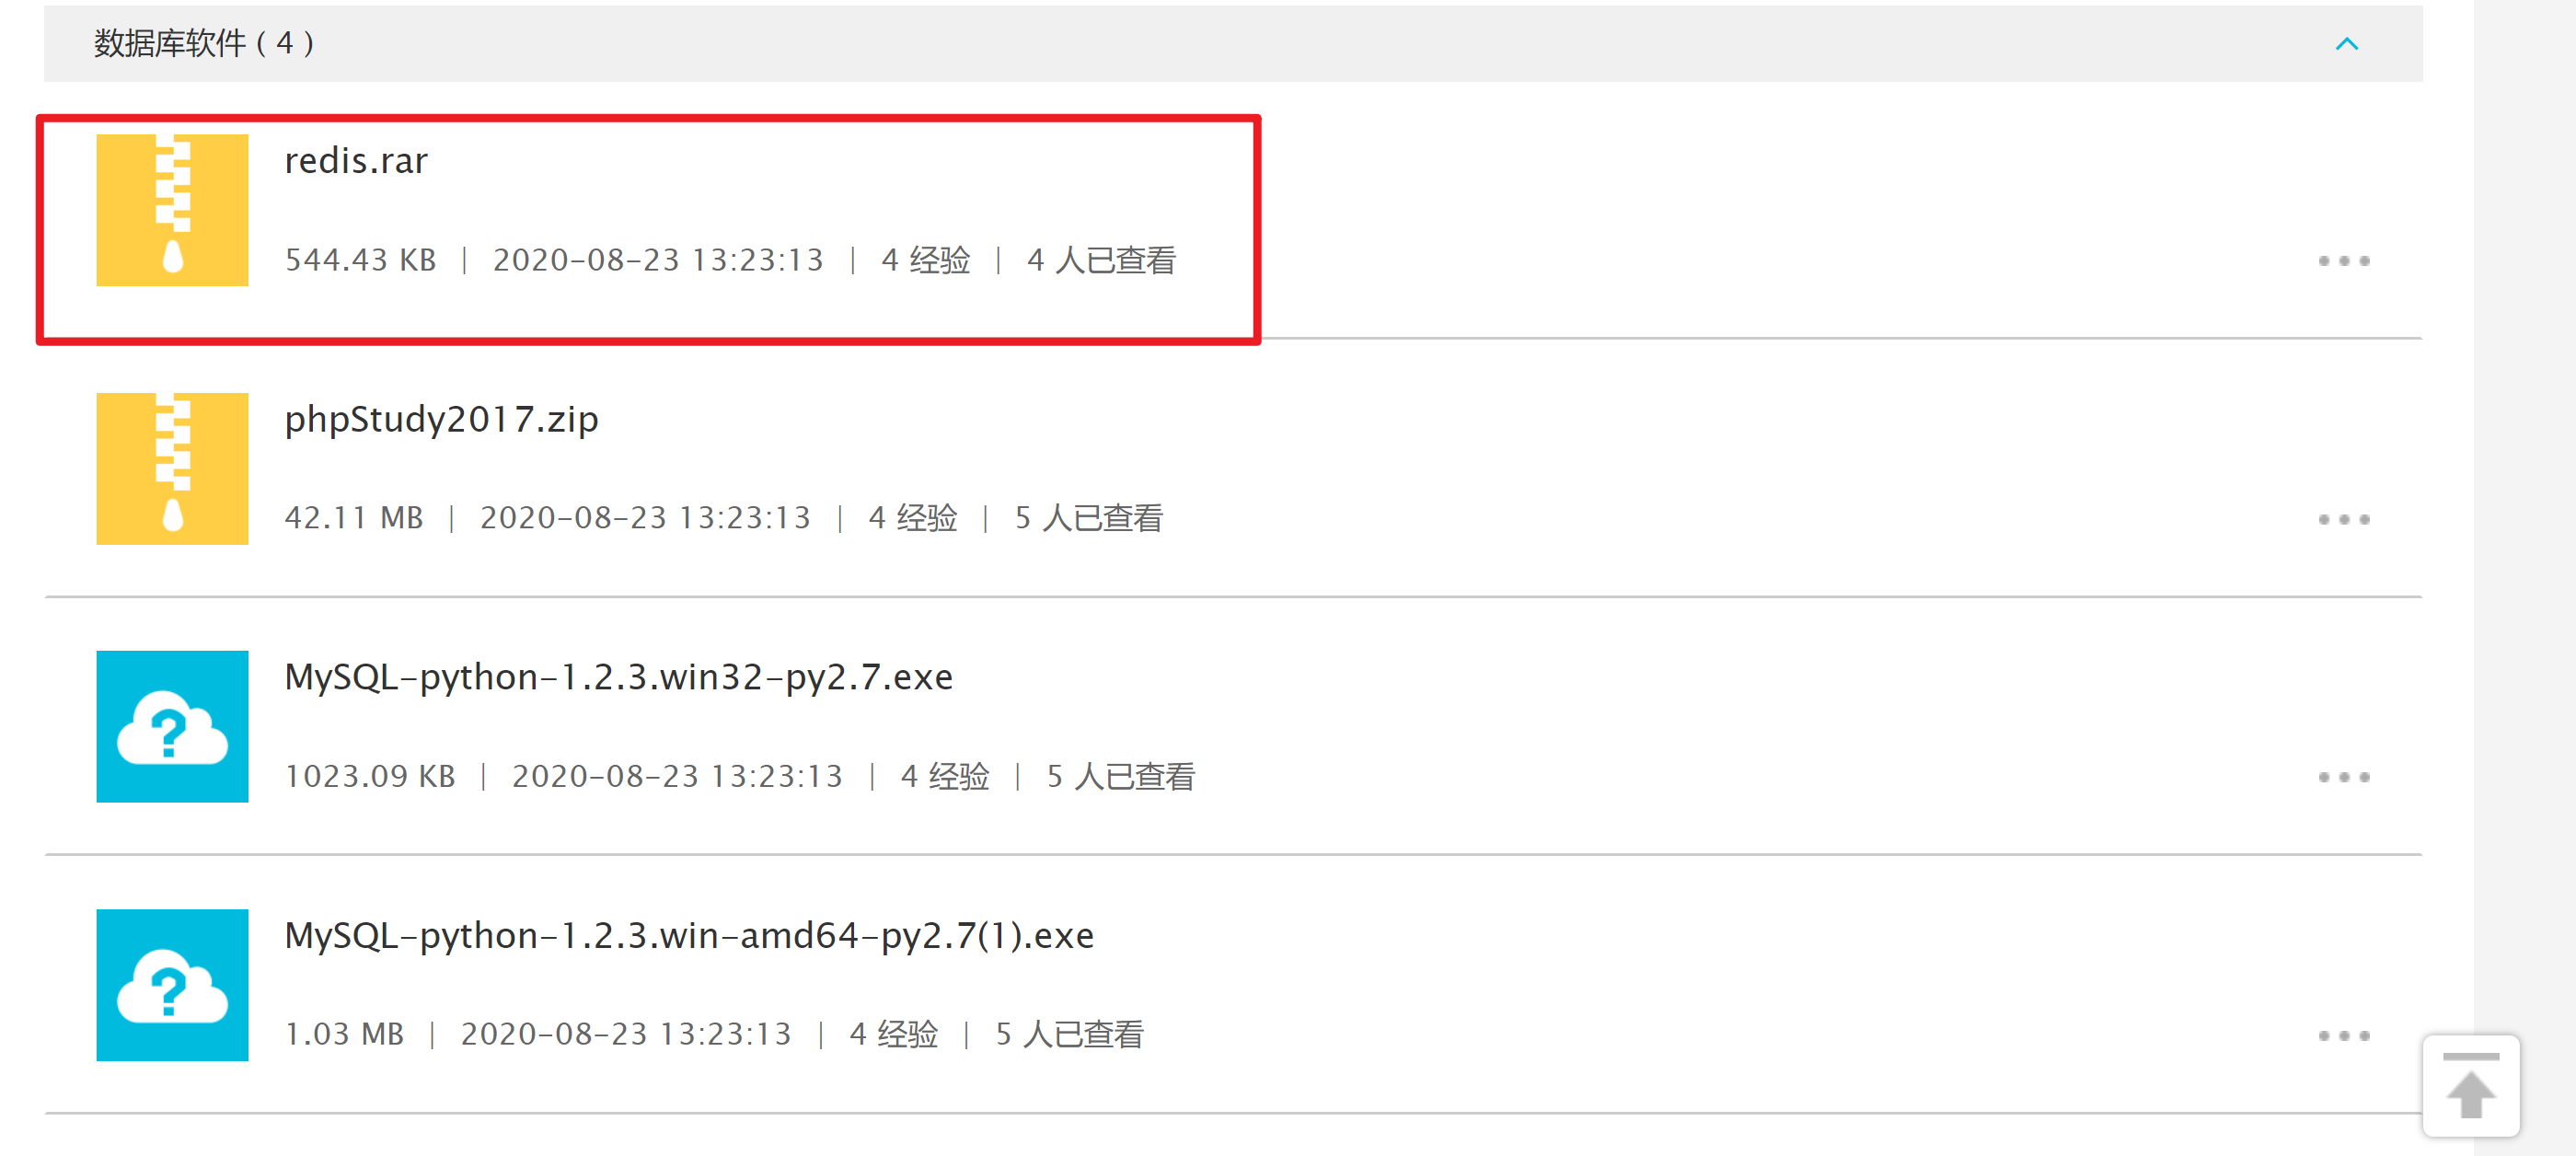
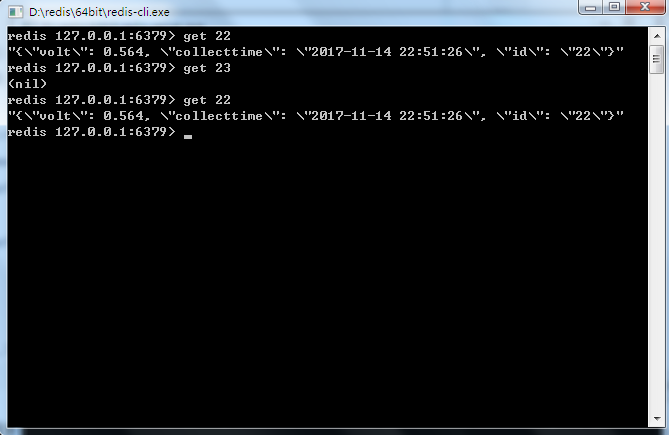
3.3.4.1 redis key/value数据库
安装redis,直接解压运行即可。
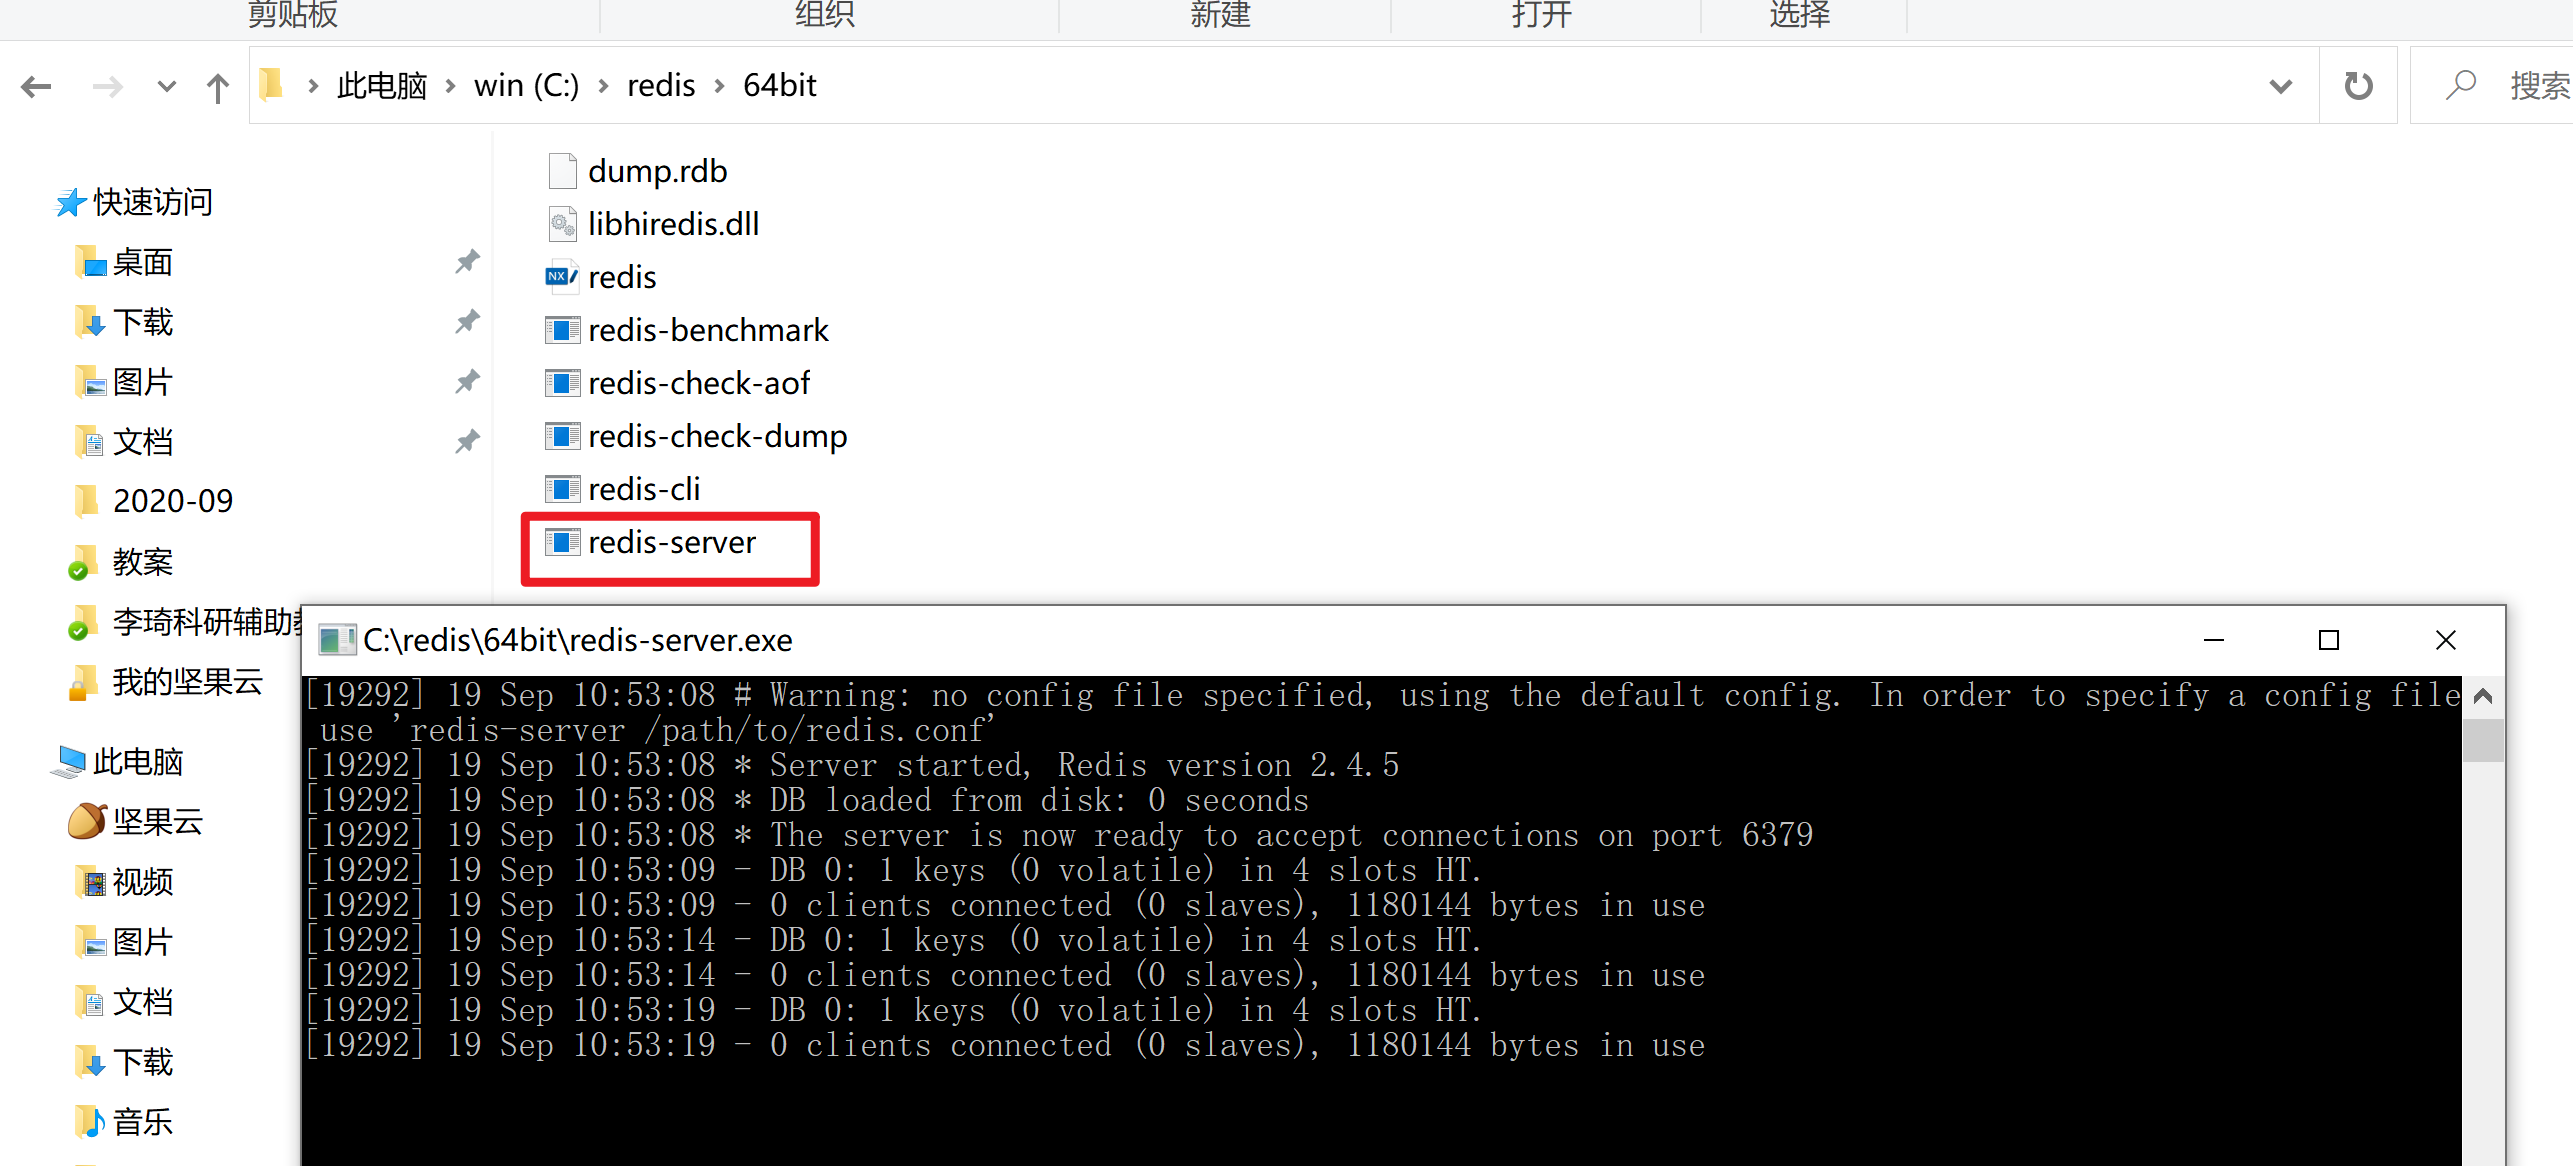
3.3.4.1.1 启动redis服务(运行exe文件即可)
3.3.4.1.2 redis数据库讲解
- key/value数据库
- key的数据类型
- string
- value的数据类型:
- 五种数据类型:string,hash,list,set 及sorted set。
我们将json格式的字符串作为value存入redis
3.3.4.1.3 要点讲解
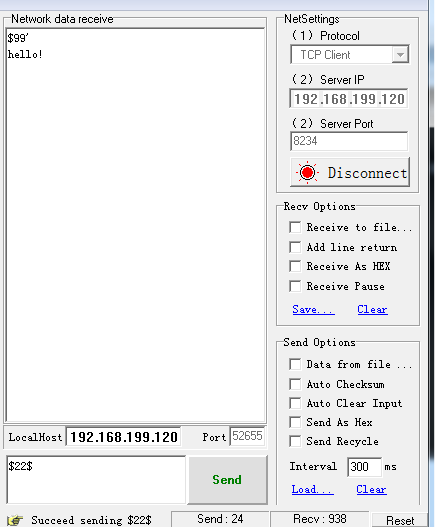
- (1)服务器端侦听端口,等待客户端连接
- (2)当有客户端连接请求时,发送"$99'",要求客户端注册
- (3)客户端收到"$99'"后,发送"$22$"注册,其中22为其ID(或称为addr,具有唯一性,表示该客户端的地址)
- (4)双方建立通信连接,可以互相收发数据。
- (5)服务器端如何向客户端发送数据?
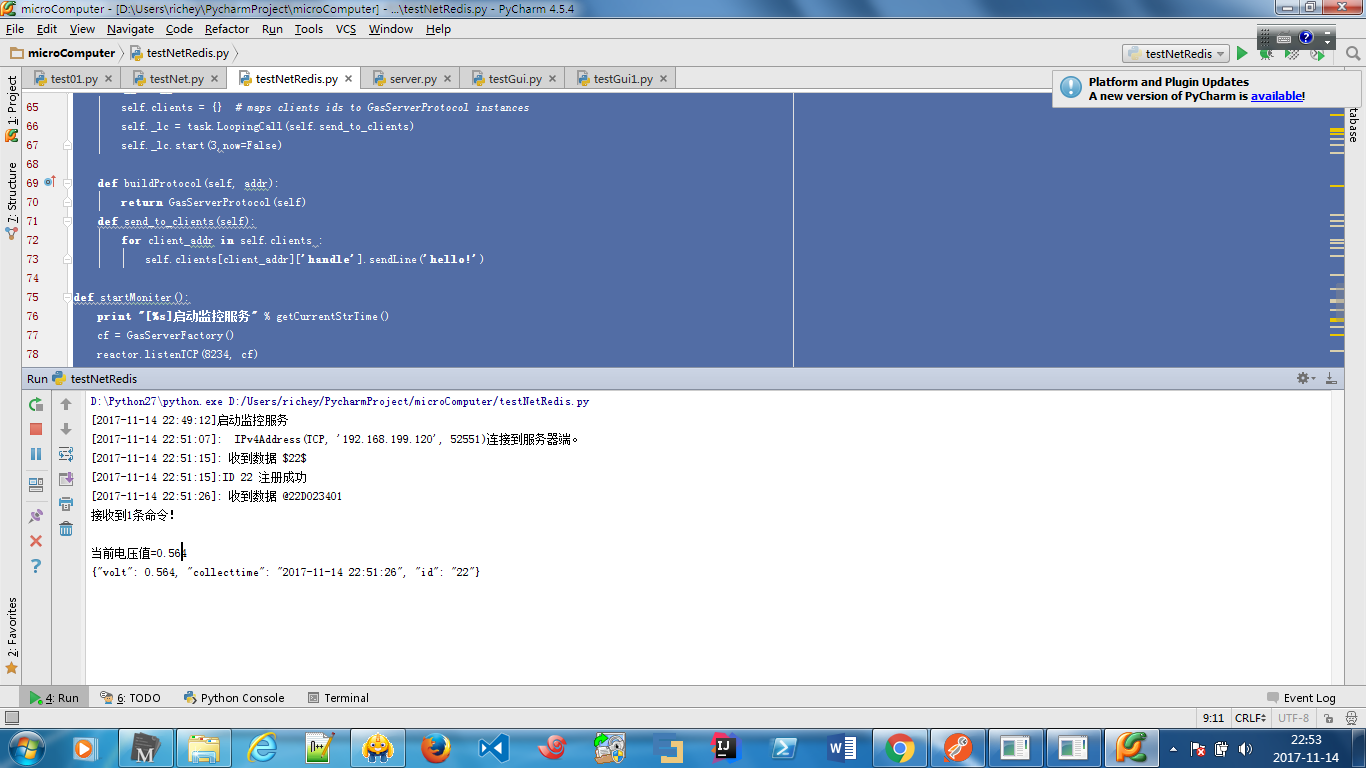
在GasServerProtocol对象内部直接调用self.sendLine()即可 。 - (6)如何接收数据?在lineReceived回调函数中。
# coding: utf-8import reimport datetimeimport timeimport jsonimport redisfrom twisted.internet import reactor, task, protocolfrom twisted.internet import defer, threadsfrom twisted.internet.protocol import Protocol, error, Factoryfrom twisted.protocols.basic import LineReceiverr = redis.Redis(host='127.0.0.1',port=6379,db=0)def getCurrentStrTime():return time.strftime("%Y-%m-%d %H:%M:%S", time.localtime())class GasServerProtocol(LineReceiver):def __init__(self, factory):self.id = ''self.factory = factorydef connectionMade(self):print(("[%s]: %s连接到服务器端。" %(getCurrentStrTime(), self.transport.getPeer())))self.sendLine("$99'".encode('utf-8'))def connectionLost(self, reason):if self.id in self.factory.clients:del self.factory.clients[self.id]print("[%s]:ID %s 下线" % (getCurrentStrTime(), self.id))print(("[%s]: %s断开了连接,原因是%s" %(getCurrentStrTime(),self.transport.getPeer(),reason)))def lineReceived(self, data):data = data.decode('utf-8')tmpstr = ("[%s]: 收到数据 %s") % (getCurrentStrTime(), data)print(tmpstr)if(re.match("\$\d{2}\$", data)):self.id = str(data[1:3])dicttmp = {}dicttmp['handle'] = selfdicttmp['timestamp'] = time.time()self.factory.clients[self.id] = dicttmpprint("[%s]:ID %s 注册成功" % (getCurrentStrTime(), self.id))if(re.match('@\d{2}\D\w{4}\d{2}',data)):if(data[3] == 'D'):print('接收到1条命令!\r\n')volttmp = (int(data[4:8],16)/1000.0)tmpstr = "当前电压值=%.3f" % volttmpprint(tmpstr)dicttmp = {}dicttmp['collecttime'] = getCurrentStrTime()dicttmp['volt'] = volttmpdicttmp['id'] = self.idr.set(self.id, json.dumps(dicttmp))print(r.get(self.id))class GasServerFactory(Factory):def __init__(self):self.clients = {} # maps clients ids to GasServerProtocol instancesself._lc = task.LoopingCall(self.send_to_clients)self._lc.start(3,now=False)def buildProtocol(self, addr):return GasServerProtocol(self)def send_to_clients(self):for client_addr in self.clients :self.clients[client_addr]['handle'].sendLine('hello!'.encode('utf-8'))def startMoniter():print("[%s]启动监控服务" % getCurrentStrTime())cf = GasServerFactory()reactor.listenTCP(8234, cf)reactor.run()def stopMoniter():print("[%s]停止监控服务" % getCurrentStrTime())try:reactor.crash()except RuntimeError:return defer.fail()else:return defer.succeed(None)startMoniter()
3.3.5 RESTful API接口后端软件
- 理解RESTful架构
http://www.ruanyifeng.com/blog/2011/09/restful.html
RESTful API是主流的后端API接口规范,可以为移动客户端、WEB客户端及CS客户端提供后端数据访问接口,其优势在于同一套后端接口既可以为不同形式的客户端提供一致性的访问。客户端可以跨操作系统,甚至可以是嵌入式设备。
-典型的数据访问过程:
手机、浏览器、CS客户端 <-> 服务器端软件(REST API) <->数据库 - flask web框架(http://www.pythondoc.com/flask/)
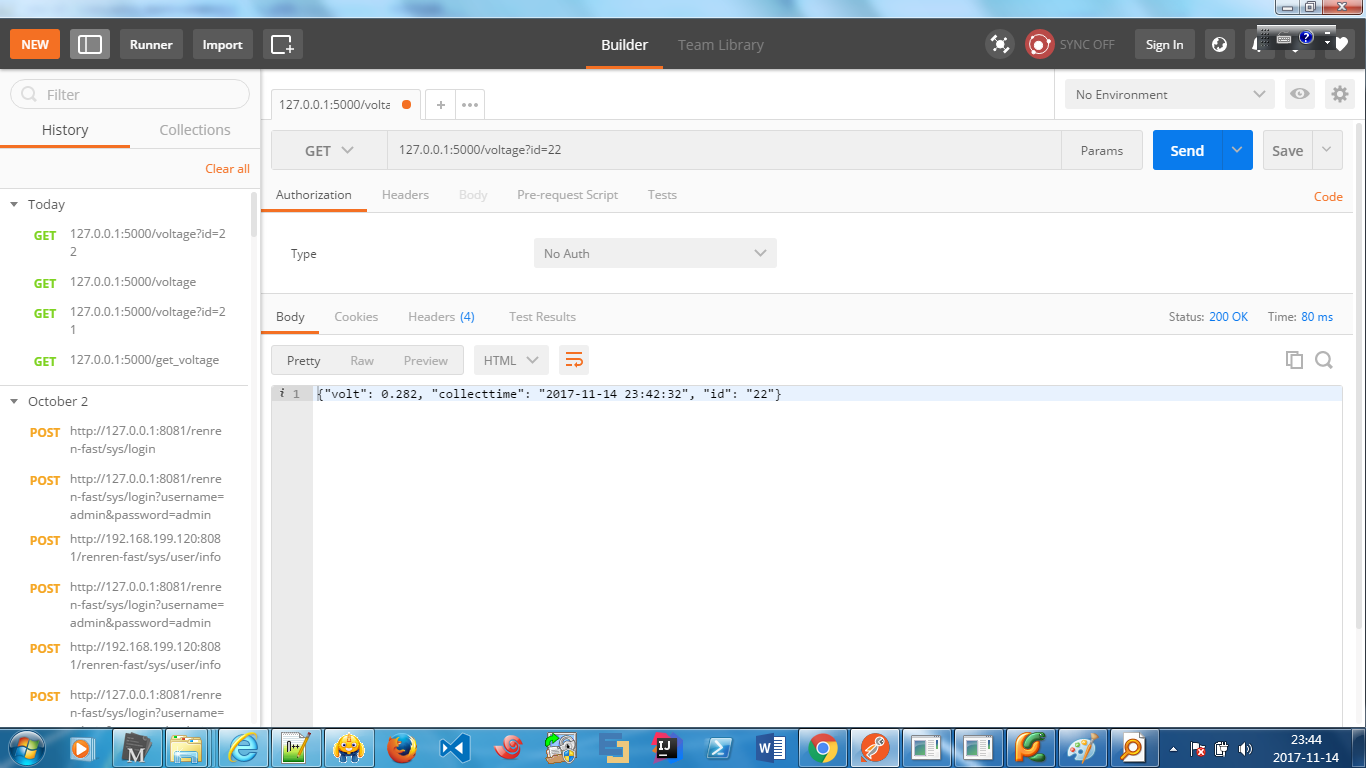
- 安装RESTful API调试工具postman https://app.getpostman.com/app/download/win64
# coding=utf-8from flask import render_template, request, redirectfrom flask import abort,jsonify,url_for,render_template, request, redirectfrom flask_cors import CORSimport jsonimport redisfrom flask import Flaskimport datetimefrom flask_cors import CORSapp = Flask(__name__)CORS(app)r = redis.Redis(host='127.0.0.1', port=6379, db=0)@app.route('/')def hello_world():return '你好!'@app.route('/voltage')def get_voltage():id = request.args.get('id', '')if id:json_data = r.get(id)if json_data:return jsonify(json.loads(json_data))return 'no data!'return 'no id!'if __name__ == '__main__':app.run(host='0.0.0.0', port=int("5000"))
3.3.6 mysql 关系数据库
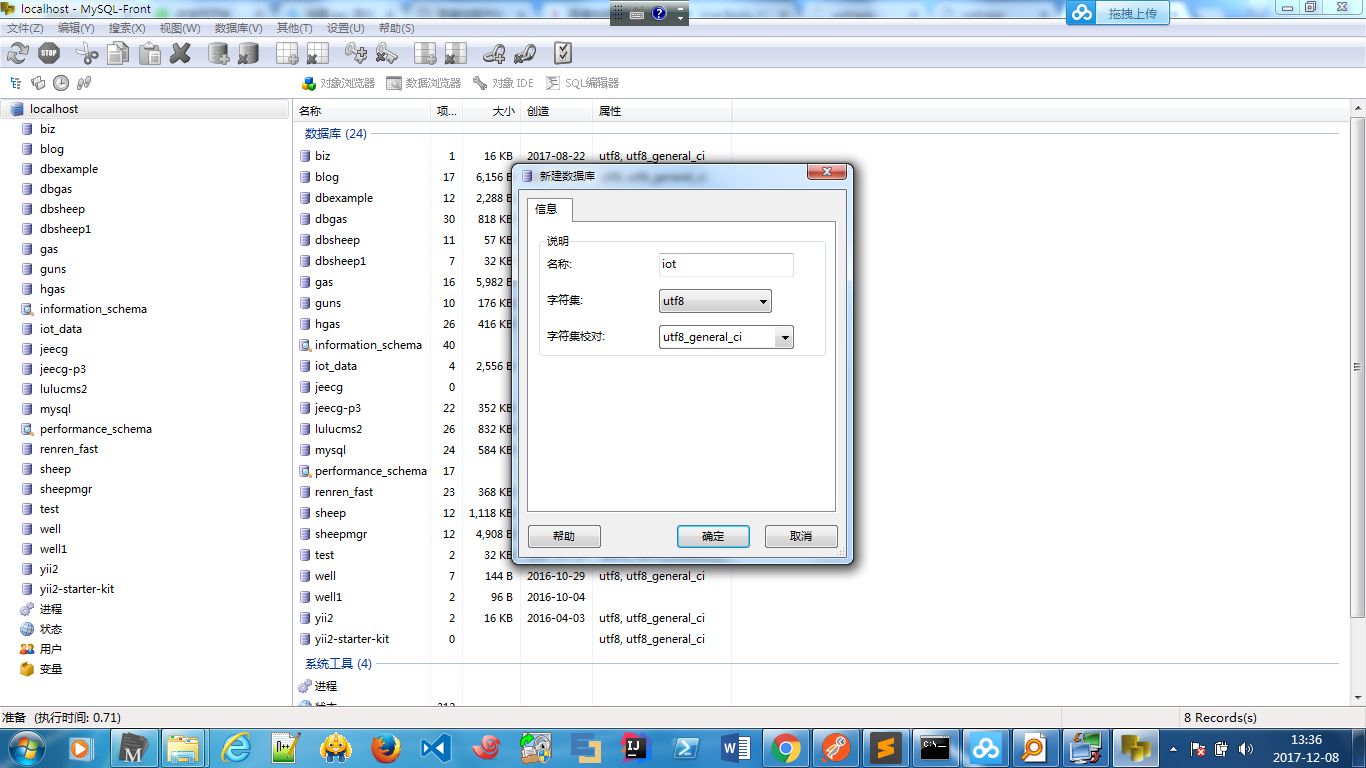
3.3.6.1 新建数据库
- 启动phpstudy中的mysql数据库
- 打开mysql管理器
- 新建一个名字为iot的数据库,注意编码格式选utf8
3.3.6.2 新建表
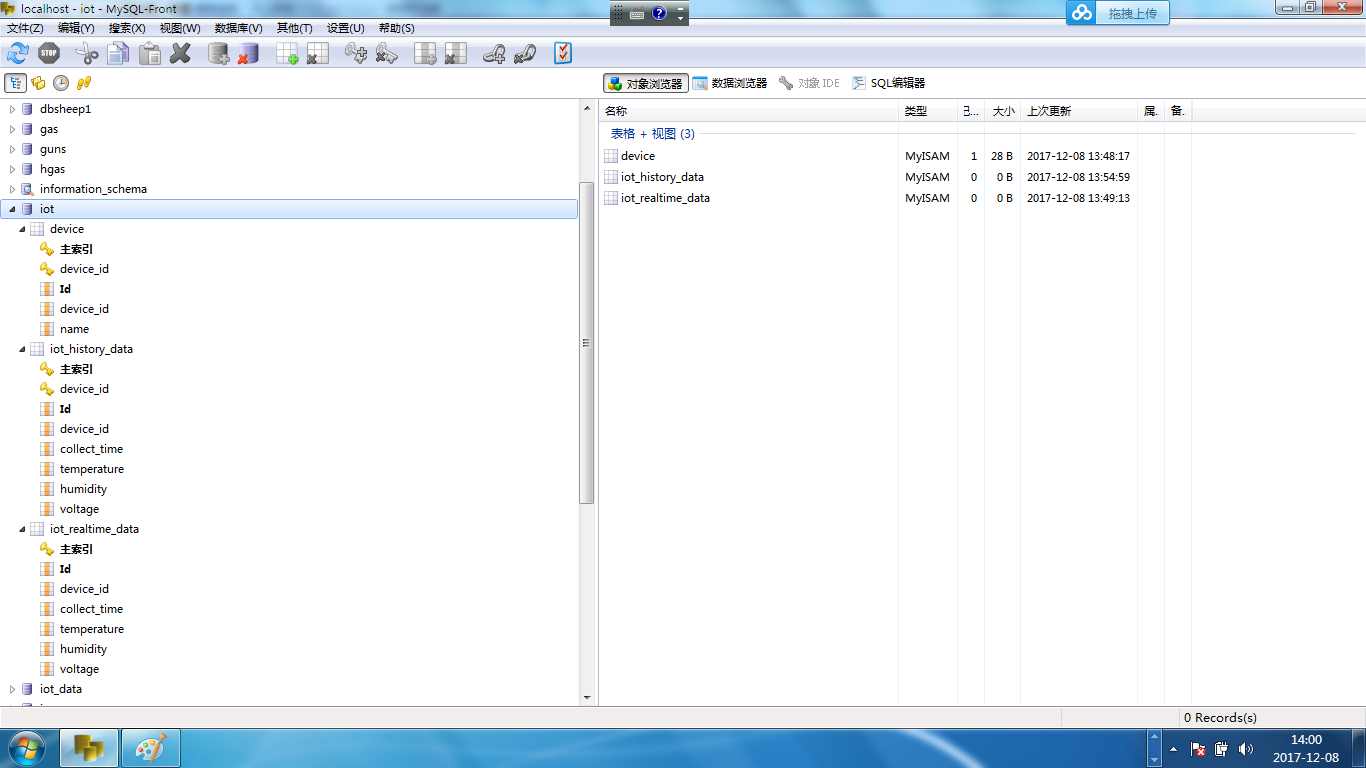
在iot数据库中,新建device、iot_realtime_data,iot_history_data,共三张表。
或执行如下脚本创建三张表

CREATE TABLE `device` (`Id` int(11) NOT NULL AUTO_INCREMENT,`device_id` varchar(64) DEFAULT NULL,`name` varchar(255) DEFAULT NULL,PRIMARY KEY (`Id`),KEY `device_id` (`device_id`)) ENGINE=MyISAM AUTO_INCREMENT=2 DEFAULT CHARSET=utf8;CREATE TABLE `iot_history_data` (`Id` int(11) NOT NULL AUTO_INCREMENT,`device_id` varchar(64) DEFAULT NULL,`collect_time` datetime DEFAULT NULL,`temperature` float DEFAULT NULL,`humidity` float DEFAULT NULL,`voltage` float DEFAULT NULL,PRIMARY KEY (`Id`),UNIQUE KEY `device_id` (`device_id`,`collect_time`)) ENGINE=MyISAM DEFAULT CHARSET=utf8 ROW_FORMAT=DYNAMIC;#CREATE TABLE `iot_realtime_data` (`Id` int(11) NOT NULL AUTO_INCREMENT,`device_id` varchar(64) DEFAULT NULL,`collect_time` datetime DEFAULT NULL,`temperature` float DEFAULT NULL,`humidity` float DEFAULT NULL,`voltage` float DEFAULT NULL,PRIMARY KEY (`Id`)) ENGINE=MyISAM DEFAULT CHARSET=utf8;CREATE TABLE `position` (`Id` int(11) NOT NULL AUTO_INCREMENT,`device_id` varchar(255) DEFAULT NULL,`longitude` varchar(255) DEFAULT NULL,`latitude` varchar(255) DEFAULT NULL,`collect_time` datetime DEFAULT NULL,PRIMARY KEY (`Id`)) ENGINE=MyISAM DEFAULT CHARSET=utf8;
3.3.6.3 操作mysql数据库
-增加功能
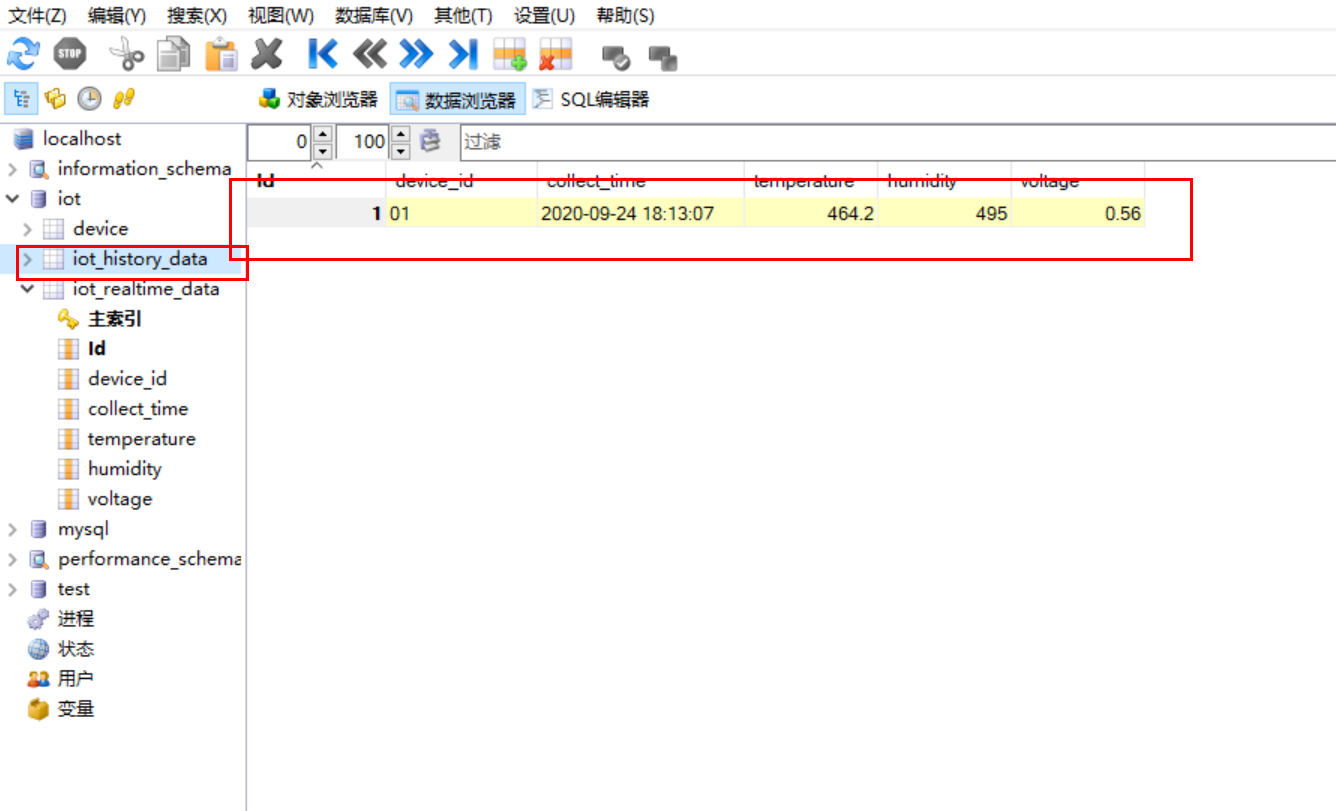
在现有功能基础上,每5分钟将数据存入iot的iot_history_data表中
# coding=utf8#testNet.pyimport reimport timeimport jsonimport redisfrom datetime import datetimefrom twisted.internet import reactor, task, protocolfrom twisted.internet import defer, threadsfrom twisted.internet.protocol import Protocol, error, Factoryfrom twisted.protocols.basic import LineReceiverfrom dbhelper import insert_iot_recordr = redis.Redis(host='127.0.0.1',port=6379,db=0)def getCurrentStrTime():return time.strftime("%Y-%m-%d %H:%M:%S", time.localtime())class GasServerProtocol(LineReceiver):def __init__(self, factory):self.id = ''self.factory = factoryself.last_iot_time = datetime.now()self.fisrt_recv_flag = Truedef connectionMade(self):print("[%s]: %s连接到服务器端。" %(getCurrentStrTime(), self.transport.getPeer()))self.sendLine("$99'".encode('utf-8'))def connectionLost(self, reason):if self.id in self.factory.clients:del self.factory.clients[self.id]print ("[%s]:ID %s 下线" % (getCurrentStrTime(), self.id))print("[%s]: %s断开了连接,原因是%s" %(getCurrentStrTime(),self.transport.getPeer(),reason))def insert_iot_record_cb(self, result):print (result)self.last_iot_time = datetime.now()self.fisrt_recv_flag = Falsedef lineReceived(self, data):data = data.decode('utf-8')tmpstr = ("[%s]: 收到数据 %s") % (getCurrentStrTime(), data)print (tmpstr)if(re.match("\$\d{2}\$", data)):self.id = str(data[1:3])dicttmp = {}dicttmp['handle'] = selfdicttmp['timestamp'] = time.time()self.factory.clients[self.id] = dicttmpprint ("[%s]:ID %s 注册成功" % (getCurrentStrTime(), self.id))if(re.match('@\d{2}\D\w{12}\d{2}',data)):if(data[3] == 'D'):print (u'接收到1条命令!\r\n')volttmp = (int(data[4:8],16)/1000.0)temperature = (int(data[8:12],16)/10.0)humidity = (int(data[12:16],16)/10.0)dicttmp = {}dicttmp['collecttime'] = getCurrentStrTime()dicttmp['voltage'] = volttmpdicttmp['temperature'] = temperaturedicttmp['humidity'] = humiditydicttmp['id'] = self.idr.set(self.id, json.dumps(dicttmp))print (r.get(self.id))current_time = datetime.now()if((current_time - self.last_iot_time).seconds >= 5 * 60 or self.fisrt_recv_flag):insert_iot_record( r.get(self.id)).addCallback(self.insert_iot_record_cb)class GasServerFactory(Factory):def __init__(self):self.clients = {} # maps clients ids to GasServerProtocol instancesself._lc = task.LoopingCall(self.send_to_clients)self._lc.start(3,now=False)def buildProtocol(self, addr):return GasServerProtocol(self)def send_to_clients(self):for client_addr in self.clients :self.clients[client_addr]['handle'].sendLine('hello!'.encode('utf-8'))def startMoniter():print ("[%s]启动监控服务" % getCurrentStrTime())cf = GasServerFactory()reactor.listenTCP(8235, cf)reactor.run()def stopMoniter():print ("[%s]停止监控服务" % getCurrentStrTime())try:reactor.crash()except RuntimeError:return defer.fail()else:return defer.succeed(None)startMoniter()
# coding=utf-8# dbhelper.pyfrom flask_sqlalchemy import SQLAlchemyfrom twisted.enterprise import adbapiimport binasciiimport decimalimport datetimeimport MySQLdbimport jsondb_conn = 'MySQLdb'db_user = 'root'db_pass = 'root'db_host = '127.0.0.1'db_database = 'iot'dbpool = adbapi.ConnectionPool(db_conn,host=db_host,user=db_user,passwd=db_pass,db=db_database,charset='utf8',cp_reconnect=True)def _insert_iot_record(trans, record):iot_dict = json.loads(record) # 根据字符串书写格式,将字符串自动转换成 字典类型print (iot_dict)try:sql = 'insert into iot_history_data (device_id,voltage,humidity,temperature,collect_time)'+\' values(\'%s\',\'%6.2f\',\'%6.2f\',\'%6.2f\',\'%s\')' % (iot_dict['id'], iot_dict['voltage'], iot_dict['humidity'], iot_dict['temperature'], iot_dict['collecttime'])print (sql)result = trans.execute(sql)return 'True'except:return 'False'def insert_iot_record(record):return dbpool.runInteraction(_insert_iot_record, record)

3.4 物联网应用移动端软件设计
3.4.1 打包下载:云盘webapp目录
3.4.2.安装node.js、npm及sublime text3
- 见第8组安装文档
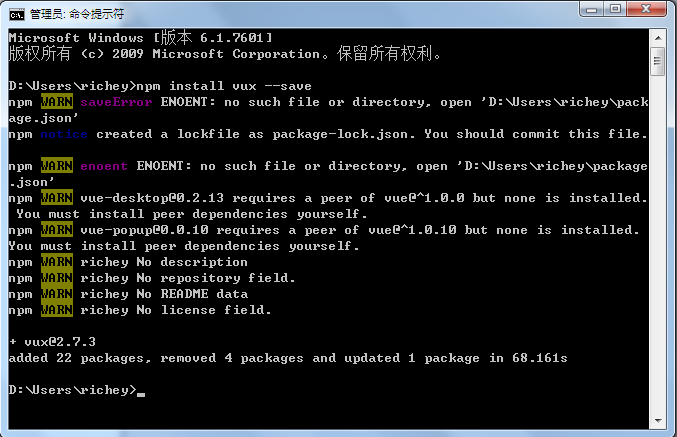
3.4.3 安装vue的UI框架vux
- npm install vux --save
- 快速入门
使用 vue-cli 工具和 airyland/vux2 模板快速初始化项目
默认为 webpack2 模板,projectPath为你自己的工程目录,课修改
npm install vue-cli -g // 如果还没安装
vue init airyland/vux2 projectPath
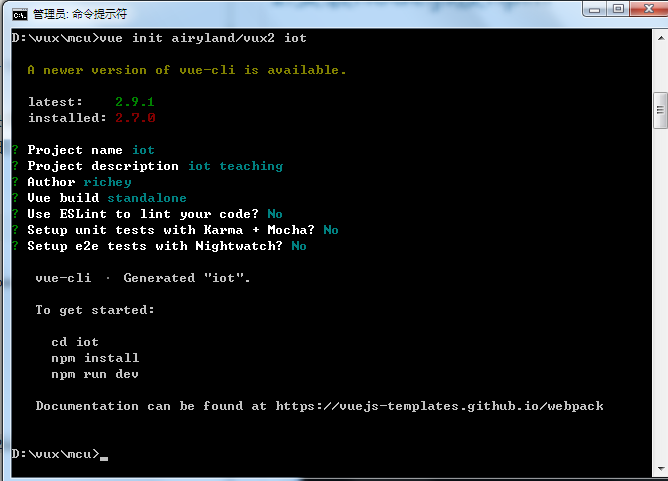
cd projectPath
npm install --registry=https://registry.npm.taobao.org

npm run dev
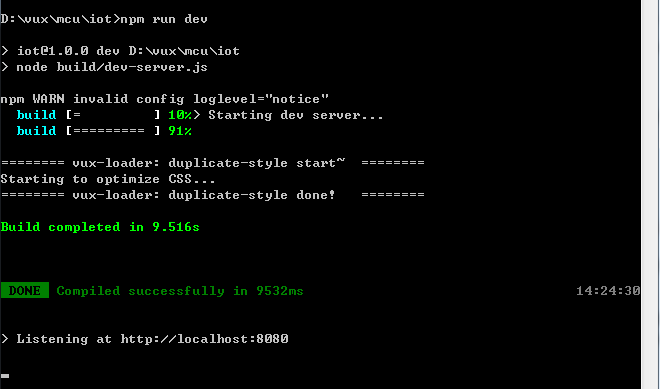
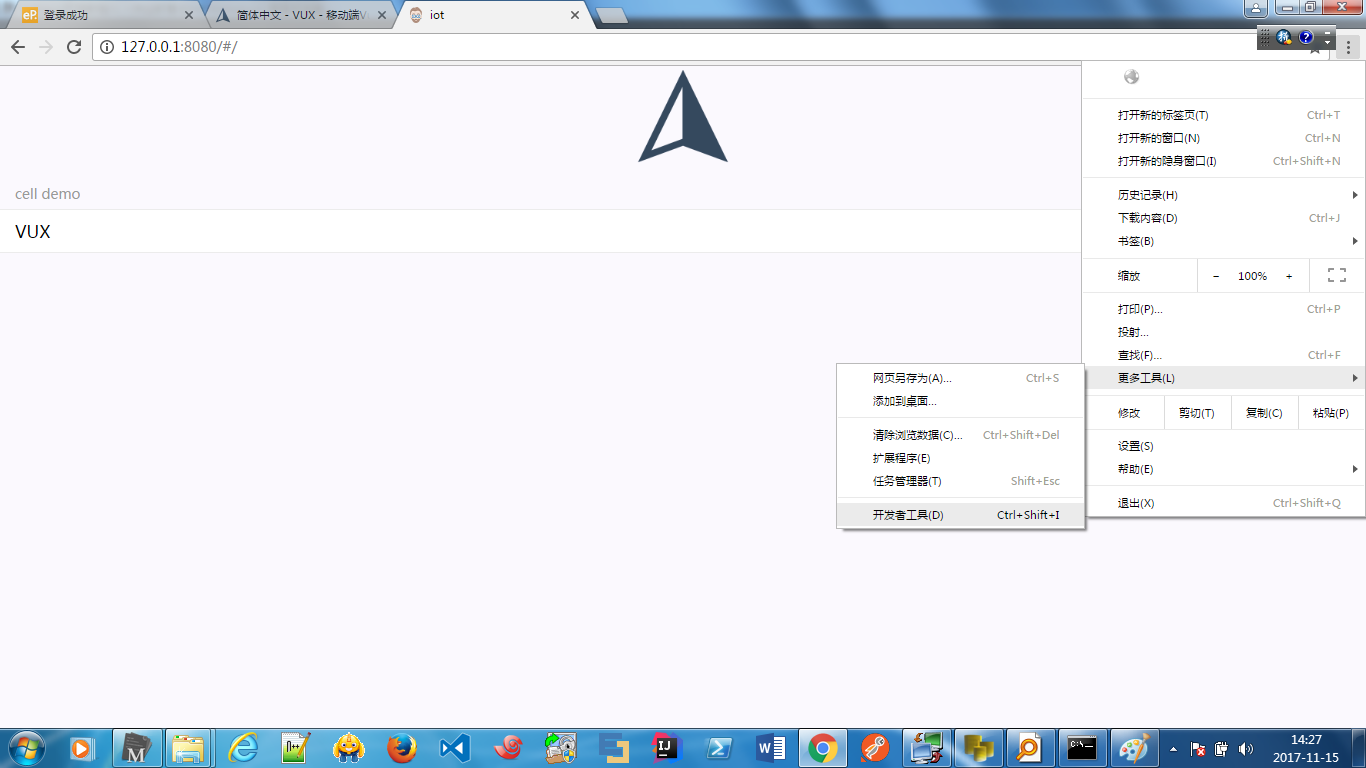
用chrome浏览器打开网页
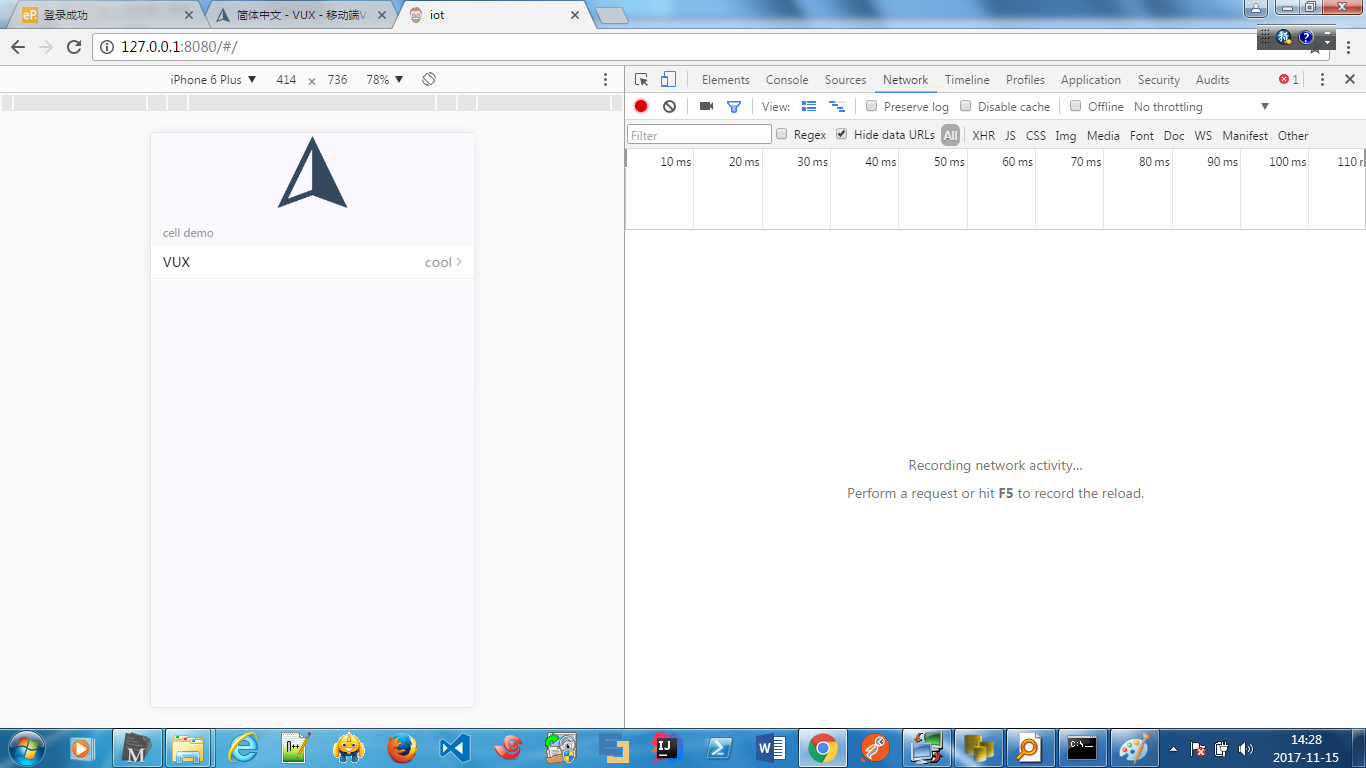
- 快速入门
用sublime打开工程文件夹,讲解文件结构
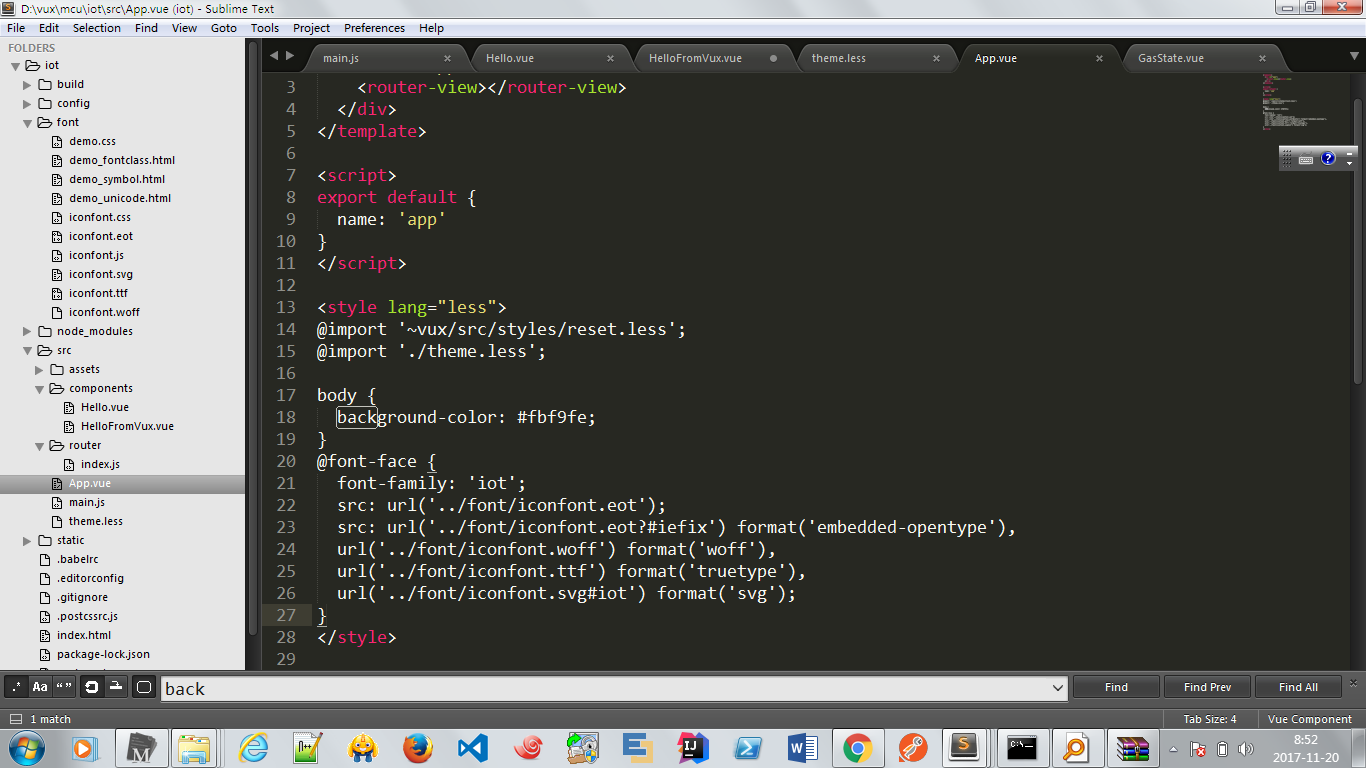
3.4.4 iconfont图标库
- http://www.iconfont.cn/
- 注册登录
- 点击“图标库”,找到你需要的图标->放入购物车(添加入库)
- 点击“图标管理”->我的项目->新建1个项目
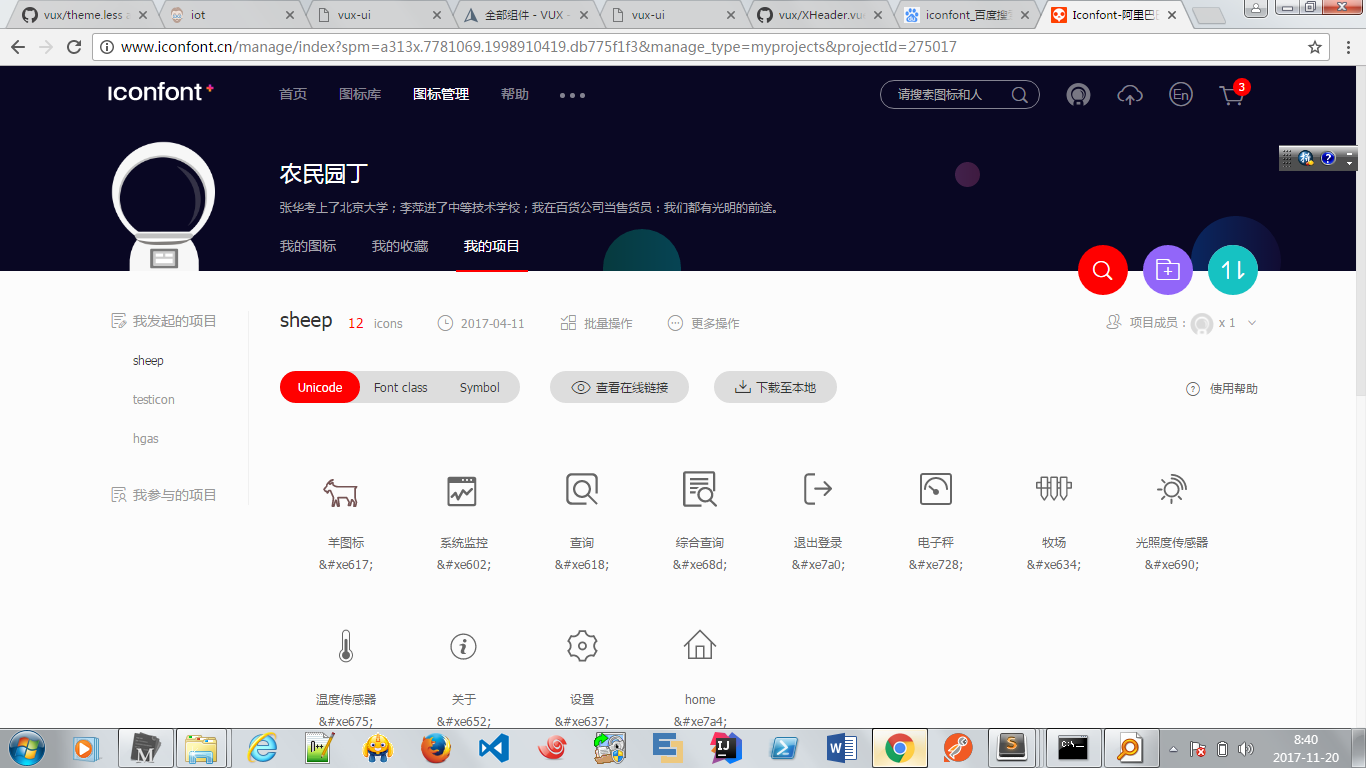
- 将购物车中的图标->添加至新建的项目
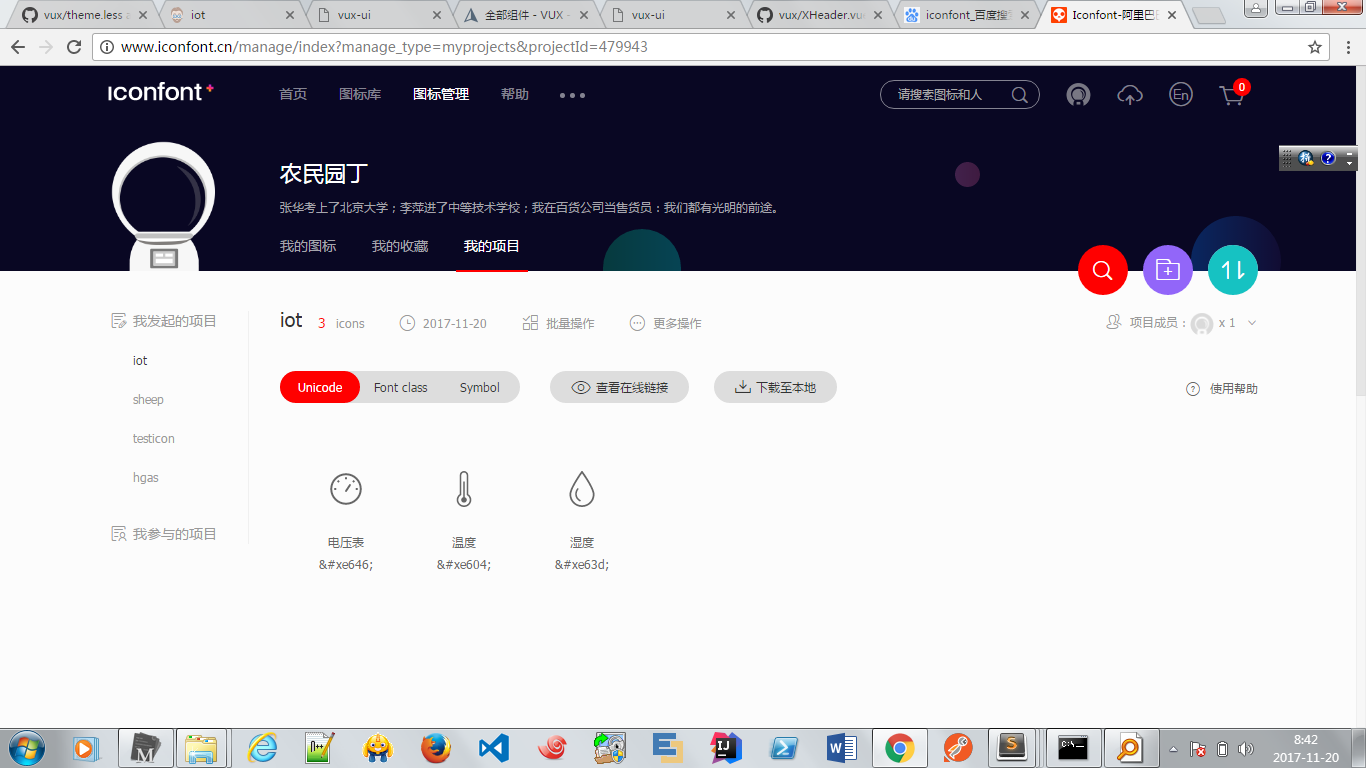
- 将图标下载至本地,解压缩至与src同级的font文件夹

- 在app.vue 添加如下代码
3.4.5 webapp设计
- 要点讲解
- vue文件讲解(template:编译为网页 script:编译为js)
- RESTful api与后台接口及页面数据接口
- 后台定时刷新数据
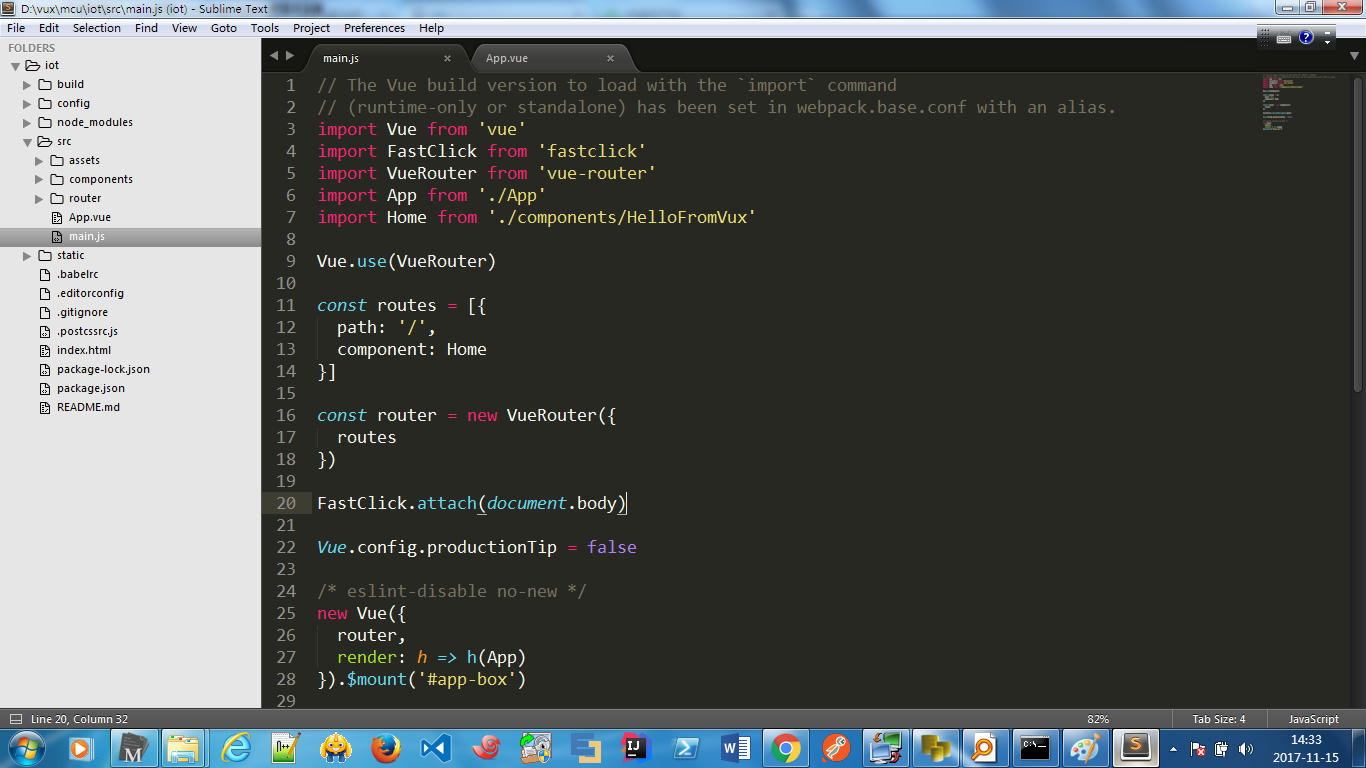
- 修改main.js
- 配色(他山之石,可以攻玉::))
https://www.iviewui.com/components/color
// The Vue build version to load with the `import` command// (runtime-only or standalone) has been set in webpack.base.conf with an alias.import Vue from 'vue'import FastClick from 'fastclick'import VueRouter from 'vue-router'import App from './App'import Home from './components/HelloFromVux'import { AjaxPlugin } from 'vux'Vue.use(AjaxPlugin)//this.$http.defaults.baseURL = '127.0.0.1:5000';Vue.use(VueRouter)const routes = [{path: '/',component: Home}]const router = new VueRouter({routes})FastClick.attach(document.body)Vue.config.productionTip = false/* eslint-disable no-new */new Vue({router,render: h => h(App)}).$mount('#app-box')
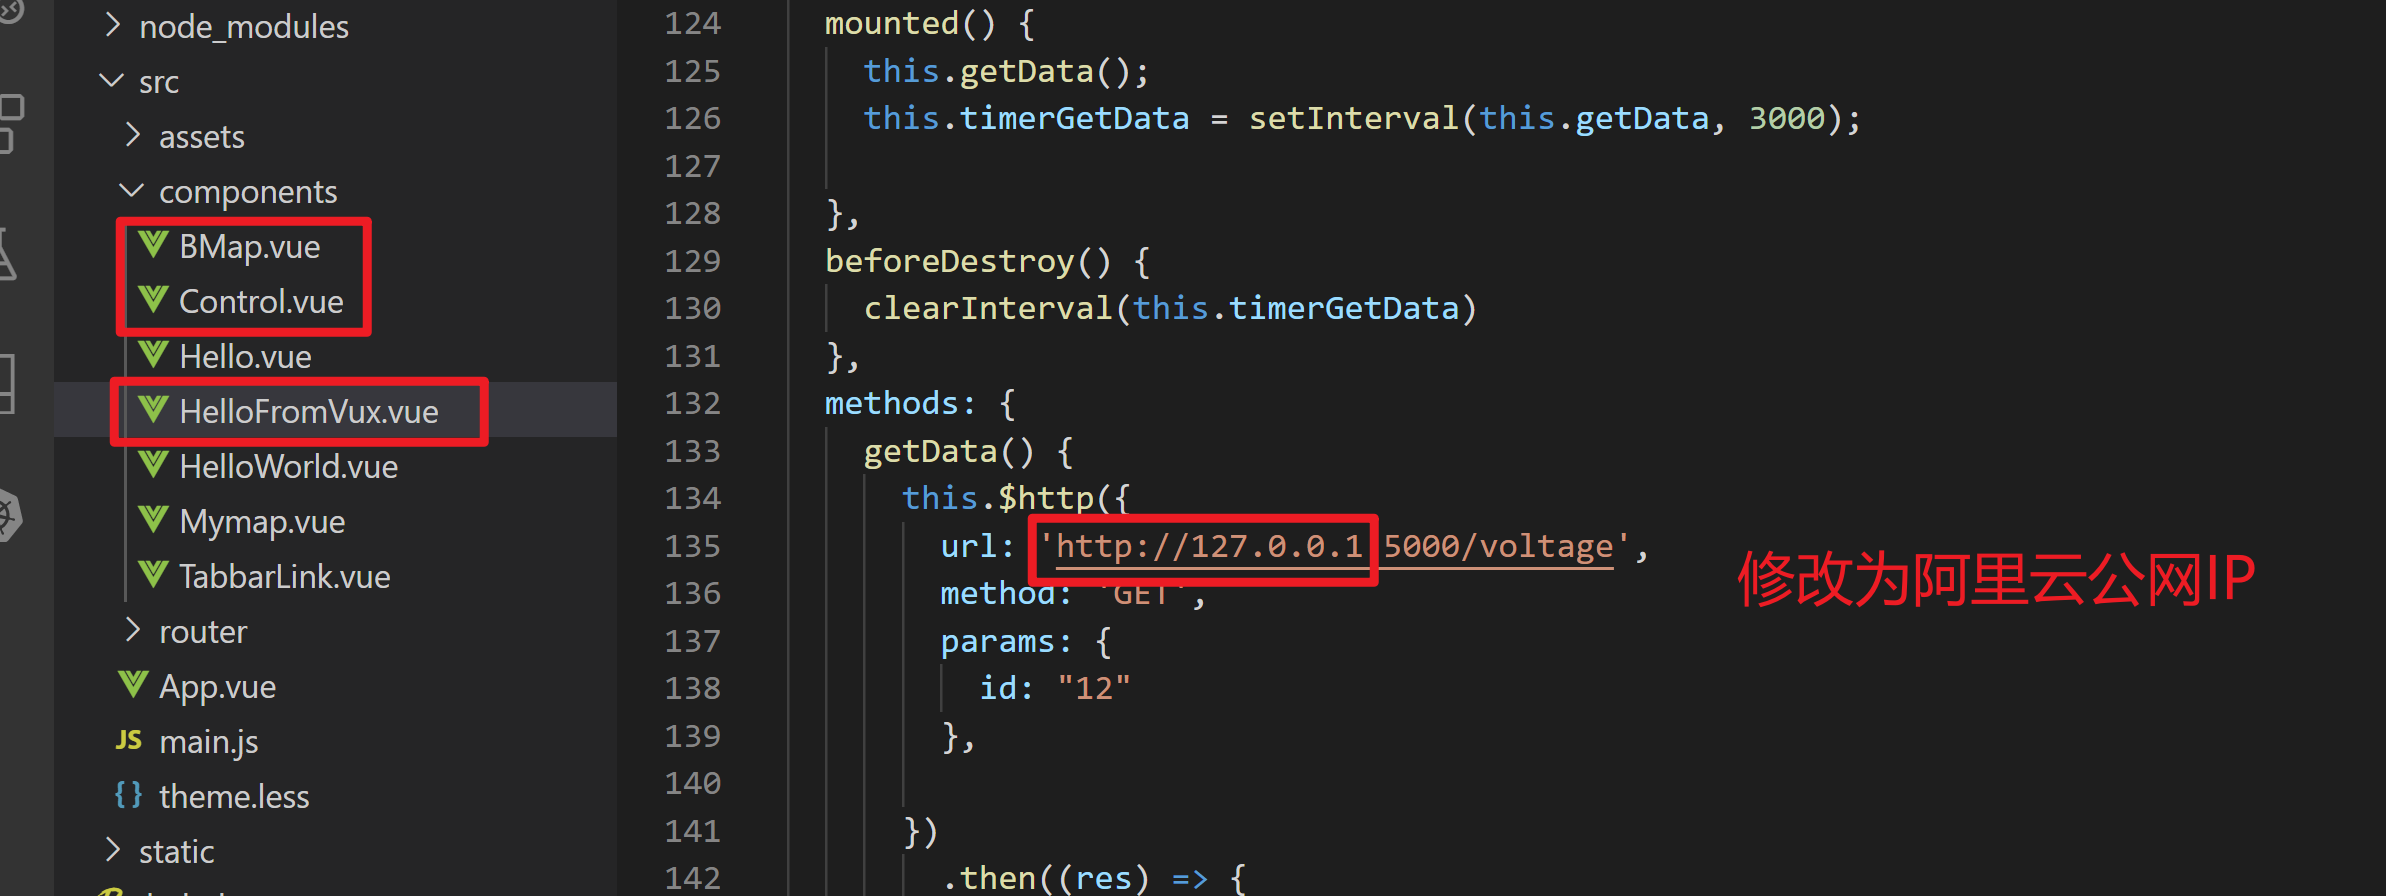
- 修改HelloFromVux.vue
<template><div><x-header class="header" :left-options="{showBack: false}">物联网应用系统</x-header><divider>实时数据</divider><grid><grid-item ><ul class="grid"><li<span class="grid-iot-icon" slot="icon" ></span></li><li class = "grid-text1">气温(℃)</li><li class = "grid-text2"> {{my_data.temperature}}</li></ul></grid-item><grid-item ><ul class="grid"><li<span class="grid-iot-icon" slot="icon" ></span></li><li class = "grid-text1">湿度(%)</li><li class = "grid-text2"> {{my_data.humidity}}</li></ul></grid-item><grid-item ><ul class="grid"><li<span class="grid-iot-icon" slot="icon" ></span></li><li class = "grid-text1">电压(V)</li><li class = "grid-text2"> {{my_data.voltage}}</li></ul></grid-item></grid></div></template><script>import { Group, Cell,Divider,XHeader,Flexbox,FlexboxItem,Grid, GridItem } from 'vux'export default {components: {Group,Cell,Divider,XHeader,Flexbox,FlexboxItem,Grid,GridItem},data () {return {// note: changing this line won't causes changes// with hot-reload because the reloaded component// preserves its current state and we are modifying// its initial state.msg: 'Hello World!',my_data:[],}},mounted() {this.getData();this.timerGetData = setInterval(this.getData, 3000);},beforeDestroy() {clearInterval(this.timerGetData)},methods: {getData() {this.$http({url: 'http://127.0.0.1:5000/voltage?id=12',method: 'GET',}).then((res) => {this.my_data = res.data;console.log('success ');}, (res) => {console.log('error ');});},}}</script><style>.vux-demo {text-align: center;}.logo {width: 100px;height: 100px}.grid-iot-icon {font-family: 'iot';font-size: 32px;color: @theme-color;text-align: center;}.grid-text1 {text-align: center;color: grey;list-style-type:none;font-size: 18px;}.grid-text2 {text-align: center;color: black;list-style-type:none;font-size: 22px;}.grid {font-size: 22px;text-align: center;background-color: white;list-style-type:none;}.header {background-color: @theme-color;}</style>
3.4.6 底部tabbar及百度地图的实现
3.4.6.1底部导航tabbar
- 在components目录下新建1个文件Tabbarlink.vue
- 要点
<template><div><tabbar style="position:fixed" slot="bottom"><tabbar-item link="/"><span class="iot-icon-title" slot="icon"></span><span class="iot-text-title" slot="label">首页</span></tabbar-item><tabbar-item link="/map"><span class="iot-icon-title" slot="icon"></span><span class="iot-text-title" slot="label">监控</span></tabbar-item><tabbar-item link="home"><span class="iot-icon-title1" slot="icon"></span><span class="iot-text-title" slot="label">查询</span></tabbar-item><tabbar-item ><span class="iot-icon-title" slot="icon"></span><span class="iot-text-title" slot="label">设置</span></tabbar-item></tabbar></div></template><script>import { Tabbar, TabbarItem } from 'vux'export default {ready () {document.querySelector('body').style.height = '100%'document.querySelector('html').style.height = '100%'document.querySelector('#app').style.height = '100%'},components: {Tabbar,TabbarItem}}</script><style lang="less">.iot-tabbar {position: fixed;}.iot-icon-title {font-family: 'iot';font-size: 32px;line-height: 30px;}.iot-icon-title1 {font-family: 'iot';font-size: 28px;line-height: 32px;}.iot-text-title {font-size: 14px;line-height: 28px;}</style>
3.4.6.2 百度地图
- components目录下新建mymap.vue
<template><div><div style="height: 10%; overflow: auto;"><h3>Simple map</h3>Marker is placed at {{ marker.lat }}, {{ marker.lng }}</div><v-map style="height: 90%" :zoom="zoom" :center="center"><v-tilelayer :url="url" :attribution="attribution"></v-tilelayer><v-marker :lat-lng="marker"></v-marker></v-map></div></template><script>import Vue2Leaflet from 'vue2-leaflet';export default {components: {'v-map': Vue2Leaflet.Map,'v-tilelayer' :Vue2Leaflet.TileLayer,'v-marker': Vue2Leaflet.Marker},data () {return {zoom:13,center: L.latLng(47.413220, -1.219482),url:'http://{s}.tile.osm.org/{z}/{x}/{y}.png',attribution:'© <a href="http://osm.org/copyright">OpenStreetMap</a> contributors',marker: L.latLng(47.413220, -1.219482),}}}</script>
- 修改main.js
// The Vue build version to load with the `import` command// (runtime-only or standalone) has been set in webpack.base.conf with an alias.import Vue from 'vue'import FastClick from 'fastclick'import VueRouter from 'vue-router'import App from './App'import Home from './components/HelloFromVux'import Hello from './components/Hello'import Map from './components/BMap'import BaiduMap from 'vue-baidu-map'Vue.use(BaiduMap, {// ak 是在百度地图开发者平台申请的密钥 详见 http://lbsyun.baidu.com/apiconsole/key */ak: 'YOUR_APP_KEY'})import { AjaxPlugin } from 'vux'Vue.use(AjaxPlugin)//this.$http.defaults.baseURL = '127.0.0.1:5000';Vue.use(VueRouter)const routes = [{path: '/',name: 'default',component: Home},{path: '/map',component: Map},{path: '*',redirect: { name: 'default' },}]const router = new VueRouter({hashbang: false,linkActiveClass: 'active',mode: 'history',base: __dirname,routes})FastClick.attach(document.body)/* eslint-disable no-new */new Vue({router,render: h => h(App)}).$mount('#app-box')
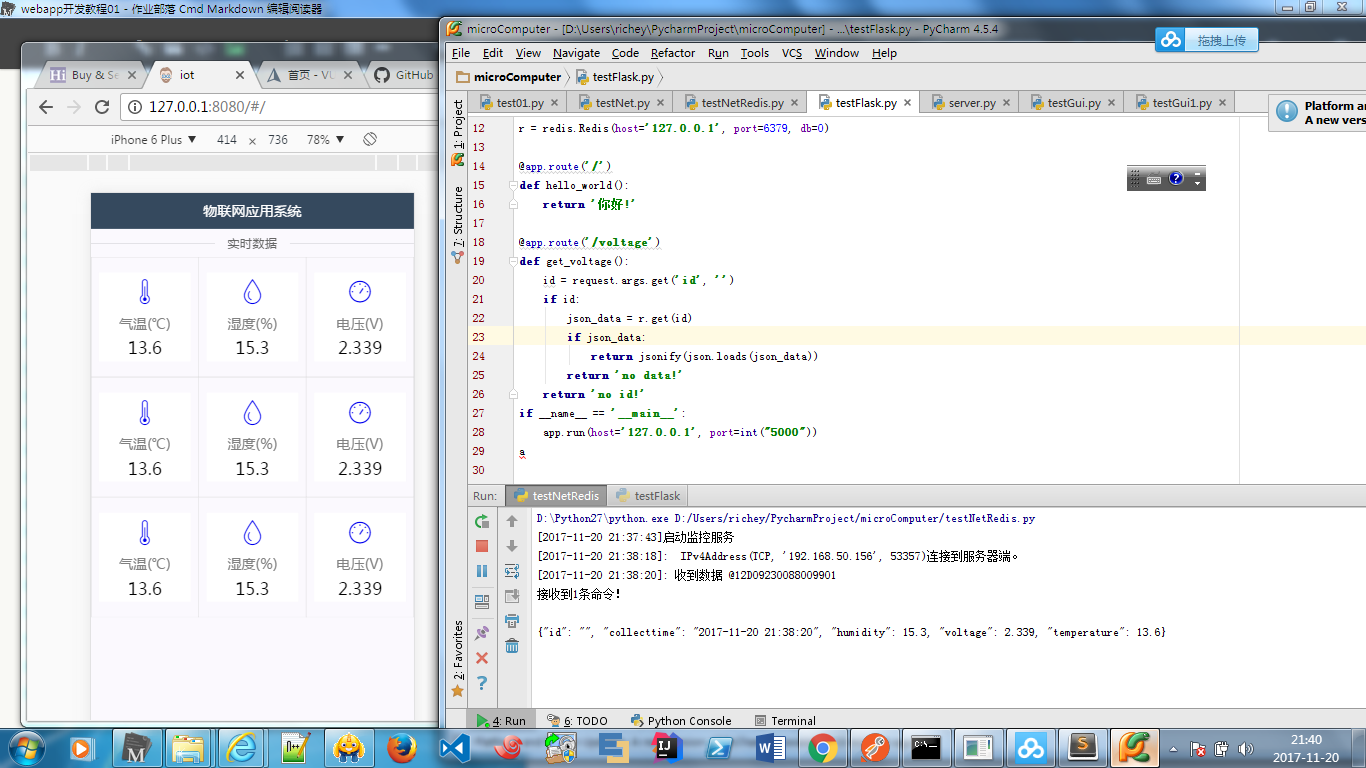
3.5 手机端反向控制单片机的设计与实现
3.5.1 复习如何从单片机读取数据?
- 单片机通过串口发送"@01DXXXXXXXXXXXX01\r\n"
- twisted进程做的工作
- twisted进程通过lineRecieved回调函数接收到数据
- twisted进程取出对应的数据->转为json格式
- twisted进程将数据存入redis数据库(set)
- flask进程做的工作
- 实现RESTful API的端点 '/volatage'
- flask进程将数据从redis数据库取出(get)
- 返回json格式数据(可以为手机、web客户端提供服务)
- webapp如何工作?
- 通过定时器定时调用getData()函数更新数据
- 界面在MVVM框架作用下自动更新
getData() {

this.$http({

url: 'http://192.168.0.120:5000/voltage',

method: 'GET',

params: {

  id: "12"

},
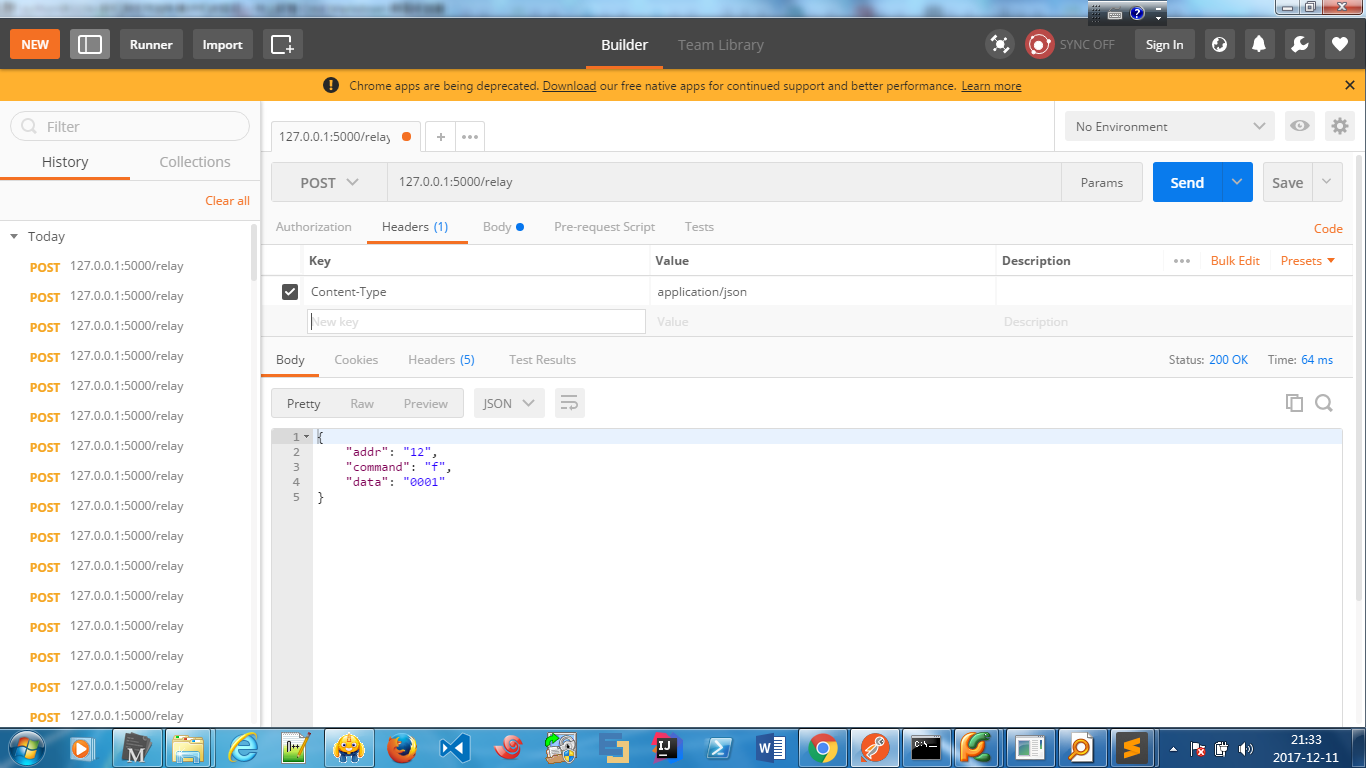
3.5.2 如何从手机反向控制单片机?
- 手机从RESTful API接口POST数据(json格式)
- flask进程接收到json数据
- flask进程将其存如redis数据库(lpush)
- twisted进程定时度redis数据库(rpop)
- twisted进程读到数据后,向单片机发送@XXXXXXXXX
3.5.3 flask进程
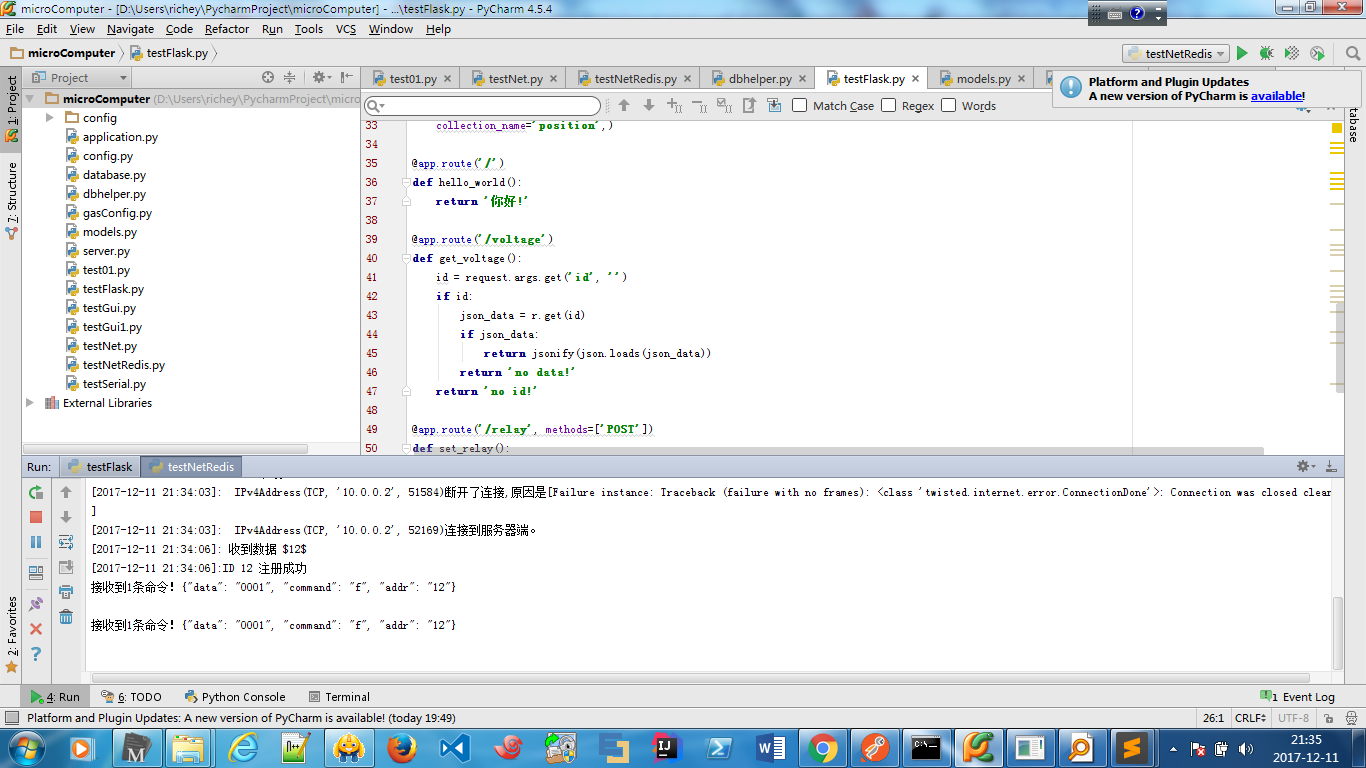
#testFlask.py# coding=utf-8from flask import render_template, request, redirectfrom flask import abort,jsonify,url_for,render_template, request, redirectfrom flask_cors import CORS, cross_originfrom flask_restless import APIManagerimport jsonimport redisfrom flask import Flaskimport datetimefrom flask_cors import CORSfrom flask_sqlalchemy import SQLAlchemyfrom database import dbfrom application import appfrom models import IotHistoryData,Positionr = redis.Redis(host='127.0.0.1', port=6379, db=0)apimanager = APIManager(app, flask_sqlalchemy_db=db)apimanager.create_api(IotHistoryData,methods=['GET'],# url_prefix='/api/v1',# preprocessors=dict(GET_SINGLE=[auth_func], GET_MANY=[auth_func]),results_per_page=100,url_prefix='',collection_name='history',)apimanager.create_api(Position,methods=['GET','PUT','PATCH','POST'],# url_prefix='/api/v1',# preprocessors=dict(GET_SINGLE=[auth_func], GET_MANY=[auth_func]),results_per_page=100,url_prefix='',include_columns = ['Id', 'latitude', 'longitude','collect_time'],collection_name='position',)@app.route('/')def hello_world():return '你好!'@app.route('/voltage')def get_voltage():id = request.args.get('id', '')if id:json_data = r.get(id)if json_data:return jsonify(json.loads(json_data))return 'no data!'return 'no id!'@app.route('/relay', methods=['POST'])def set_relay():json_data = request.get_data()py_data = json.loads(json_data)r.lpush('front_tcp', (json.dumps(py_data)).encode('utf-8'))return jsonify(py_data)if __name__ == '__main__':app.run(host='127.0.0.1', port=int("5000"))
3.5.4 twisted进程
#testNetRedis.py# coding=utf8import reimport timeimport jsonimport redisfrom datetime import datetimefrom twisted.internet import reactor, task, protocolfrom twisted.internet import defer, threadsfrom twisted.internet.protocol import Protocol, error, Factoryfrom twisted.protocols.basic import LineReceiverfrom dbhelper import insert_iot_recordr = redis.Redis(host='127.0.0.1',port=6379,db=0)def getCurrentStrTime():return time.strftime("%Y-%m-%d %H:%M:%S", time.localtime())class GasServerProtocol(LineReceiver):def __init__(self, factory):self.id = ''self.factory = factoryself.last_iot_time = datetime.now()self.fisrt_recv_flag = Truedef connectionMade(self):print("[%s]: %s连接到服务器端。" %(getCurrentStrTime(), self.transport.getPeer()))self.sendLine("$99'".encode('utf-8'))def connectionLost(self, reason):if self.id in self.factory.clients:del self.factory.clients[self.id]print("[%s]:ID %s 下线" % (getCurrentStrTime(), self.id))print("[%s]: %s断开了连接,原因是%s" %(getCurrentStrTime(),self.transport.getPeer(),reason))def insert_iot_record_cb(self, result):print(result)self.last_iot_time = datetime.now()self.fisrt_recv_flag = Falsedef lineReceived(self, data):data = data.decode('utf-8')tmpstr = ("[%s]: 收到数据 %s") % (getCurrentStrTime(), data)print(tmpstr)if(re.match("\$\d{2}\$", data)):self.id = str(data[1:3])dicttmp = {}dicttmp['handle'] = selfdicttmp['timestamp'] = time.time()self.factory.clients[self.id] = dicttmpprint("[%s]:ID %s 注册成功" % (getCurrentStrTime(), self.id))if(re.match('@\d{2}\D\w{12}\d{2}',data)):if(data[3] == 'D'):print(u'接收到1条命令!\r\n')volttmp = (int(data[4:8],16)/1000.0)temperature = (int(data[8:12],16)/10.0)humidity = (int(data[12:16],16)/10.0)dicttmp = {}dicttmp['collecttime'] = getCurrentStrTime()dicttmp['voltage'] = volttmpdicttmp['temperature'] = temperaturedicttmp['humidity'] = humiditydicttmp['id'] = self.idr.set(self.id, json.dumps(dicttmp))print(r.get(self.id))current_time = datetime.now()if((current_time - self.last_iot_time).seconds >= 5 * 60 or self.fisrt_recv_flag):insert_iot_record( r.get(self.id)).addCallback(self.insert_iot_record_cb)class GasServerFactory(Factory):def __init__(self):self.clients = {} # maps clients ids to GasServerProtocol instancesself._lc = task.LoopingCall(self.send_to_clients)self._lc.start(60,now=False)def buildProtocol(self, addr):return GasServerProtocol(self)def send_to_clients(self):for client_addr in self.clients :self.clients[client_addr]['handle'].sendLine('@12d000000'.encode('utf-8'))@defer.inlineCallbacksdef receive_from_mq(self):try:data = yield r.rpop('front_tcp')if data and data != '':print(u'接收到1条命令!%s\r\n' % (data))self.process_data_from_mq(data)except:passdef process_data_from_mq(self, data):loads_data = (json.loads(data))command = loads_data.get('command')addr = (loads_data.get('addr'))mydata = loads_data.get('data')send_data = '@%s%s%s01' % (addr,command,mydata)send_data = send_data.encode('utf-8')self.clients[addr]['handle'].sendLine(send_data)def startMoniter():print("[%s]启动监控服务" % getCurrentStrTime())cf = GasServerFactory()task_receive_data_from_mq = task.LoopingCall(cf.receive_from_mq)task_receive_data_from_mq.start(0.1, now=False)reactor.listenTCP(8234, cf)reactor.run()def stopMoniter():print("[%s]停止监控服务" % getCurrentStrTime())try:reactor.crash()except RuntimeError:return defer.fail()else:return defer.succeed(None)startMoniter()
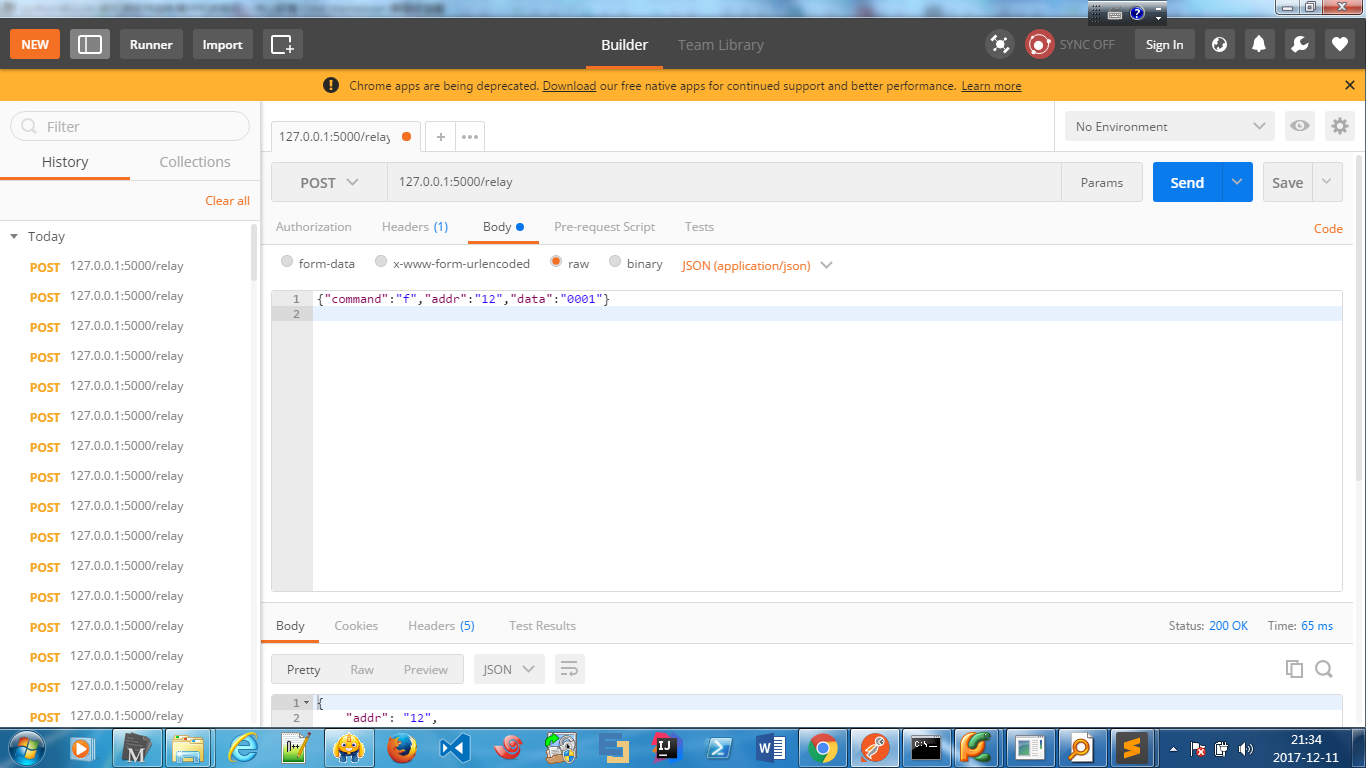
3.5.5调试界面
- postman(模拟手机端)
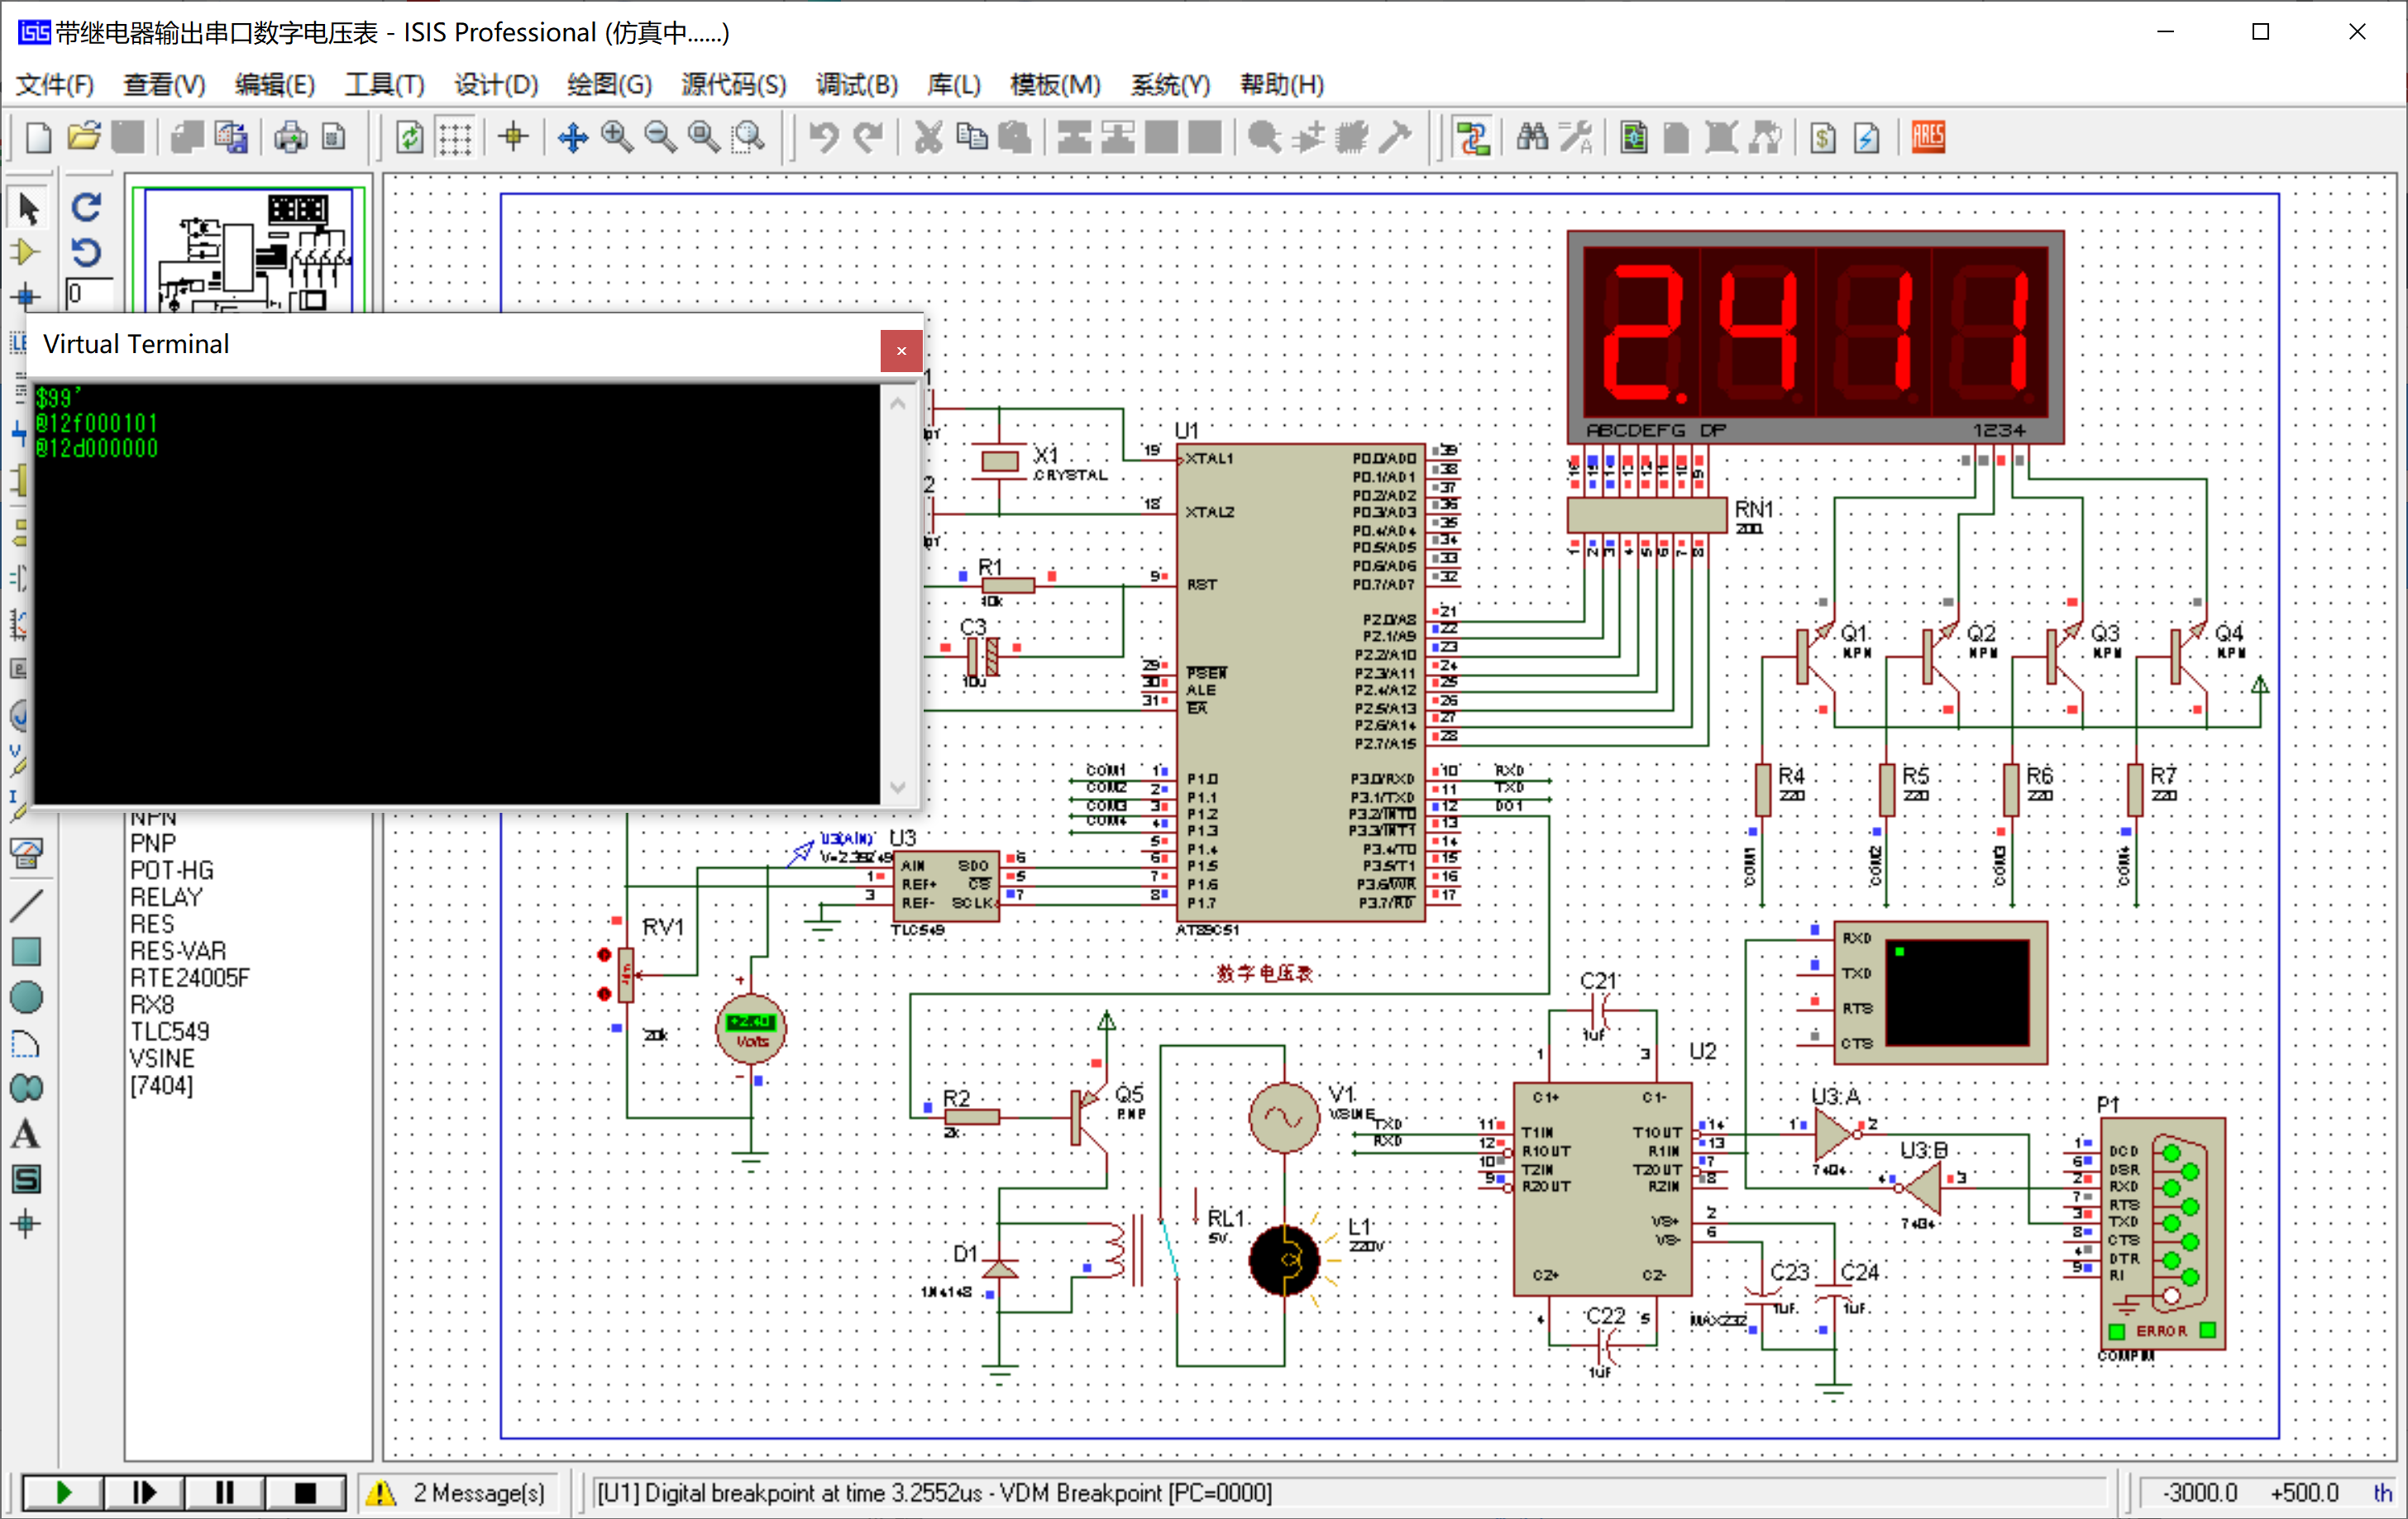
- 网络助手

- twisted进程
- 当出现“ModuleNotFoundError: No module named XX”怎么办?
一般是由于缺少依赖库导致的 ,pip install 库名 可以解决 - pyhton应用依赖的库汇总
- pip install flask
- pip install pyserial
- pip install mysqlclient
- pip install flask_restless
- pip install flask_cors
- pip install pypiwin32
- pip install twisted
- pip install redis
- pip install flask_sqlalchemy
3.
3.6 部署到阿里云服务器