@Yano
2016-03-23T06:36:59.000000Z
字数 3464
阅读 2759
JUnit Tutorial
Java
关于 JUnit 的两篇文章,搬运过来了:
http://www.programcreek.com/2012/02/junit-tutorial-eclipse/
http://www.programcreek.com/2012/02/junit-tutorial-2-annotations/
Introduction and Installation
JUnit is the defacto standard for unit testing.
JUnit is part of Eclipse Java Development Tools (JDT). So, we can either install JDT via Software Updates site, or download and install Eclipse IDE for Java Developers.
Using JUnit in Eclipse Environment
1. Create a project and create a class.
This should contains the method you want to test.
public class MyString {public static String capitalize(String str) {int strLen;if (str == null || (strLen = str.length()) == 0) {return str;}return new StringBuilder(strLen).append(Character.toTitleCase(str.charAt(0))).append(str.substring(1)).toString();}}
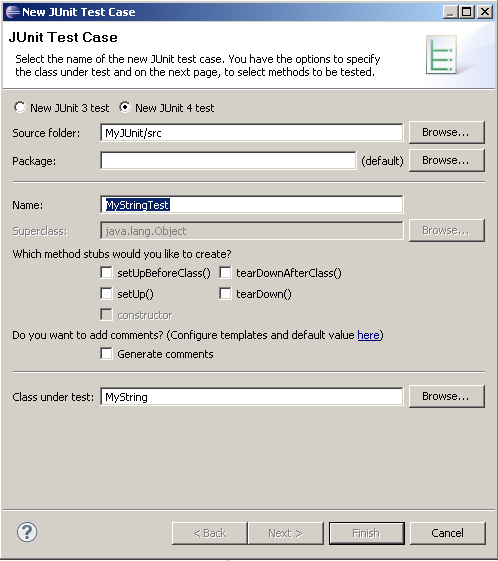
2. Create a test case by using JUnit Wizard.
Right Click the class -> new -> JUnit Test Case

Complete the steps.
Fill up the following code to the test case:
public class MyStringTest {@Testpublic void testMyStringCapitalize(){assertEquals(null, MyString.capitalize(null));//similarily we can use assertTrue()assertTrue(null == MyString.capitalize(null));assertEquals("capitalize(empty-string) failed", "", MyString.capitalize("") );}}
- The annotation @Test identifies that a method is a test method which will be executed when it is run as a JUnit Test automatically.
- assertEquals method records information when the parameters are not equal
- assertTrue method records information when parameter is false
3. Run the test case as JUnit Test

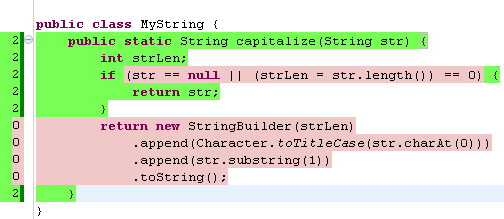
4. Use code coverage tool to check if all statements/branches are covered in your test case(s).
For example, Clover, Emma.

We can easily see that some part of the method is not covered, which means test case is not good enough.
You may ask questions like: How to skip a test case in Junit? How to timeout a test? etc. Annotations can make those very simple to implement, without even writing any complex code for configuration.
@Test
This marks a method to be a test method. A test class can have MULTIPLE test methods.
@Before and @After
Will execute the method before/after each test. This method can prepare/clean up the test environment (e.g. read input data, initialize the class, delete temporary data, etc). As a class can have multiple test methods, @Before and @After methods will be executed before and after each test. This is different with @BeforeClass and @AfterClass.
@Beforepublic void setUp() throws Exception {//setup something}@Afterpublic void tearDown() throws Exception {//tear down something}
@BeforeClass and @AfterClass
@BeforeClass executes before the start of tests. This can be used to perform time intensive activities, e.g., connect to a database. @AfterClass executes after all tests have finished. This can be used to perform clean-up activities, e.g., disconnect from a database. Those two only run one time no matter how many test the class has. Also you have to declare “@BeforeClass” and“@AfterClass” method as static method. The two annotations should be used do some static initialization code and destroy static variables.
@BeforeClasspublic static void runBeforeClass() {// run before all test cases}@AfterClasspublic static void runAfterClass() {// run after all test cases}
@Ignore
Will ignore the test method. This is useful when the underlying code has been changed and the test case has not yet been adapted. Or if the execution time of this test is too long to be included.
@Ignore("ignored method")@Testpublic void someTestMethod() {System.out.println("Method is ignored");}
@Test (expected = Exception.class)
If a test case expects some exception, use this annotation. It fails, if the method does not throw the named exception.
@Test(expected = ArithmeticException.class)public void divisionWithException() {int i = 1/0;}
@Test(timeout=100)
If you want to time out a test, use timeout annotation. It will fail, if the method takes longer than 100 milliseconds.
@Test(timeout = 100)public void timeoutMethod() {while (true);}
