@qidiandasheng
2021-01-11T14:28:57.000000Z
字数 19782
阅读 2182
设计模式(五):行为型模式之观察者、模板、策略、责任链(😁)
架构
四种行为型模式
介绍
行为型模式为设计模式的一种类型,用来识别对象之间的常用交流模式并加以实现。如此可在进行这些交流活动时增强弹性。
- 观察者模式: 允许你定义一种订阅机制,可在对象事件发生时通知多个 “观察” 该对象的其他对象
- 模板方法模式:它在超类中定义了一个算法的框架,允许子类在不修改结构的情况下重写算法的特定步骤
- 策略模式: 它能让你定义一系列算法, 并将每种算法分别放入独立的类中, 以使算法的对象能够相互替换
- 责任链模式:允许你将请求沿着处理者链进行发送。 收到请求后, 每个处理者均可对请求进行处理, 或将其传递给链上的下个处理者
后三种模式具有相同的作用:复用和扩展,在实际的项目开发中比较常用,特别是框架开发中,我们可以利用它们来提供框架的扩展点,能够让框架的使用者在不修改框架源码的情况下,基于扩展点定制化框架的功能。
工厂模式和策略模式的区别
工厂模式是解耦对象的创建和使用,策略模式解耦的是策略的定义、创建、使用这三部分。实际上策略模式也会用到简单工厂来创建不同的策略对象。
❤观察者模式
定义
观察者模式(Observer Pattern):定义对象间的一种一对多的依赖关系,使得每当一个对象状态发生改变时,其相关依赖对象都可以到通知并做相应针对性的处理。
适用场景
凡是涉及到一对一或者一对多的对象交互场景都可以使用观察者模式。通常我们使用观察者模式实现一个对象的改变会令其他一个或多个对象发生改变的需求,比如换肤功能,监听列表滚动的偏移量等等。
成员与类图
成员
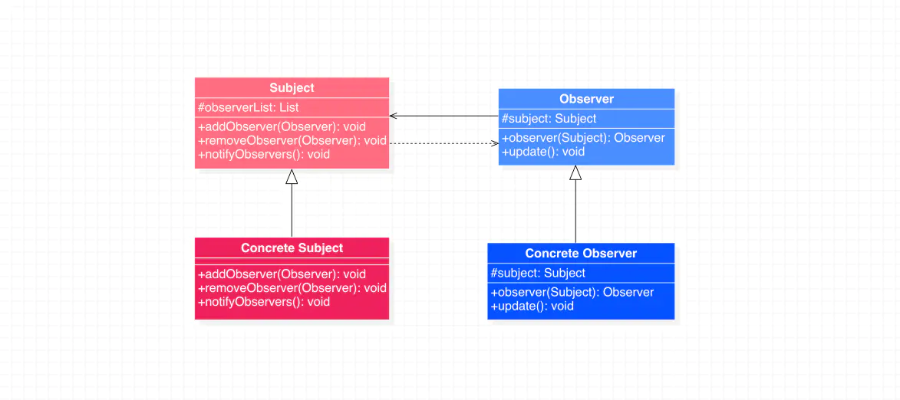
观察者模式有四个成员:
- 目标(Subject):目标是被观察的角色,声明添加和删除观察者以及通知观察者的接口。
- 具体目标(Concrete Subject):具体目标实现目标类声明的接口,保存所有观察者的实例(通过集合的形式)。在被观察的状态发生变化时,给所有登记过的观察者发送通知。
- 观察者(Observer):观察者定义具体观察者的更新接口,以便在收到通知时实现一些操作。
- 具体观察者(Concrete Observer):具体观察者实现抽象观察者定义的更新接口。
模式类图
代码示例
场景概述
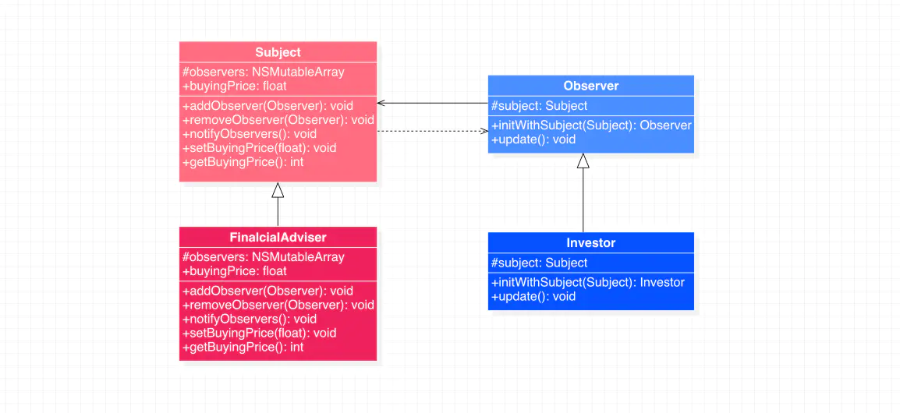
模拟这样的一个场景:客户(投资者)订阅理财顾问的建议购买不同价格的股票。当价格信息变化时,所有客户会收到通知(可以使短信,邮件等等),随后客户查看最新数据并进行操作。
一个理财顾问可能服务于多个客户,而且消息需要及时传达到各个客户那边;而客户接收到这些消息后,需要对这些消息做出相应的措施。这种一对多的通知场景我们可以使用观察者模式:理财顾问是被观察的目标(Subject),而TA的客户则是观察者(Observer)。
代码实现
首先我们定义观察者Observer:
//================== Observer.h ==================@interface Observer : NSObject{@protected Subject *_subject;}- (instancetype)initWithSubject:(Subject *)subject;- (void)update;@end//================== Observer.m ==================@implementation Observer- (instancetype)initWithSubject:(Subject *)subject{self = [super init];if (self) {_subject = subject;[_subject addObserver:self];}return self;}- (void)update{NSLog(@"implementation by subclasses");}
Observer类是具体观察者的父类,它声明了一个传入目标类(Subject)的构造方法并在构造方法里持有这个传入的实例。而且在这个构造方法里,调用了Subject的‘添加观察者’的方法,即addObserver:,目的是将当前的观察者实例放入Subject的用来保存观察者实例的集合中(具体操作可以在下面讲解Subject类的部分看到)
另外它也定义了update方法供子类使用。
下面我们看一下具体观察者类Investor:
//================== Investor.h ==================@interface Investor : Observer@end//================== Investor.m ==================@implementation Investor- (void)update{float buyingPrice = [_subject getBuyingPrice];NSLog(@"investor %p buy stock of price:%.2lf",self,buyingPrice);}@end
具体观察者实现了该协议中定义的方法update方法,在这个方法里面,首先通过getBuyingPrice方法获得到最新的在监听的数据buyingPrice,然后再做其他操作。这里为了方便展示,直接使用日至打印出当前的具体观察者实例的内存地址和当前监听的最新值。
下面我们声明一下目标类和具体目标类:
目标类Subject
//================== Subject.h ==================@interface Subject : NSObject{@protected float _buyingPrice;@protected NSMutableArray <Observer *>*_observers;}- (void)addObserver:(Observer *) observer;- (void)removeObserver:(Observer *) observer;- (void)notifyObservers;- (void)setBuyingPrice:(float)price;- (double)getBuyingPrice;@end//================== Subject.m ==================@implementation Subject- (instancetype)init{self = [super init];if (self) {_observers = [NSMutableArray array];}return self;}- (void)addObserver:( Observer * ) observer{[_observers addObject:observer];}- (void)removeObserver:( Observer *) observer{[_observers removeObject:observer];}- (void)notifyObservers{[_observers enumerateObjectsUsingBlock:^(Observer * _Nonnull observer, NSUInteger idx, BOOL * _Nonnull stop) {[observer update];}];}- (void)setBuyingPrice:(float)price{_buyingPrice = price;[self notifyObservers];}- (double)getBuyingPrice{return _buyingPrice;}@end
目标类持有一个可变数组,用来保存观察自己的观察者们;并且还提供了增加,删除观察者的接口,也提供了通知所有观察者的接口。
而且它持有一个数据buyingPrice,这个数据就是让外部观察者观察的数据。尤其注意它向外界提供的setBuyingPrice:方法:当外部调用这个方法,也就是要更新buyingPrice这个数据时,目标类调用了notifyObservers方法来告知当前所有观察自己的观察者们:我更新了。
而getBuyingPrice就是用来返回当前的buyingPrice的值的,一般是在观察者们收到更新通知后,主动调动这个方法获取的(具体看上面Investor类的实现)。
OK,现在抽象目标类定义好了,下面我们看一下具体目标类FinancialAdviser:
//================== FinancialAdviser.h ==================@interface FinancialAdviser : Subject@end//================== FinancialAdviser.m ==================@implementation FinancialAdviser@end
因为所有的接口的事先已经在Subject类定义好了,所以我们只需新建一个我们需要的子类即可(如果有不同于父类的操作的话还是可以按照自己的方式定义)。
下面我们看一下观察者的机制是如何实现的:
FinancialAdviser *fa = [[FinancialAdviser alloc] init];Investor *iv1 = [[Investor alloc] initWithSubject:fa];NSLog(@"====== first advice ========");[fa setBuyingPrice:1.3];Investor *iv2 = [[Investor alloc] initWithSubject:fa];Investor *iv3 = [[Investor alloc] initWithSubject:fa];NSLog(@"====== second advice ========");[fa setBuyingPrice:2.6];
从代码中可以看到,我们最开始向FinancialAdviser(具体目标类)添加了一个具体观察者类的实例iv1,然后FinancialAdviser的实例fa便通知了所有观察者(此时的观察者只有iv1)。
后面我们继续向fa添加了iv2和iv3后发送通知。此时三个观察者都收到了消息。
在下面的日至输出中也可以看到,内存地址0x600003094c00就是iv1,0x600003083680和0x600003083690就是iv2和iv3。
====== first advice ========investor 0x600003094c00 buy stock of price:1.30====== second advice ========investor 0x600003094c00 buy stock of price:2.60investor 0x600003083680 buy stock of price:2.60investor 0x600003083690 buy stock of price:2.60
代码对应的类图
优点
- 观察者模式在观察目标和观察者之间建立了一个抽象的耦合。
- 可实现广播的,一对多的通信
缺点
- 如果一个观察目标对象有很多直接和间接的观察者的话,会需要比较多的通信时间。
- 需要注意观察者和观察目标之间是否有循环引用。
iOS SDK中的应用
- 在 iOS SDK 中的 KVO 与 NSNotification 是观察者模式的应用。
❤模板方法模式
定义
在模板模式(Template Method Pattern)中,定义一个操作中的算法的框架,而将一些步骤的执行延迟到子类中,使得子类可以在不改变算法的结构的前提下即可重新定义该算法的某些特定步骤。
适用场景
通常一个算法需要几个执行步骤来实现,而有时我们需要定义几种执行步骤一致,但是却可能在某个步骤的实现略有差异的算法。也就是说我们既需要复用实现相同的步骤,也可以通过在某个步骤的不同实现来灵活扩展出更多不同的算法。
在这种场景下,我们可以使用模板方法模式:定义好一个算法的框架,在父类实现可以复用的算法步骤,而将需要扩展和修改其他步骤的任务推迟给子类进行。
成员与类图
成员
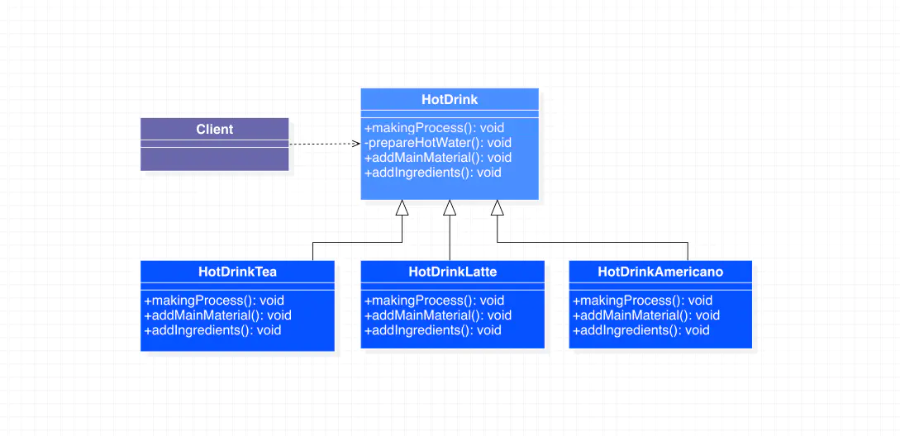
模板方法模式的成员除了客户端以外,只有两个成员:
- 算法类(Algorithm):算法类负责声明算法接口,算法步骤接口。并实现可复用的算法步骤接口,且将需要子类实现的接口暴露出来。
- 具体算法类(Concrete Algorithm):具体算法类负责实现算法类声明的算法步骤接口。
模式类图

由上图可以看出,
Algorithm的excute方法是算法接口,它在内部调用了三个步骤方法:step1,step2,step3。而step2是未暴露在外部的,因为这个步骤是需要各个子类复用的。因此Algorithm只将step1和step3暴露了出来以供子类来调用。
代码示例
场景概述
模拟一个制作两种热饮的场景:热拿铁,热茶。
这三种热饮的制作步骤是一致的,都是三个步骤:
- 步骤一:准备热水
- 步骤二:加入主成分
- 步骤三:加入辅助成分(也可以不加,看具体热饮的种类)
虽然制作步骤是一致的,但是不同种类的热饮在每一步可能是不同的:咖啡和茶叶主成分是咖啡粉和茶叶;而辅助成分:茶叶可以不添加,而拿铁还需添加牛奶。
而第一步是相同的:准备热水。
根据上面对模板方法模式的介绍,像这样算法步骤相同,算法步骤里的实现可能相同或不同的场景我们可以使用模板方法模式。下面我们看一下如何用代码来模拟该场景。
代码实现
算法类(也就是模板):
因为热饮的第一步都是一致的(准备热水),所以第一步骤的接口没有暴露出来给子类实现,而是直接在当前类实现了,这也就是模板方法的一个可以复用代码的优点
//================== HotDrink.h ==================@interface HotDrink : NSObject//暴露了制作过程,这个接口内部调用了热饮的所有制作步骤方法- (void)makingProcess;//需要子类按照自己方式实现添加主成分- (void)addMainMaterial;//需要子类按照自己方式实现添加辅助成分- (void)addIngredients;@end//================== HotDrink.m ==================@implementation HotDrink- (void)makingProcess{NSLog(@" ===== Begin to making %@ ===== ", NSStringFromClass([self class]));[self boilWater];[self addMainMaterial];[self addIngredients];}- (void)prepareHotWater{NSLog(@"prepare hot water");}- (void)addMainMaterial{NSLog(@"implemetation by subClasses");}- (void)addIngredients{NSLog(@"implemetation by subClasses");}- (void)makingProcess{//准备热水[self prepareHotWater];//添加主成分[self addMainMaterial];//添加辅助成分[self addIngredients];}@end
热茶:
因为热饮的第一步都是一致的(准备热水),所以第一步骤的接口没有暴露出来给子类实现,而是直接在当前类实现了,这也就是模板方法的一个可以复用代码的优点
//================== HotDrinkTea.h ==================@interface HotDrinkTea : HotDrink@end//================== HotDrinkTea.m ==================@implementation HotDrinkTea- (void)addMainMaterial{NSLog(@"add tea leaf");}- (void)addIngredients{NSLog(@"add nothing");}@end
热拿铁:
//================== HotDrinkLatte.h ==================@interface HotDrinkLatte : HotDrink@end//================== HotDrinkLatte.m ==================@implementation HotDrinkLatte- (void)addMainMaterial{NSLog(@"add ground coffee");}- (void)addIngredients{NSLog(@"add milk");}@end
主程序调用并输出:
===== Begin to making HotDrinkTea =====prepare hot wateradd tea leafadd nothing===== Begin to making HotDrinkLatte =====prepare hot wateradd ground coffeeadd milk
上面的日至输出准确无误地反映了我们所定义的这两种热饮制作过程:
- 热茶:准备热水 + 茶叶
- 热拿铁:准备热水 + 咖啡 + 牛奶
代码对应的类图
优点
- 复用性高:将相同的代码放在父类中,而不同的部分则由子类实现
- 扩展性高:可以通过创建不同的子类来扩展不同的算法
- 符合开闭原则:可变与不可变的部分分离,而且不同的可变部分(子类)也是相互分离的,所以符合了开闭原则
缺点
- 导致类的个数增加:对于每一个算法实现都需要一个子类,如果实现过多的话会导致类的个数增加
- 由继承关系导致的缺点:如果父类需要增加或减少它的行为,则所有的子类都需要同步修改一次
iOS SDK中的应用
- 在 iOS SDK 中,我们可以重写
UIView的drawRect:方法可以自定义绘图,是模板方法模式的一种实践。
❤策略模式
定义
策略模式(Strategy Pattern):定义一系列算法,将每一个算法封装起来,并让它们可以相互替换。
适用场景
有时候在实现某一个功能的时可能会有多个方案:我们需要让系统可以动态灵活地更换方案;而且也能够让开发者方便地增加新的方案或删除旧的方案。
如果我们将所有的方案硬编码在同一个类中,那么在今后修改,添加,删除某个方案的时候就会改动原有类,这是违反开闭原则的。
其实我们可以定义一些独立的类来封装不同的解决方案,每一个类封装一个具体的方案,这些不同的方案就是我们所说的策略。而且我们可以用一个抽象的策略类来保证这些策略的一致性,这就是策略模式的设计方案。
成员与类图
成员
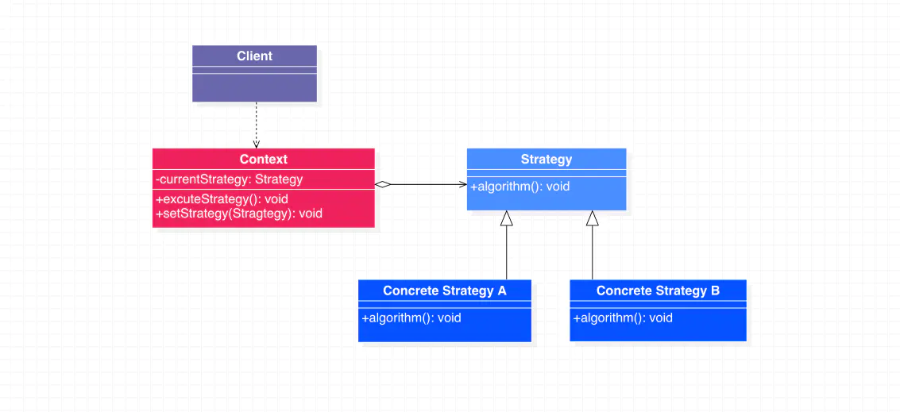
策略模式除了客户端之外共有三个成员:
环境类(Context):环境类内部持有一个具体策略类的实例,这个实例就是当前的策略,可以供客户端使用
其实环境类可以使用工厂类,由外部传入策略类型,工厂类根据类型创建具体策略类,客户端拿到具体策略类执行抽象策略类定义的方法即可
抽象策略类(Strategy):抽象策略类声明具体策略类需要实现的接口,这个接口同时也是提供给客户端调用的接口
- 具体策略类(Concrete Strategy):具体策略类实现抽象策略类声明的接口,每个具体策略类都有自己独有的实现方式,即代表不同策略
模式类图
代码示例
场景概述
模拟一个两个整数可以随意替换加减乘除算法的场景。
在该场景中,传入的两个整数参数是不变的,但是对于这两个整数的具体操作可以灵活切换,那么我们可以使用策略模式:将每个操作(算法)封装起来,在需要替换的时候将Context类持有的具体策略实例更新即可。
代码实现
首先我们定义好抽象策略类和具体策略类:
因为是针对两个整数的操作,所以在抽象策略类中,我们只需定义一个传入两个整数的接口即可。
抽象策略类:
//================== TwoIntOperation.h ==================@interface TwoIntOperation : NSObject- (int)operationOfInt1:(int)int1 int2:(int)int2;@end//================== TwoIntOperation.m ==================@implementation TwoIntOperation- (int)operationOfInt1:(int)int1 int2:(int)int2{//implenting by sub classes;return 0;}@end
接着我们根据加减乘除四种运算,来分别定义四个具体策略类:
//================== 加法策略类==================@interface TwoIntOperationAdd : TwoIntOperation@end@implementation TwoIntOperationAdd- (int)operationOfInt1:(int)int1 int2:(int)int2{NSLog(@"==== adding ====");return int1 + int2;}@end//================== 减法策略类 ==================@interface TwoIntOperationSubstract : TwoIntOperation@end@implementation TwoIntOperationSubstract- (int)operationOfInt1:(int)int1 int2:(int)int2{NSLog(@"==== Substract ====");return int1 - int2;}@end//================== 乘法策略类 ==================@interface TwoIntOperationMultiply : TwoIntOperation@end@implementation TwoIntOperationMultiply- (int)operationOfInt1:(int)int1 int2:(int)int2{NSLog(@"==== multiply ====");return int1 * int2;}@end//================== 除法策略类 ==================@interface TwoIntOperationDivision : TwoIntOperation@end@implementation TwoIntOperationDivision- (int)operationOfInt1:(int)int1 int2:(int)int2{NSLog(@"==== division ====");return int1/int2;}@end
环境类:
//================== Context.h ==================@interface Context : NSObject- (instancetype)initWithOperation: (TwoIntOperation *)operation;- (void)setOperation:(TwoIntOperation *)operation;- (int)excuteOperationOfInt1:(int)int1 int2:(int)int2;@end//================== Context.m ==================@implementation Context{TwoIntOperation *_operation;}- (instancetype)initWithOperation: (TwoIntOperation *)operation{self = [super init];if (self) {//injection from instane initialization_operation = operation;}return self;}- (void)setOperation:(TwoIntOperation *)operation{//injection from setting method_operation = operation;}- (int)excuteOperationOfInt1:(int)int1 int2:(int)int2{//return value by constract strategy instanereturn [_operation operationOfInt1:int1 int2:int2];}@end
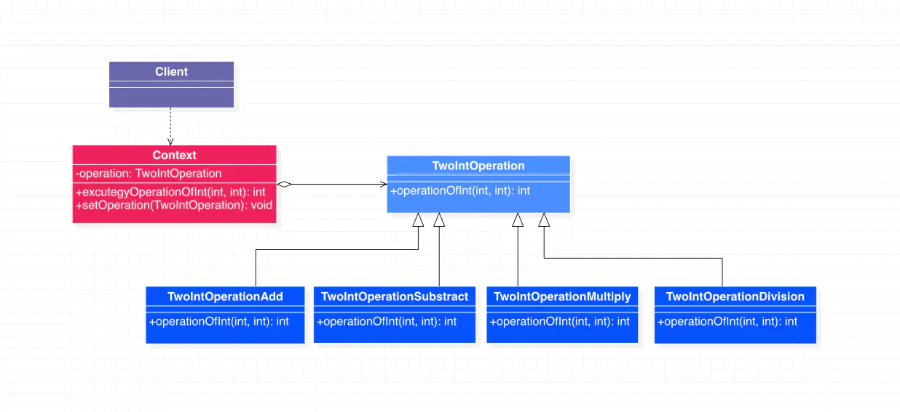
Context类在构造器(init方法)注入了一个具体策略实例并持有它,而且Context也提供了set方法,让外部注入进来具体策略类的实例。
而策略的具体执行是通过Context的接口excuteOperationOfInt1:int2。这个接口是提供给客户端调用的;而且在它的内部其实调用的是当前持有的策略实例的执行策略的方法。
所以如果想使用哪种策略,只要将具体策略的实例传入到Context实例即可。
客户端使用:
int int1 = 6;int int2 = 3;NSLog(@"int1: %d int2: %d",int1,int2);//Firstly, using add operationTwoIntOperationAdd *addOperation = [[TwoIntOperationAdd alloc] init];Context *ct = [[Context alloc] initWithOperation:addOperation];int res1 = [ct excuteOperationOfInt1:int1 int2:int2];NSLog(@"result of adding : %d",res1);//Changing to multiple operationTwoIntOperationMultiply *multiplyOperation = [[TwoIntOperationMultiply alloc] init];[ct setOperation:multiplyOperation];int res2 = [ct excuteOperationOfInt1:int1 int2:int2];NSLog(@"result of multiplying : %d",res2);//Changing to substraction operationTwoIntOperationSubstract *subOperation = [[TwoIntOperationSubstract alloc] init];[ct setOperation:subOperation];int res3 = [ct excuteOperationOfInt1:int1 int2:int2];NSLog(@"result of substracting : %d",res3);//Changing to division operationTwoIntOperationDivision *divisionOperation = [[TwoIntOperationDivision alloc] init];[ct setOperation:divisionOperation];int res4 = [ct excuteOperationOfInt1:int1 int2:int2];NSLog(@"result of dividing : %d",res4);
看一下日至输出:
[13431:1238320] int1: 6 int2: 3[13431:1238320] ==== adding ====[13431:1238320] result of adding : 9[13431:1238320] ==== multiply ====[13431:1238320] result of multiplying : 18[13431:1238320] ==== Substract ====[13431:1238320] result of substracting : 3[13431:1238320] ==== division ====[13431:1238320] result dividing : 2
在上面的例子中,首先我们要使用加法,所以 实例化了加法策略类并传入到了Context类的构造器中。
而后续的乘法,减法,除法的更换,则是分别将它们的策略实例传入到了Context的set方法中,并执行即可。
代码对应的类图
优点
- 策略模式遵循开闭原则,用户可以在不修改原有系统的前提下选择和更换算法
- 避免使用多重条件判断
- 可以灵活地增加新的算法或行为
- 提高算法和策略的安全性:可以封装策略的具体实现,调用者只需要知道不同策略之间的区别就可以
缺点
- 客户端必须知道当前所有的具体策略类,而且需要自行决定使用哪一个策略类
- 如果可选的方案过多,会导致策略类数量激增。
❤责任链模式
定义
责任链模式(Chain of Responsibility Pattern):为请求创建了一个接收者对象的链,每个接收者都包含对另一个接收者的引用。如果一个对象不能处理该请求,那么它会把相同的请求传给下一个接收者,依此类推。
适用场景
- 当程序需要使用不同方式处理不同种类请求,而且请求类型和顺序预先未知时,可以使用责任链模式。
- 当必须按顺序执行多个处理者时, 可以使用该模式。
- 如果所需处理者及其顺序必须在运行时进行改变, 可以使用责任链模式。
成员与类图
成员
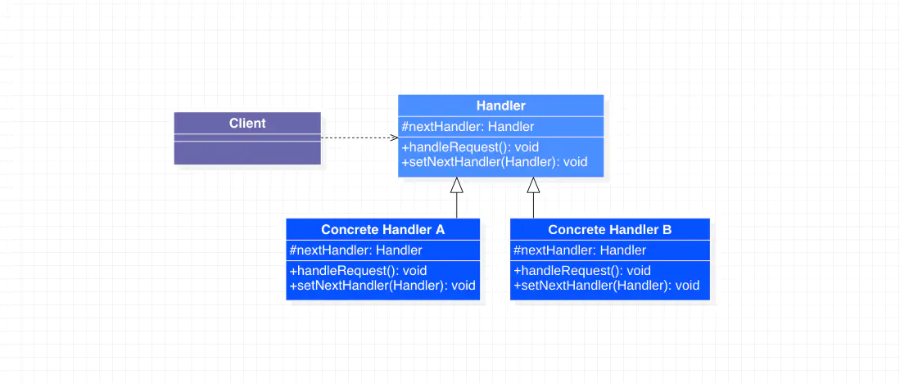
责任链模式的结构比较简单,不包括客户端只有两个成员:
- 处理者(Handler):定义处理请求的接口
- 具体处理者(Concrete Handler): 实现处理者声明的接口,负责处理请求
模式类图
代码示例
场景概述
模拟一个 ATM 取现金的场景:ATM机器有50,20,10面值的纸币,根据用户需要提取的现金金额来输出纸币张数最少的等价金额的纸币。
比如用户需要取130元,则ATM需要输出2张50面额的纸币,1张20面额的纸币,1张10面额的纸币;而不是6张20面额的纸币加1张10面额的纸币。
场景分析
显然,为了输出最少张数的纸币,ATM在计算的时候是从面额最大的纸币开始计算的。
如果不使用责任链模式,我们可能会写一个do-while循环,在循环里面再根据纸币的面额在做if-else判断,不断去尝试直到将面额除尽(没有余数)。但是如果未来面额的数值发生变化,或者添加新的面额的纸币的话,我们还需要更改判断条件或增加if-else语句,这显然违反了开闭原则。
但是如果使用责任链模式,我们将每个面值的纸币当做责任链中的一个处理者(节点,node),自成一类,单独做处理。然后将这些处理者按照顺序连接起来(50,20,10),按照顺序对用户输入的数值进行处理即可。
这样做的好处是,如果以后修改面值或添加一种新的面值,我们只需要修改其中某一个处理者或者新建一个处理者类,再重新插入到责任链的合适的位置即可。
代码实现
初始代码
首先创建抽象处理者DispenseChainNode:
//================== DispenseChainNode.h ==================@interface DispenseChainNode : NSObject <DispenseProtocol>{@protected DispenseChainNode *_nextChainUnit;}- (void)setNextChainUnit:(DispenseChainNode *)chainUnit;@end//================== DispenseChainNode.m ==================@implementation DispenseChainNode- (void)setNextChainNode:(DispenseChainNode *)chainNode{_nextChainNode = chainNode;}- (void)dispense:(int)amount{return;}@end
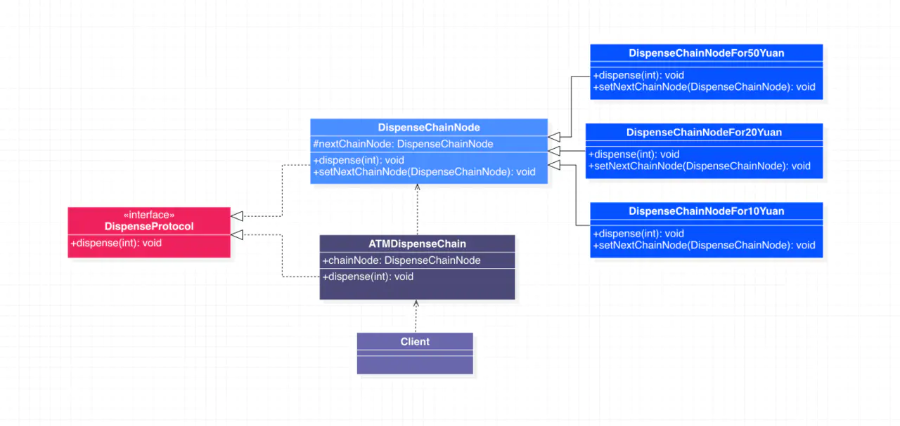
DispenseChainNode是责任链节点,也就是具体处理者的父类,它持有DispenseChainNode的实例,用来保存当前节点的下一个节点。这个下一个节点的实例是通过setNextChainNode:方法注入进来的
而且,DispenseChainNode遵循<DispenseProtocol>协议,这个协议只有一个方法,就是dispense:方法,每个节点都实现这个方法来对输入的金额做处理。(dispense 单词的意思是分配,分发)
50,20,10面额的具体处理者:
//================== 50面额的具体处理者 ==================@interface DispenseChainNodeFor50Yuan : DispenseChainNode@end@implementation DispenseChainNodeFor50Yuan- (void)dispense:(int)amount{int unit = 50;if (amount >= unit) {int count = amount/unit;int remainder = amount % unit;NSLog(@"Dispensing %d of %d",count,unit);if (remainder != 0) {[_nextChainNode dispense:remainder];}}else{[_nextChainNode dispense:amount];}}@end//================== 20面额的具体处理者 ==================@interface DispenseChainNodeFor20Yuan : DispenseChainNode@end@implementation DispenseChainNodeFor20Yuan- (void)dispense:(int)amount{int unit = 20;if (amount >= unit) {int count = amount/unit;int remainder = amount % unit;NSLog(@"Dispensing %d of %d",count,unit);if (remainder != 0) {[_nextChainNode dispense:remainder];}}else{[_nextChainNode dispense:amount];}}@end//================== 10面额的具体处理者 ==================@interface DispenseChainNodeFor10Yuan : DispenseChainNode@end@implementation DispenseChainNodeFor10Yuan- (void)dispense:(int)amount{int unit = 10;if (amount >= unit) {int count = amount/unit;int remainder = amount % unit;NSLog(@"Dispensing %d of %d",count,unit);if (remainder != 0) {[_nextChainNode dispense:remainder];}}else{[_nextChainNode dispense:amount];}}@end
上面三个具体处理者在dispense:方法的处理都是类似的:
首先查看当前值是否大于面额:
- 如果大于面额
- 将当前值除以当前面额
- 如果没有余数,则停止,不作处理
- 如果有余数,则继续将当前值传递给下一个具体处理者(责任链的下一个节点)
- 将当前值除以当前面额
- 如果小于面额:将当前值传递给下一个具体处理者(责任链的下一个节点)
ATM类来把这些节点串起来:
//================== ATMDispenseChain.h ==================@interface ATMDispenseChain : NSObject<DispenseProtocol>@end//================== ATMDispenseChain.m ==================@implementation ATMDispenseChain{DispenseChainNode *_chainNode;}- (instancetype)init{self = [super init];if(self){DispenseChainNodeFor50Yuan *chainNode50 = [[DispenseChainNodeFor50Yuan alloc] init];DispenseChainNodeFor20Yuan *chainNode20 = [[DispenseChainNodeFor20Yuan alloc] init];DispenseChainNodeFor10Yuan *chainNode10 = [[DispenseChainNodeFor10Yuan alloc] init];_chainNode = chainNode50;[_chainNode setNextChainNode:chainNode20];[chainNode20 setNextChainNode:chainNode10];}return self;}- (void)dispense:(int)amount{NSLog(@"==================================");NSLog(@"ATM start dispensing of amount:%d",amount);if (amount %10 != 0) {NSLog(@"Amount should be in multiple of 10");return;}[_chainNode dispense:amount];}@end
ATMDispenseChain这个类在初始化的时候就将三个具体处理者并按照50,20,10的顺序连接起来,并持有一个DispenseChainNode的指针指向当前的具体处理者(也就是责任链的第一个节点,面额50的具体处理者,因为面额的处理是从50开始的)。
业务方使用:
ATMDispenseChain *atm = [[ATMDispenseChain alloc] init];[atm dispense:230];[atm dispense:70];[atm dispense:40];[atm dispense:10];[atm dispense:8];//查看输出:==================================ATM start dispensing of amount:230Dispensing 4 of 50Dispensing 1 of 20Dispensing 1 of 10==================================ATM start dispensing of amount:70Dispensing 1 of 50Dispensing 1 of 20==================================ATM start dispensing of amount:40Dispensing 2 of 20==================================ATM start dispensing of amount:10Dispensing 1 of 10==================================ATM start dispensing of amount:8Amount should be in multiple of 10
需要注意的是,该代码示例中的责任链类(
ATMDispenseChain)并没有在上述责任链模式的成员中。不过此处不必做过多纠结,我们在这里只是在业务上稍微多做一点处理罢了。其实也完全可以不封装这些节点,直接逐个调用setNextChainNode:方法组装责任链,然后将任务交给第一个处理者即可。
重构代码
我们回去看一下这三个具体处理者在dispense:方法的处理是非常相似的,他们的区别只有处理的面额数值的不同:而我们其实是创建了针对这三个面值的类,并将面值(50,20,10)硬编码在了这三个类中。这样做是有缺点的,因为如果后面的面额大小变了,或者增加或者减少面额的话我们会修改这些类或添加删除这些类(即使这也比不使用责任链模式的if-else要好一些)。
因此我们可以不创建这些与面额值硬编码的具体处理类,而是在初始化的时候直接将面额值注入到构造方法里面即可!这样一来,我们可以随意调整和修改面额了。
在DispenseChainNode添加传入面额值的初始化方法以及面额值的成员变量:
//================== ADispenseChainNode.h ==================@interface DispenseChainNode : NSObject <DispenseProtocol>{@protected DispenseChainNode *_nextChainNode;@protected int _dispenseValue;}//可以根据需求随意生成不同面额的具体处理者- (instancetype)initWithDispenseValue:(int)dispenseValue;- (void)setNextChainNode:(DispenseChainNode *)chainNode;@end//================== ADispenseChainNode.m ==================@implementation DispenseChainNode- (instancetype)initWithDispenseValue:(int)dispenseValue{self = [super init];if (self) {_dispenseValue = dispenseValue;}return self;}- (void)setNextChainNode:(DispenseChainNode *)chainNode{_nextChainNode = chainNode;}- (void)dispense:(int)amount{if (amount >= _dispenseValue) {int count = amount/_dispenseValue;int remainder = amount % _dispenseValue;NSLog(@"Dispensing %d of %d",count,_dispenseValue);if (remainder != 0) {[_nextChainNode dispense:remainder];}}else{[_nextChainNode dispense:amount];}}@end
既然DispenseChainNode可以根据不同的面额值生成处理不同面额的具体处理者实例,那么对于串联多个具体处理者的类ATMDispenseChain是不是也可以添加一个注入面额数组的初始化方法呢?比如输入[50,20,10]的数组就可以生成50,20,10面额的具体处理者了;而且数组是有序的,传入数组的元素顺序就可以是责任链中节点的顺序。
传入数组的节点串联类:
//================== ATMDispenseChain.m ==================@implementation ATMDispenseChain{DispenseChainNode *_firstChainNode;DispenseChainNode *_finalChainNode;int _minimumValue;}//需要从外部传入面额值的数组,在这个方法里面根据传入的数组构造了整条责任链- (instancetype)initWithDispenseNodeValues:(NSArray *)nodeValues{self = [super init];if(self){NSUInteger length = [nodeValues count];[nodeValues enumerateObjectsUsingBlock:^(NSNumber * nodeValue, NSUInteger idx, BOOL * _Nonnull stop) {DispenseChainNode *iterNode = [[DispenseChainNode alloc] initWithDispenseValue:[nodeValue intValue]];if (idx == length - 1 ) {_minimumValue = [nodeValue intValue];}if (!self->_firstChainNode) {//because this chain is empty, so the first node and the final node will refer the same node instanceself->_firstChainNode = iterNode;self->_finalChainNode = self->_firstChainNode;}else{//appending the next node, and setting the new final node[self->_finalChainNode setNextChainNode:iterNode];self->_finalChainNode = iterNode;}}];}return self;}- (void)dispense:(int)amount{NSLog(@"==================================");NSLog(@"ATM start dispensing of amount:%d",amount);if (amount % _minimumValue != 0) {NSLog(@"Amount should be in multiple of %d",_minimumValue);return;}[ _firstChainNode dispense:amount];}@end
业务方使用:
NSArray *dispenseNodeValues = @[@(100),@(50),@(20),@(10)];ATMDispenseChain *atm = [[ATMDispenseChain alloc] initWithDispenseNodeValues:dispenseNodeValues];[atm dispense:230];[atm dispense:70];[atm dispense:40];[atm dispense:10];[atm dispense:8];//输出:==================================ATM start dispensing of amount:230Dispensing 2 of 100Dispensing 1 of 20Dispensing 1 of 10==================================ATM start dispensing of amount:70Dispensing 1 of 50Dispensing 1 of 20==================================ATM start dispensing of amount:40Dispensing 2 of 20==================================ATM start dispensing of amount:10Dispensing 1 of 10==================================ATM start dispensing of amount:8Amount should be in multiple of 10
代码对应的类图
重构前:
重构后:
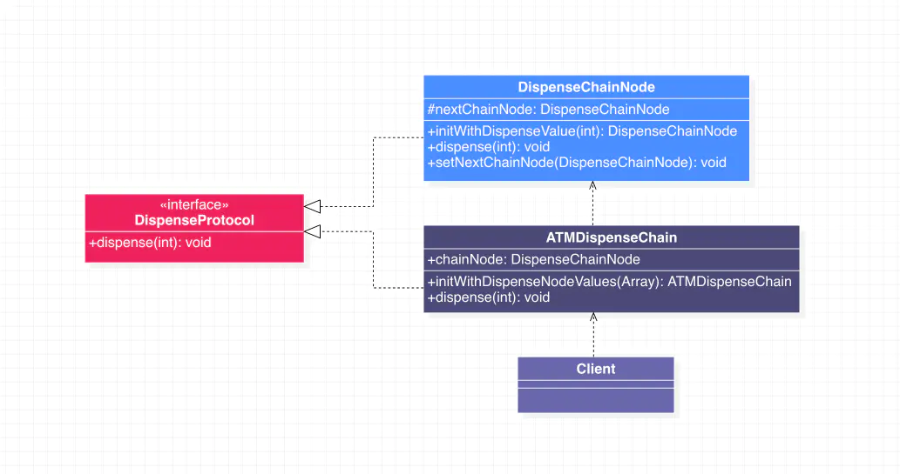
优点
- 你可以控制请求处理的顺序
- 单一职责原则:处理者之间的责任分离,处理者只要处理好自己的逻辑即可
- 开闭原则:方便修改每个处理者的处理逻辑,也方便删除或者添加处理者,或者改变责任链中处理者的顺序
缺点
- 因为需要在责任链上传递责任,直到找到合适的对象来处理,所以可能会导致处理的延迟。因此在延迟不允许过高的场景下不适合使用责任链模式。
iOS SDK中的应用
- iOS SDK中的响应者链就是责任链模式的实践:如果当前视图无法响应则传递给下一层级视图。
