@qidiandasheng
2022-08-07T13:39:48.000000Z
字数 10287
阅读 2339
iOS底层原理:创建和释放源码分析(😁)
iOS实战
创建alloc&new&retain
alloc调用过程
我们下载源码编译查看(objc4-781),alloc调用顺序如下,而 new 相当于调用 alloc 后再调用 init:
//第一步:+ (id)alloc {return _objc_rootAlloc(self);}//第二步:id_objc_rootAlloc(Class cls){return callAlloc(cls, false/*checkNil*/, true/*allocWithZone*/);}//第三步:static ALWAYS_INLINE idcallAlloc(Class cls, bool checkNil, bool allocWithZone=false){#if __OBJC2__if (slowpath(checkNil && !cls)) return nil;if (fastpath(!cls->ISA()->hasCustomAWZ())) {return _objc_rootAllocWithZone(cls, nil);}#endif// No shortcuts available.if (allocWithZone) {return ((id(*)(id, SEL, struct _NSZone *))objc_msgSend)(cls, @selector(allocWithZone:), nil);}return ((id(*)(id, SEL))objc_msgSend)(cls, @selector(alloc));}//第四步:id_objc_rootAllocWithZone(Class cls, malloc_zone_t *zone __unused){// allocWithZone under __OBJC2__ ignores the zone parameterreturn _class_createInstanceFromZone(cls, 0, nil,OBJECT_CONSTRUCT_CALL_BADALLOC);}
第五步:
static ALWAYS_INLINE id_class_createInstanceFromZone(Class cls, size_t extraBytes, void *zone,int construct_flags = OBJECT_CONSTRUCT_NONE,bool cxxConstruct = true,size_t *outAllocatedSize = nil){ASSERT(cls->isRealized());// Read class's info bits all at once for performancebool hasCxxCtor = cxxConstruct && cls->hasCxxCtor();bool hasCxxDtor = cls->hasCxxDtor();bool fast = cls->canAllocNonpointer();size_t size;//要开辟多少内存size = cls->instanceSize(extraBytes);if (outAllocatedSize) *outAllocatedSize = size;id obj;if (zone) {obj = (id)malloc_zone_calloc((malloc_zone_t *)zone, 1, size);} else {//怎么去申请内存obj = (id)calloc(1, size);}if (slowpath(!obj)) {if (construct_flags & OBJECT_CONSTRUCT_CALL_BADALLOC) {return _objc_callBadAllocHandler(cls);}return nil;}// 3:将当前的类和指针地址绑定在一起if (!zone && fast) {obj->initInstanceIsa(cls, hasCxxDtor);} else {// Use raw pointer isa on the assumption that they might be// doing something weird with the zone or RR.obj->initIsa(cls);}if (fastpath(!hasCxxCtor)) {return obj;}construct_flags |= OBJECT_CONSTRUCT_FREE_ONFAILURE;return object_cxxConstructFromClass(obj, cls, construct_flags);}
最重要的就是第五步:
size = cls->instanceSize(extraBytes);计算要开辟的内存大小,这里使用了16字节内存对齐计算要开辟的内存空间obj = (id)calloc(1, size);通过calloc申请内存,并赋值给obj,因此 obj是指向内存地址的指针obj->initInstanceIsa(cls, hasCxxDtor);通过initInstanceIsa,将当前的类和指针地址关联在一起,也就是给objc_object结构体设置isa指针的值:
inline voidobjc_object::initInstanceIsa(Class cls, bool hasCxxDtor){ASSERT(!cls->instancesRequireRawIsa());ASSERT(hasCxxDtor == cls->hasCxxDtor());initIsa(cls, true, hasCxxDtor);}objc_object::initIsa(Class cls, bool nonpointer, bool hasCxxDtor){ASSERT(!isTaggedPointer());if (!nonpointer) {isa = isa_t((uintptr_t)cls);} else {ASSERT(!DisableNonpointerIsa);ASSERT(!cls->instancesRequireRawIsa());isa_t newisa(0);#if SUPPORT_INDEXED_ISAASSERT(cls->classArrayIndex() > 0);newisa.bits = ISA_INDEX_MAGIC_VALUE;newisa.has_cxx_dtor = hasCxxDtor;newisa.indexcls = (uintptr_t)cls->classArrayIndex();#elsenewisa.bits = ISA_MAGIC_VALUE;newisa.has_cxx_dtor = hasCxxDtor;newisa.shiftcls = (uintptr_t)cls >> 3;#endifisa = newisa;}}
retain过程
我们知道通过retain会使引用计数加一,那我们接下去看一看retain的调用过程:
//第一步:- (id)retain {return _objc_rootRetain(self);}//第二步:objc_object::rootRetain(){return rootRetain(false, false);}objc_object::rootRetain(bool tryRetain, bool handleOverflow){if (isTaggedPointer()) return (id)this;bool sideTableLocked = false;bool transcribeToSideTable = false;isa_t oldisa;isa_t newisa;do {transcribeToSideTable = false;oldisa = LoadExclusive(&isa.bits);newisa = oldisa;...uintptr_t carry;// extra_rc加1newisa.bits = addc(newisa.bits, RC_ONE, 0, &carry); // extra_rc++// carry为1表示溢出if (slowpath(carry)) {// newisa.extra_rc++ overflowedif (!handleOverflow) {ClearExclusive(&isa.bits);return rootRetain_overflow(tryRetain);}if (!tryRetain && !sideTableLocked) sidetable_lock();sideTableLocked = true;//转存到SideTable位TruetranscribeToSideTable = true;//更新值为RC_HALF,RC_HALF=(1ULL<<7)=0b10000000newisa.extra_rc = RC_HALF;//isa中存储sidetable中有引用计数newisa.has_sidetable_rc = true;}} while (slowpath(!StoreExclusive(&isa.bits, oldisa.bits, newisa.bits)));if (slowpath(transcribeToSideTable)) {//保存一半的引用计数到sidetablesidetable_addExtraRC_nolock(RC_HALF);}if (slowpath(!tryRetain && sideTableLocked)) sidetable_unlock();return (id)this;}
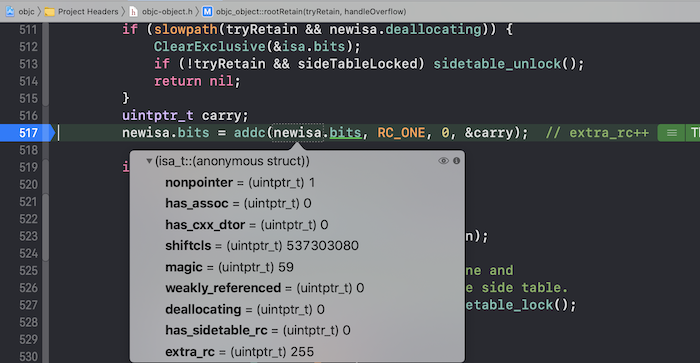
我们可以看到newisa.bits = addc(newisa.bits, RC_ONE, 0, &carry);其实就是把isa公用体里extra_rc的值加一。当extra_rc值为255时,如果再加1,则carry为1,表示溢出。(extra_rc在arm64中占8位,最大值可表示255)
代码测试extra_rc的值
我们这里把代码改为MRC环境下,手动进行retain。
int main(int argc, const char * argv[]) {@autoreleasepool {// insert code here...NSObject *objc1 = [[NSObject alloc] init];for (int i=0; i<512; i++) {[objc1 retain];}}return 0;}
在循环处设置i==255的断点,同时在newisa.bits = addc(newisa.bits, RC_ONE, 0, &carry);处加上断点,这时候extra_rc无法存储就会溢出,然后设置isa的值newisa.extra_rc = RC_HALF(128);和newisa.has_sidetable_rc = true;:
然后再进入i==256,这时候在extra_rc减半的基础上再加1,extra_rc==129:
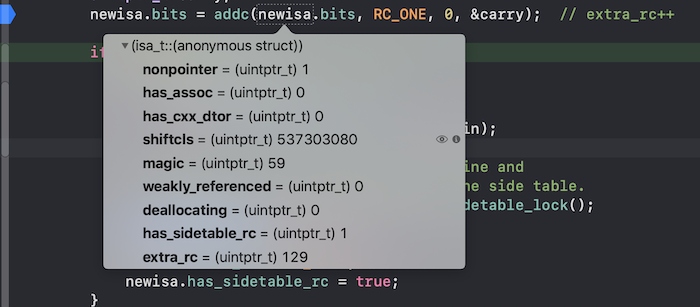
所以这里每次溢出的时候就会存储一半的引用计数到sidetable中。
retain引用计数
我们使用如下代码,并且在objc_object::rootRetain()处加上断点:
int main(int argc, const char * argv[]) {@autoreleasepool {//1.创建对象,引用计数为1NSObject *objc1 = [[NSObject alloc] init];//2.引用计数加1NSObject *objc2 = objc1;printf("retain count = %ld\n",CFGetRetainCount((__bridge CFTypeRef)(objc1)));NSLog(@"Hello, World! %@ - %@",objc1,objc2);}return 0;}
//输出retain count = 2
我们发现在第一步alloc、init时并没有调用objc_object::rootRetain()方法,在第二步把objc2指向objc1时才调用了objc_object::rootRetain()使引用计数加1。但我们看到输出时引用计数值为2,这是为什么呢?
我们看一下获取引用计数的调用方法即可,CFGetRetainCount最后调用的是objc-object.h源码中的objc_object::rootRetainCount()方法:
inline uintptr_tobjc_object::rootRetainCount(){if (isTaggedPointer()) return (uintptr_t)this;sidetable_lock();isa_t bits = LoadExclusive(&isa.bits);ClearExclusive(&isa.bits);if (bits.nonpointer) {//引用计数值为extra_rc+1uintptr_t rc = 1 + bits.extra_rc;//如果之前retain时extra_rc溢出,//则从sidetable中取溢出的引用计数和rc的值相加即为完整的引用计数if (bits.has_sidetable_rc) {rc += sidetable_getExtraRC_nolock();}sidetable_unlock();return rc;}sidetable_unlock();return sidetable_retainCount();}
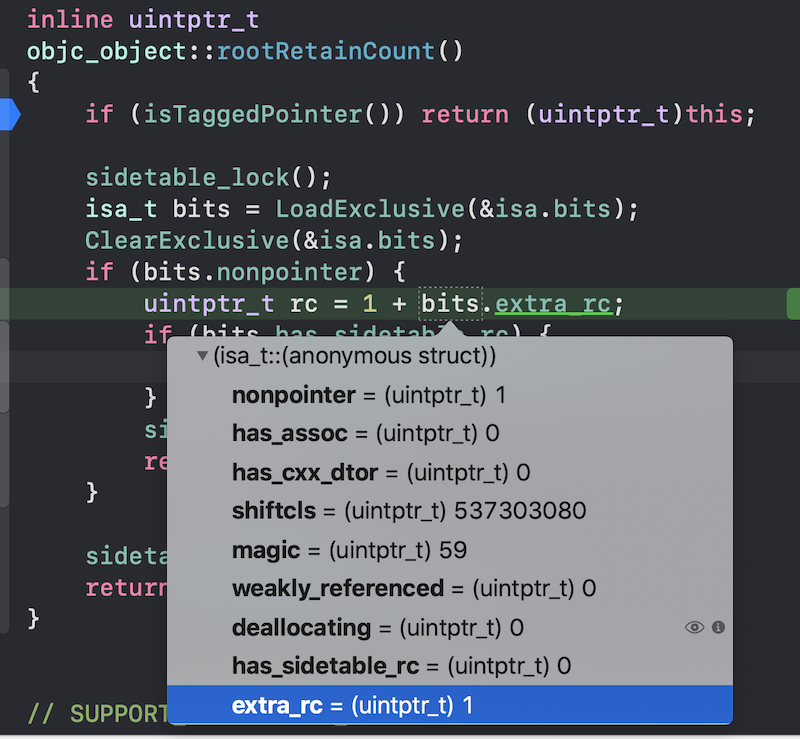
我们发现extra_rc值确实为1,只是这里永远会有一个extra_rc+1的操作,也就是说你创建对象(alloc)之后其实引用计数就是为1的,没必要再调用retain了,直接在获取引用计数的地方加一个常数1即可。
也就是说retainCount有三部分组成:
1
extra_rc中存储的值sidetable_getExtraRC_nolock返回的值
释放dealloc&release
dealloc调用过程
调用步骤:
//第一步:- (void)dealloc {_objc_rootDealloc(self);}void_objc_rootDealloc(id obj){ASSERT(obj);obj->rootDealloc();}//第二步:inline voidobjc_object::rootDealloc(){if (isTaggedPointer()) return; // fixme necessary?if (fastpath(isa.nonpointer && // 是否是优化过的isa!isa.weakly_referenced && // 不包含或者不曾经包含weak指针!isa.has_assoc && // 没有关联对象!isa.has_cxx_dtor && // 没有c++析构方法!isa.has_sidetable_rc)) // 引用计数没有超出上限的时候可以快速释放,rootRetain(bool tryRetain, bool handleOverflow) 中设置为true{assert(!sidetable_present());free(this);}else {object_dispose((id)this);}}
我们从第二步可以看到满足一定条件下,对象指针会直接free释放掉,实际很多情况下都会走object_dispose((id)this)函数。这一步主要就是释放成员变量,移除关联对象,设置弱引用指针为nil:
//第三步:idobject_dispose(id obj){if (!obj) return nil;objc_destructInstance(obj);/// 释放内存free(obj);return nil;}void *objc_destructInstance(id obj){if (obj) {// Read all of the flags at once for performance.bool cxx = obj->hasCxxDtor();bool assoc = obj->hasAssociatedObjects();// 对象拥有成员变量时编译器会自动插入.cxx_desctruct方法用于自动释放。if (cxx) object_cxxDestruct(obj);// 移除关联对象if (assoc) _object_remove_assocations(obj);// weak->nilobj->clearDeallocating();}return obj;}
//释放成员变量,沿着继承链逐层向上搜寻SEL_cxx_destruct这个selector,找到函数实现(void (*)(id)(函数指针)并执行。void object_cxxDestruct(id obj){if (!obj) return;if (obj->isTaggedPointer()) return;object_cxxDestructFromClass(obj, obj->ISA());}static void object_cxxDestructFromClass(id obj, Class cls){void (*dtor)(id);// Call cls's dtor first, then superclasses's dtors.for ( ; cls; cls = cls->superclass) {if (!cls->hasCxxDtor()) return;dtor = (void(*)(id))lookupMethodInClassAndLoadCache(cls, SEL_cxx_destruct);if (dtor != (void(*)(id))_objc_msgForward_impcache) {if (PrintCxxCtors) {_objc_inform("CXX: calling C++ destructors for class %s",cls->nameForLogging());}(*dtor)(obj);}}}
// weak->nilinline voidobjc_object::clearDeallocating(){if (slowpath(!isa.nonpointer)) {// Slow path for raw pointer isa.sidetable_clearDeallocating();}else if (slowpath(isa.weakly_referenced || isa.has_sidetable_rc)) {// Slow path for non-pointer isa with weak refs and/or side table data.clearDeallocating_slow();}assert(!sidetable_present());}NEVER_INLINE voidobjc_object::clearDeallocating_slow(){ASSERT(isa.nonpointer && (isa.weakly_referenced || isa.has_sidetable_rc));// 根据对象地址从SideTables中取出SideTableSideTable& table = SideTables()[this];table.lock();if (isa.weakly_referenced) {// 从SideTable中取出weak_table,根据weak_table获取弱引用数组,然后一个个置为nilweak_clear_no_lock(&table.weak_table, (id)this);}if (isa.has_sidetable_rc) {table.refcnts.erase(this);}table.unlock();}

release过程
//第一步:- (oneway void)release {_objc_rootRelease(self);}//第二步:_objc_rootRelease(id obj){ASSERT(obj);obj->rootRelease();}//第三步:objc_object::rootRelease(){return rootRelease(true, false);}
最终调用的是如下方法:
ALWAYS_INLINE boolobjc_object::rootRelease(bool performDealloc, bool handleUnderflow){if (isTaggedPointer()) return false;bool sideTableLocked = false;isa_t oldisa;isa_t newisa;retry:do {oldisa = LoadExclusive(&isa.bits);newisa = oldisa;...uintptr_t carry;// extra_rc中的值减1newisa.bits = subc(newisa.bits, RC_ONE, 0, &carry); // extra_rc--// 如果减1后小于0,则carry为1,执行下溢操作if (slowpath(carry)) {goto underflow;}} while (slowpath(!StoreReleaseExclusive(&isa.bits,oldisa.bits, newisa.bits)));if (slowpath(sideTableLocked)) sidetable_unlock();return false;underflow:newisa = oldisa;// 如果sidetable中有保存引用计数,则从SideTable 借位if (slowpath(newisa.has_sidetable_rc)) {if (!handleUnderflow) {ClearExclusive(&isa.bits);return rootRelease_underflow(performDealloc);}。。。size_t borrowed = sidetable_subExtraRC_nolock(RC_HALF);if (borrowed > 0) {newisa.extra_rc = borrowed - 1;bool stored = StoreReleaseExclusive(&isa.bits,oldisa.bits, newisa.bits);if (!stored) {isa_t oldisa2 = LoadExclusive(&isa.bits);isa_t newisa2 = oldisa2;if (newisa2.nonpointer) {uintptr_t overflow;newisa2.bits =addc(newisa2.bits, RC_ONE * (borrowed-1), 0, &overflow);if (!overflow) {stored = StoreReleaseExclusive(&isa.bits, oldisa2.bits,newisa2.bits);}}}if (!stored) {sidetable_addExtraRC_nolock(borrowed);goto retry;}sidetable_unlock();return false;}else {// Side table 也是空值,则进入下面的dealloc的操作}}// 上面引用计数真的减少到零之后,则执行dealloc的操作if (slowpath(newisa.deallocating)) {ClearExclusive(&isa.bits);if (sideTableLocked) sidetable_unlock();return overrelease_error();// does not actually return}newisa.deallocating = true;if (!StoreExclusive(&isa.bits, oldisa.bits, newisa.bits)) goto retry;if (slowpath(sideTableLocked)) sidetable_unlock();__c11_atomic_thread_fence(__ATOMIC_ACQUIRE);if (performDealloc) {((void(*)(objc_object *, SEL))objc_msgSend)(this, @selector(dealloc));}return true;}
extra_rc减1,如果没有下溢则更新isa的extra_rc为新值- 如果下溢了,判断
has_sidetable_rc==True则调用sidetable_subExtraRC_nolock,成功借位之后,我们会重新设置newisa的值newisa.extra_rc = borrowed - 1并更新 isa。 - 如果
has_sidetable_rc==False或者没有借到位的话,就说明没有任何的变量引用了当前对象(即retainCount = 0),就需要向它发送dealloc消息了。
参考
Objective-C 引用计数原理
iOS 引用计数 retainCount、retain、release 源码分析+注释+实验
ARC下,Dealloc还需要注意什么?
黑箱中的 retain 和 release
