@CrazyHenry
2018-04-05T06:32:54.000000Z
字数 6820
阅读 2695
Linux/Ubuntu虚拟机、配置、美化、常用软件安装--详细教程
xxxxLinux命令行
- Author:李英民 | Henry
- E-mail: li
_yingmin@outlookdotcom- Home: https://liyingmin.wixsite.com/henry
快速了解我: About Me
转载请保留上述引用内容,谢谢配合!
0.背景:
- Ubuntu14或者16
- VMware12
1.Ubuntu系统安装以及配置
查看电脑核心数,打开任务管理器,性能->逻辑处理器n
i7四代 : 1x2
i7八代 : 1x4

中途可以跳过,然后进去修改源,更新,升级。
- 安装VMware-tools(不要使用open-vm-tools,无法完成拖拽文件)
VMware选择查看-自动调整大小-自适应客户机
如果出现 where is ifconfig?使用语句
sudo apt-get install net-tools来解决这个问题!
安装完成后,注销再进入,应该就可以放大和双向拷贝了,双系统之间的复制粘贴也可以了!
2.美化ubuntu系统
2.1去掉一些没用的插件
1)卸载LibreOffice
sudo apt-get autoremove --purge libreoffice-common
2)卸载掉亚马逊链接
sudo apt-get remove unity-webapps-common
3)卸载其他
sudo apt-get autoremove thunderbird --purgesudo apt-get autoremove rhythmbox --purgesudo apt-get autoremove transmission* --purge
到这里,
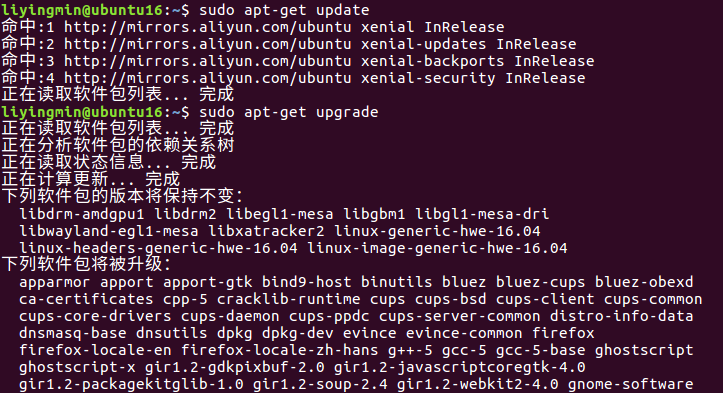
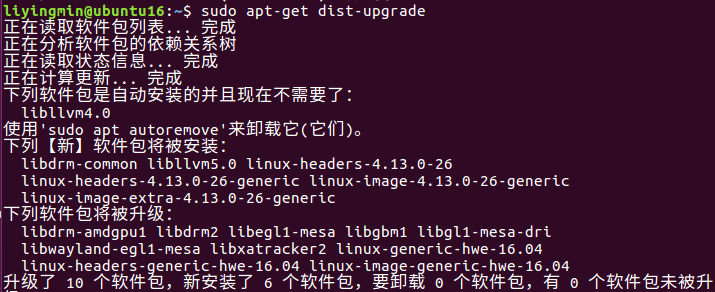
修改源为阿里的,然后再升级:
sudo apt-get updatesudo apt-get autoremove --purge//彻底删除一些没用的东西sudo apt-get upgrade//软件包升级//这一步如果有错误,则再update一次,然后再upgradesudo apt-get dist-upgrade//内核升级
2.2安装
1)Vim
sudo apt-get install vim
sudo gedit /etc/vim/vimrc
添加set tabstop=4在文档末尾, 设定 tab 长度为 4,注意,=两边不能有空格!

以下是配置信息,可根据自己的需要添加:
set nocompatible " 关闭 vi 兼容模式syntax on " 自动语法高亮colorscheme molokai " 设定配色方案set number " 显示行号set cursorline " 突出显示当前行set ruler " 打开状态栏标尺set shiftwidth=4 " 设定 << 和 >> 命令移动时的宽度为 4set softtabstop=4 " 使得按退格键时可以一次删掉 4 个空格set tabstop=4 " 设定 tab 长度为 4set nobackup " 覆盖文件时不备份set autochdir " 自动切换当前目录为当前文件所在的目录filetype plugin indent on " 开启插件set backupcopy=yes " 设置备份时的行为为覆盖set ignorecase smartcase " 搜索时忽略大小写,但在有一个或以上大写字母时仍保持对大小写敏感set nowrapscan " 禁止在搜索到文件两端时重新搜索set incsearch " 输入搜索内容时就显示搜索结果set hlsearch " 搜索时高亮显示被找到的文本set noerrorbells " 关闭错误信息响铃set novisualbell " 关闭使用可视响铃代替呼叫set t_vb= " 置空错误铃声的终端代码set showmatch " 插入括号时,短暂地跳转到匹配的对应括号set matchtime=2 " 短暂跳转到匹配括号的时间set magic " 设置魔术set hidden " 允许在有未保存的修改时切换缓冲区,此时的修改由 vim 负责保存set guioptions-=T " 隐藏工具栏set guioptions-=m " 隐藏菜单栏set smartindent " 开启新行时使用智能自动缩进set backspace=indent,eol,start" 不设定在插入状态无法用退格键和 Delete 键删除回车符set cmdheight=1 " 设定命令行的行数为 1set laststatus=2 " 显示状态栏 (默认值为 1, 无法显示状态栏)set statusline=\ %<%F[%1*%M%*%n%R%H]%=\ %y\ %0(%{&fileformat}\ %{&encoding}\ %c:%l/%L%)\" 设置在状态行显示的信息set foldenable " 开始折叠set foldmethod=syntax " 设置语法折叠set foldcolumn=0 " 设置折叠区域的宽度setlocal foldlevel=1 " 设置折叠层数为set foldclose=all " 设置为自动关闭折叠nnoremap <space> @=((foldclosed(line('.')) < 0) ? 'zc' : 'zo')<CR>" 用空格键来开关折叠
2)git
sudo apt-get install git
3)lantern
到这里下载deb包,用dpkg -i安装
直接在软件中心拖拽就可以添加到启动器。
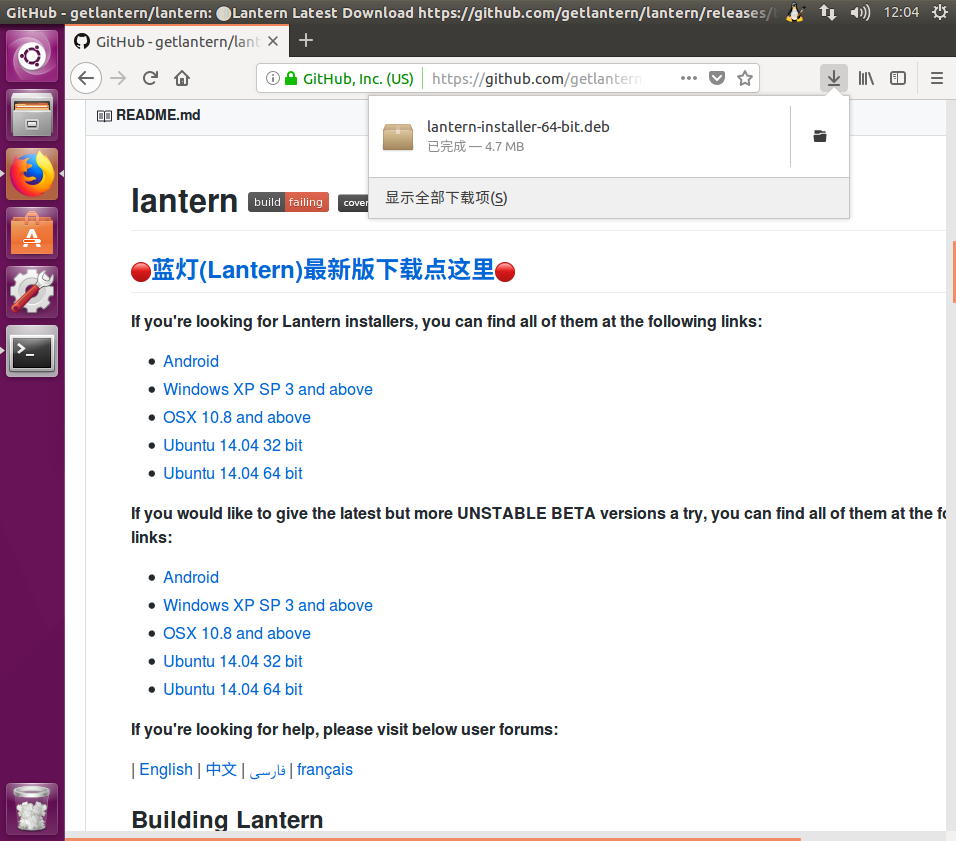
sudo dpkg -i lantern*
4)unity-tweak-tool
调整 Unity 桌面环境,还是推荐使用Unity Tweak Tool,这是一个非常好用的 Unity 图形化管理工具,可以修改工作区数量、热区等。
sudo apt-get install unity-tweak-tool
5)Flatabulous主题
Flatabulous主题是一款ubuntu下扁平化主题,也是我试过众多主题中最喜欢的一个!最终效果如上述图所示。
执行以下命令安装Flatabulous主题:
sudo add-apt-repository ppa:noobslab/themessudo apt-get updatesudo apt-get install flatabulous-theme
该主题有配套的图标,安装方式如下:
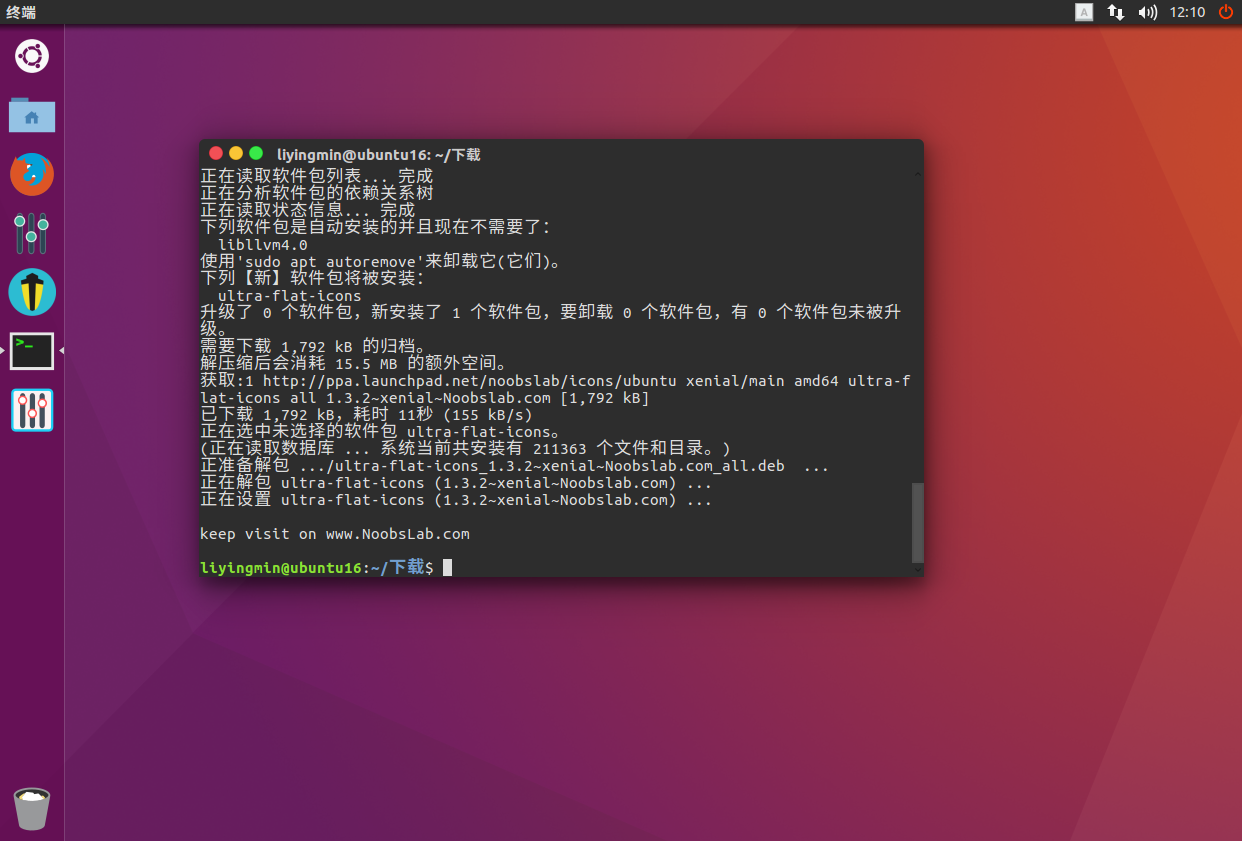
sudo add-apt-repository ppa:noobslab/iconssudo apt-get updatesudo apt-get install ultra-flat-icons
安装完成后,打开unity-tweak-tool软件,修改主题和图标:
6)oh my zsh
1.先安装zsh
sudo apt-get install zsh
2.注意这个引号,` ` 是tab键上面的那个键
chsh -s `which zsh` //把zsh设为默认
执行完上边那句,登出。
重启后/登出之后重新打开终端会提示选择,此时选择q就可以,下次启动还会提示。当然,我们配置完之后,启动就不会提示了。
按下q继续操作,直到最后一步(chsh -s /bin/zsh)完成
3.查看当前安装的版本(非必要)
zsh --verison
4.从GitHub 下载 oh-my-zsh 套件
sudo git clone https://github.com/robbyrussell/oh-my-zsh.git ~/.oh-my-zsh
5.如果从来没有安装过zsh,可以拷贝oh-my-zsh的范例
cp ~/.oh-my-zsh/templates/zshrc.zsh-template ~/.zshrc
6.查看有什么theme主题可以使用如下代码
ls ~/.oh-my-zsh/themes
7.可以编辑~/.zshrc 文件来修改主题
sudo gedit ~/.zshrc
然后修改
ZSH_THEME="amuse" (找到这条语句,然后修改引号内的内容改为amuse)
(国外大神对这些主题的截图:https://github.com/robbyrussell/oh-my-zsh/wiki/themes )
8.查看可以使用的plugins
ls ~/.oh-my-zsh/plugins
设置zsh替换掉原有的shell
chsh -s /bin/zsh
ubuntu中默认安装了那些shell ?
cat /etc/shells
9.设置控制台透明度
在控制台任意处右键设置,选择合适的透明度:
附: ~/.zshrc 文件默认的内容:
# Path to your oh-my-zsh installation.export ZSH=$HOME/.oh-my-zsh# Set name of the theme to load.# Look in ~/.oh-my-zsh/themes/# Optionally, if you set this to "random", it'll load a random theme each# time that oh-my-zsh is loaded.ZSH_THEME="robbyrussell"# Uncomment the following line to use case-sensitive completion.# CASE_SENSITIVE="true"# Uncomment the following line to disable bi-weekly auto-update checks.# DISABLE_AUTO_UPDATE="true"# Uncomment the following line to change how often to auto-update (in days).# export UPDATE_ZSH_DAYS=13# Uncomment the following line to disable colors in ls.# DISABLE_LS_COLORS="true"# Uncomment the following line to disable auto-setting terminal title.# DISABLE_AUTO_TITLE="true"# Uncomment the following line to enable command auto-correction.# ENABLE_CORRECTION="true"# Uncomment the following line to display red dots whilst waiting for completion.# COMPLETION_WAITING_DOTS="true"# Uncomment the following line if you want to disable marking untracked files# under VCS as dirty. This makes repository status check for large repositories# much, much faster.# DISABLE_UNTRACKED_FILES_DIRTY="true"# Uncomment the following line if you want to change the command execution time# stamp shown in the history command output.# The optional three formats: "mm/dd/yyyy"|"dd.mm.yyyy"|"yyyy-mm-dd"# HIST_STAMPS="mm/dd/yyyy"# Would you like to use another custom folder than $ZSH/custom?# ZSH_CUSTOM=/path/to/new-custom-folder# Which plugins would you like to load? (plugins can be found in ~/.oh-my-zsh/plugins/*)# Custom plugins may be added to ~/.oh-my-zsh/custom/plugins/# Example format: plugins=(rails git textmate ruby lighthouse)# Add wisely, as too many plugins slow down shell startup.plugins=(git)source $ZSH/oh-my-zsh.sh# User configurationexport PATH=$HOME/bin:/usr/local/bin:$PATH# export MANPATH="/usr/local/man:$MANPATH"# You may need to manually set your language environment# export LANG=en_US.UTF-8# Preferred editor for local and remote sessions# if [[ -n $SSH_CONNECTION ]]; then# export EDITOR='vim'# else# export EDITOR='mvim'# fi# Compilation flags# export ARCHFLAGS="-arch x86_64"# ssh# export SSH_KEY_PATH="~/.ssh/dsa_id"# Set personal aliases, overriding those provided by oh-my-zsh libs,# plugins, and themes. Aliases can be placed here, though oh-my-zsh# users are encouraged to define aliases within the ZSH_CUSTOM folder.# For a full list of active aliases, run `alias`.## Example aliases# alias zshconfig="mate ~/.zshrc"# alias ohmyzsh="mate ~/.oh-my-zsh"
7)vscode
到官网下载deb包,之后安装插件,C/C++,Python,vscode-icons。
8)搜狗输入法
官网下载deb包,注销重开后可能需要设置一下:(也许不需要设置)
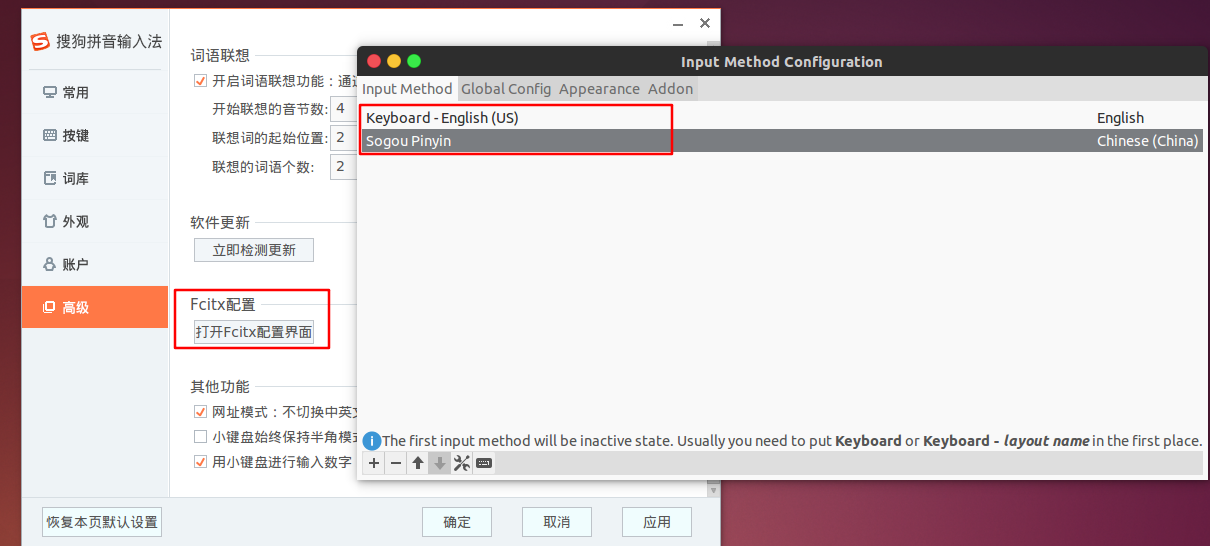
3.安装chrome
安装谷歌浏览器,只需要三行代码:
对于谷歌Chrome32位版本,使用如下链接:
sudo wget https://dl.google.com/linux/direct/google-chrome-stable_current_i386.deb
对于64位版本可以使用如下链接下载:
sudo wget https://dl.google.com/linux/direct/google-chrome-stable_current_amd64.deb
下载完后,运行如下命令安装。
sudo dpkg -i google-chrome*sudo apt-get -f installsudo dpkg -i google-chrome*
此时,再卸载firefox:
sudo apt-get autoremove firefox --purge
4.更换桌面壁纸和登录页面
注意,这个时候先不要设置图片,等更换完目录后在设置!!
下载ubuntu tweak:(ppa已经不支持)
ubuntu tweak.deb ,注意,这个是16的deb,14要找更早期的deb包
安装后,"调整栏目" 进入 "登陆设置",然后解锁,之后设置登录图片和壁纸一样!
5.Ubuntu tab 缩进
vim
vi /etc/vim/vimrc # 修改配置文件/etc/vim/vimrcset tabstop=4 # 在vimrc文件里面增加此行;
gedit
1、要修改gedit的tab键需要在菜单项中修改,如果是在Terminal中打开的gedit是不显示菜单的,所以需要右键点击一个文件,通过gedit打开,这时能够看到菜单栏;
2、通常ubuntu应用的菜单栏实在显示屏窗口的顶部显示,如果想像windows在应用顶部显示的话可以在System settings 中的apearance中将behavior中的“show the menu for a windows”项修改为“in the window title bar”,此时,菜单栏在gedit顶部出现;
3、选择Edit->Preferences->Editor,修改Tab Width即可。
6.英文文件夹(最后再搞这个!)
1)启动终端,先修改为英文环境:
export LANG=en_US
2)然后执行命令:
xdg-user-dirs-gtk-update
会弹出一个对话框,选择“Update Names“。
Ubuntu用户文件夹中英文切换
3)最后再恢复为中文环境:
export LANG=zh_CN
7.共享文件夹
对于大文件,最好不要直接拖拽,通过共享文件夹是个好选择。
在VMware选项里可以直接设置,然后在Ubuntu中的/mnt/hgfs目录下可以找到共享目录!
