@gnat-xj
2017-04-07T02:48:55.000000Z
字数 7842
阅读 2975
全景程序 Demo
阅读列表
- 示例程序:
- Three.js 官方 examples #panorama equirectangular
- 我的例子 (解决了移动端陀螺仪问题)
- Three.js 官方其他示例程序
- (*) WebGL Indoor Real-Scene Application System Based on Three.js
- 阅读代码
- 本文下方的代码导读
- Three.js 官方那个代码(点我),210 行,核心 50 行左右
- 陀螺仪的处理:
全景漫游技术是一种基于图像渲染(Image-Based
Rendering)的虚拟现实技术,是一个非常充满活力、具有很大发展潜力的实用技术。将某视点全方位的多幅真实图像映射到立方体、圆柱体和球体等几何体表面,从而创建的逼真虚拟场景。
相比传统的基于三维几何建模的虚拟场景,它的数据采集、处理、传输成本低,渲染效果好,沉浸感强;又因其场景的绘制独立于场景的复杂性,在生成复杂场景时,全景技术在真实感方面和制作成本及周期方面都有着无可比拟的优势。相比互联网上单调的交互性差的二维图片,它能提供更好沉浸感和交互性。简而言之,全景漫游系统是一个性价比极高的漫游系统解决方案。
如 全景漫游 所介绍的,本 Demo 用了 Three.js (WebGL 库)。
JavaScript 库依赖
- jQuery:操作 DOM 元素,事件绑定,etc
- jquery.mobile-events.min.js:主要用于 iPad 客户端地触屏操作
- gyronorm:对于其他移动设备,由于触屏操作需要进行差异化地处理,我们使用陀螺仪来进行全景交互
- three.js:全景图渲染
场景、相机
{camera},\=> scene => renderer => DOM 元素/{objects (mesh = geometry + material)}
基于 three.js / examples #webgl_panorama_equirectangular。
全景漫游主体代码如下:
// camera 是相机,好比人眼,scene 是场景,包含了用于漫游的全景球var camera, scene, renderer;var panoramamaterial;var isUserInteracting = false,onMouseDownMouseX = 0, onMouseDownMouseY = 0,lon = 0, onMouseDownLon = 0,lat = 0, onMouseDownLat = 0,phi = 0, theta = 0;var needUpdateLonLat = false;// 由于移动端无法方便地打开 console 看打印信息,我们只能输出到屏幕上var log = document.getElementById( 'loginfo' );var touchmoveX = 0, touchmoveY = 0, touchmoveId = 0;init();animate();
初始化 camera 和 scene:
function init() {var container, mesh;// 用于显示全景的 DOM 元素container = document.getElementById( 'container' );// 透视投影相机camera = new THREE.PerspectiveCamera(75, // fovwindow.innerWidth / window.innerHeight, // aspect ratio1, // near1100 // far);camera.target = new THREE.Vector3( 0, 0, 0 );scene = new THREE.Scene();// 全景球var geometry = new THREE.SphereGeometry( 500, 60, 40 );geometry.scale( - 1, 1, 1 );// 全景纹理var material = new THREE.MeshBasicMaterial( {map: new THREE.TextureLoader().load( textureURL )} );panoramamaterial = material;// 把全景纹理贴到全景球上,作为我们的观察球mesh = new THREE.Mesh( geometry, material );// 添加到场景中scene.add( mesh );// 渲染器渲染场景,并通过相机观察这个场景,呈现在 DOM 元素上renderer = new THREE.WebGLRenderer();renderer.setPixelRatio( window.devicePixelRatio );renderer.setSize( window.innerWidth, window.innerHeight );container.appendChild( renderer.domElement );// 事件绑定...}
渲染循环:
function animate() {// 规范化 lon、latif (lon > 180) {lon -= 360;} else if (lon < -180) {lon += 360;}lat = Math.max( - 85, Math.min( 85, lat ) );// 更新页面上的 debug 信息if (needUpdateLonLat) {log.innerHTML = JSON.stringify({"lon": lon,"lat": lat}, null, 4);needUpdateLonLat = false;}// 计算 camera 朝向phi = THREE.Math.degToRad( 90 - lat );theta = THREE.Math.degToRad( lon );camera.target.x = 500 * Math.sin( phi ) * Math.cos( theta );camera.target.y = 500 * Math.cos( phi );camera.target.z = 500 * Math.sin( phi ) * Math.sin( theta );camera.lookAt( camera.target );// renderer 拿到 scene 这个场景和 camera 这个相机,// 从 camera 的视角渲染更新 DOM 元素renderer.render( scene, camera );// 请求下一次渲染requestAnimationFrame( animate );}
From MDN:
Calls a function or executes a code snippet repeatedly, with a fixed time delay between each call to that function.
The window.requestAnimationFrame() method tells the browser that you wish to perform an animation and requests that the browser call a specified function to update an animation before the next repaint. The method takes as an argument a callback to be invoked before the repaint.
Use the latter for animation and the former any time you want to call a function at a specified interval.
11.2.1.c. 交互:鼠标、触屏、重力感应
所有的交互都通过事件监听完成。
PC 端的鼠标交互:
// 单击鼠标开始拖拽页面container.addEventListener( 'mousedown', onDocumentMouseDown, false );// 按住鼠标可以拖拽container.addEventListener( 'mousemove', onDocumentMouseMove, false );// 释放鼠标结束拖拽页面container.addEventListener( 'mouseup', onDocumentMouseUp, false );function onDocumentMouseDown( event ) {// 只有 canvas 才接受响应if (!$(event.target).is('canvas')) { return; }event.preventDefault();// 设置标志 isUserInteracting 为真isUserInteracting = true;// 记录下 DOM 元素的坐标,以及当前视场中心的经纬度onPointerDownPointerX = event.clientX;onPointerDownPointerY = event.clientY;onPointerDownLon = lon;onPointerDownLat = lat;}function onDocumentMouseMove( event ) {// 只有标志 isUserInteracting 为 true,才更新 lon 和 lat// lon、lat 会影响 camera 的朝向,这样就更新了视线方向if ( isUserInteracting === true ) {lon=(onPointerDownPointerX-event.clientX)*0.1+onPointerDownLon;lat=(event.clientY-onPointerDownPointerY)*0.1+onPointerDownLat;needUpdateLonLat = true;}}function onDocumentMouseUp( event ) {// 鼠标释放,标志位清为 falseisUserInteracting = false;}
用鼠标滚轮改变 fov 的大小:
container.addEventListener( 'wheel', onDocumentMouseWheel, false );function onDocumentMouseWheel( event ) {camera.fov += event.deltaY * 0.05; // 更新 fov 的值camera.updateProjectionMatrix(); // 使生效}
在移动端上,没有“mousedown”、 “mousemove”和 “mouseup”等事件。
需要通过 touch event(触屏事件)
来交互,下面的代码仅在 iPad 上 safari 浏览器中测试过:
// touchstart 和 touchend 不作处理container.addEventListener('touchstart',function(e) { }, false);container.addEventListener('touchend',function(e) { }, false);// touchmove 中更新 lon、lat(在 iOS,safari 上测试可用)container.addEventListener('touchmove',function(e) {// 更新 debug 信息log.innerText = JSON.stringify(e.touches[0], null, 4);if (e.touches[0] && touchmoveId === e.touches[0].identifier) {var dx = e.touches[0].clientX - touchmoveX;var dy = e.touches[0].clientY - touchmoveY;lon += -dx*0.1;lat += dy*0.1;} else {touchmoveId = e.touches[0].identifier;}touchmoveX = e.touches[0].clientX;touchmoveY = e.touches[0].clientY;}, false);
通过拖放图片来加载新的全景图:
document.addEventListener( 'dragover', function ( event ) {event.preventDefault();event.dataTransfer.dropEffect = 'copy';}, false );document.addEventListener( 'dragenter', function ( event ) {document.body.style.opacity = 0.5;}, false );document.addEventListener( 'dragleave', function ( event ) {document.body.style.opacity = 1;}, false );document.addEventListener( 'drop', function ( event ) {event.preventDefault();var reader = new FileReader();reader.addEventListener( 'load', function ( event ) {material.map.image.src = event.target.result;material.map.needsUpdate = true;}, false );reader.readAsDataURL( event.dataTransfer.files[ 0 ] );document.body.style.opacity = 1;}, false );
窗口改变大小后,自动更新 aspect 比例(移动端屏幕旋转后可自适应):
window.addEventListener( 'resize', onWindowResize, false );function onWindowResize() {// 重新设置 aspect 比例camera.aspect = window.innerWidth / window.innerHeight;// 生效camera.updateProjectionMatrix();// 调整渲染得到的 DOM 元素renderer.setSize( window.innerWidth, window.innerHeight );}
针对不同移动端的 touch event 的效果不一致的问题,我们使用陀螺仪来交互:
// 仅当 PC 以及没有陀螺仪的移动设备,设置 usegyro 为 falsevar usegyro = true;// 默认关闭绝对定位var gyroabsolute = false;var gn = new GyroNorm();var gyro = {"x": 0.0,"y": 0.0,"x0": 0.0,"y0": 0.0,"inited": false};gn.init().then(function(){gn.start(function(data){if (!usegyro) { return; }log.innerHTML = JSON.stringify(data, null, 4);if (gyroabsolute) {// 绝对定位,直接取 alpha、beta 值lon = 180-data.do.alpha;lat = data.do.beta - 90;log.innerHTML += "\n(绝对)\n";} else {// 相对定位,根据差量“调整” lon、latlog.innerHTML += "\n(相对)\n";if (gyro.inited) {if (Math.abs(data.do.gamma - gyro.x0) > 5) {lon += (data.do.gamma < gyro.x0)? 1.0 : -1.0;}if (Math.abs(data.do.beta - gyro.y0) > 5) {lat += (data.do.beta > gyro.y0)? 1.0 : -1.0;}} else {gyro.x0 = data.do.gamma;gyro.y0 = data.do.beta;gyro.inited = true;}}});}).catch(function(e){// Catch if the DeviceOrientation or DeviceMotion is not supported// by the browser or device$("#usegyro").attr("disabled", true);$("#usegyro").attr("checked", false);usegyro = false;$("#gyroabsolute").attr("disabled", true);$("#gyroabsolute").attr("checked", false);gyroabsolute = false;});
上面的 data 是陀螺仪传感器的输出数据,内容如下:
// 当前方向// data.do.alpha ( deviceorientation event alpha value )// data.do.beta ( deviceorientation event beta value )// data.do.gamma ( deviceorientation event gamma value )// data.do.absolute ( deviceorientation event absolute value )// 三个方向的加速度// data.dm.x ( devicemotion event acceleration x value )// data.dm.y ( devicemotion event acceleration y value )// data.dm.z ( devicemotion event acceleration z value )// 考虑了重力的加速度// data.dm.gx ( devicemotion event accelerationIncludingGravity x value )// data.dm.gy ( devicemotion event accelerationIncludingGravity y value )// data.dm.gz ( devicemotion event accelerationIncludingGravity z value )// 角速度// data.dm.alpha ( devicemotion event rotationRate alpha value )// data.dm.beta ( devicemotion event rotationRate beta value )// data.dm.gamma ( devicemotion event rotationRate gamma value )
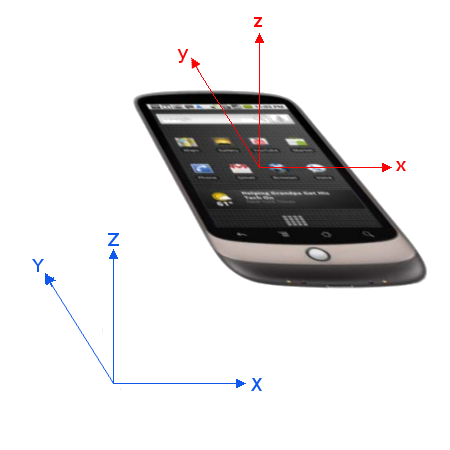
绕着 z、y、x 轴正方向旋转角度分别为 alpha、beta 和 gamma。
详细见 DeviceOrientation Event Specification。
这三个方向符合预期。
可以借鉴的库:parallax.js。
全景漫游的完整代码可以在 district10/poicreator: Create POIs 查看。
在线:Panorama。
Three.js 文档:three.js - documentation - Reference - TextureLoader
