@windmelon
2018-12-20T08:23:19.000000Z
字数 3600
阅读 2884
智能机器人实验(二):视觉3D点云图构建与深度测量
智能机器人实验
实验目的
了解深度图像处理的一般工作流程,掌握OpenCV,Eigen,PCL等第三方库的使用
尝试自行搭建双目视觉系统,实现对视图中各物体的深度测量。
实验内容
- 矩阵运算库Eigen的使用
- 彩色图、深度图的读取与参数提取
- 相机参数加载与使用
- 点云地图拼接
- 双目视觉系统标定与深度测量(限实验设计)
实验平台和工具
Ubuntu 16.04 虚拟机
C++
OpenCV 3
实验程序文件
color
depth
CMakeLists.txt
joinMap.cpp
pose.txt
Color和depth文件夹下分别放置了5张彩色和深度图,取自同一个RGB-D摄像机,按序号配对;
CMakeList.txt为编译配置文件,joinMap.cpp为点云拼接主程序,pose.txt为相机参数。
实验步骤
1.Eigen实现矩阵定义、矩阵加法、矩阵乘法和矩阵转置
矩阵的定义非常简单,Eigen里有模板类Matrix和用该模板定义好的矩阵和向量
Matrix< typename Scalar, int RowsAtCompileTime, int ColsAtCompileTime >
#数据类型为float的4X4矩阵
typedef Matrix< float, 4, 4 > Matrix4f;
#数据类型为float的3X1列向量
typedef Matrix< float, 3, 1 > Vector3f;
#数据类型为int的1X2行向量
typedef Matrix< int, 1, 2 > RowVector2i;
#数据类型为double的自定义大小的矩阵
typedef Matrix< double, Dynamic, Dynamic > MatrixXd;
使用方法如下
#include <iostream>#include <Eigen/Dense>using Eigen::MatrixXd;int main(){MatrixXd m(2,2);m(0,0) = 3;m(1,0) = 2.5;m(0,1) = -1;m(1,1) = m(1,0) + m(0,1);std::cout << m << std::endl;}
实现矩阵加减乘法也很简单,因为Matrix类已经重载过这些操作符,直接使用即可
MatrixXd m(2,2);m(0,0) = 3;m(1,0) = 2.5;m(0,1) = -1;m(1,1) = m(1,0) + m(0,1);std::cout << "this is matrix m:\n" << m << std::endl;MatrixXd n(2,2);n(0,0) = 1;n(1,0) = 2;n(0,1) = 3;n(1,1) = 4;std::cout << "this is matrix n:\n" << n << std::endl;std::cout << "this is the result of m+n:\n" << m+n << std::endl;std::cout << "this is the result of m*n:\n" << m*n << std::endl;
this is matrix m:
3 -1
2.5 1.5
this is matrix n:
1 3
2 4
this is the result of m+n:
4 2
4.5 5.5
this is the result of m*n:
1 5
5.5 13.5
实现矩阵转置也很方便
std::cout << "this is the result of m^T:\n" << m.transpose() << std::endl;
this is the result of m^T:
3 2.5
-1 1.5
2.彩色图、深度图的读取与参数提取
vector<cv::Mat> colorImgs, depthImgs; // 彩色图和深度图vector<Eigen::Isometry3d, Eigen::aligned_allocator<Eigen::Isometry3d>> poses; // 相机位姿ifstream fin("./pose.txt");if (!fin){cerr<<"请在有pose.txt的目录下运行此程序"<<endl;return 1;}for ( int i=0; i<5; i++ ){boost::format fmt( "./%s/%d.%s" ); //图像文件格式colorImgs.push_back( cv::imread( (fmt%"color"%(i+1)%"png").str() ));depthImgs.push_back( cv::imread( (fmt%"depth"%(i+1)%"pgm").str(), -1 )); // 使用-1读取原始图像double data[7] = {0};for ( auto& d:data )fin>>d;Eigen::Quaterniond q( data[6], data[3], data[4], data[5] );Eigen::Isometry3d T(q);T.pretranslate( Eigen::Vector3d( data[0], data[1], data[2] ));poses.push_back( T );}
首先读入两组图片,一组是颜色图,一组是深色图
3.相机参数加载与使用
相机位姿数据记录的形式是平移向量加旋转四元数
[x; y; z; qx; qy; qz; qw];
每一对深度图和颜色图都有对应的相机位姿数据,也读入进来并转化为旋转矩阵,存入数组中
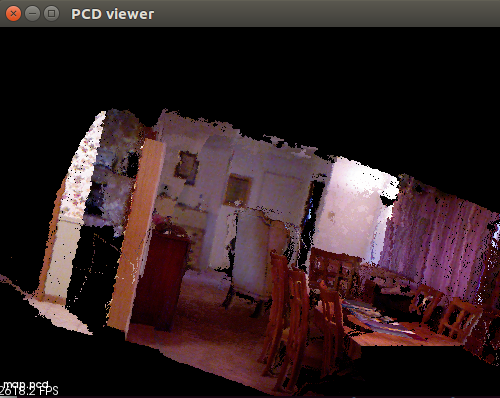
4.点云图拼接
// 定义点云使用的格式:这里用的是XYZRGBtypedef pcl::PointXYZRGB PointT;typedef pcl::PointCloud<PointT> PointCloud;// 新建一个点云PointCloud::Ptr pointCloud( new PointCloud );for ( int i=0; i<5; i++ ){cout<<"转换图像中: "<<i+1<<endl;cv::Mat color = colorImgs[i];cv::Mat depth = depthImgs[i];Eigen::Isometry3d T = poses[i];for ( int v=0; v<color.rows; v++ )for ( int u=0; u<color.cols; u++ ){unsigned int d = depth.ptr<unsigned short> ( v )[u]; // 深度值if ( d==0 ) continue; // 为0表示没有测量到Eigen::Vector3d point;point[2] = double(d)/depthScale;point[0] = (u-cx)*point[2]/fx;point[1] = (v-cy)*point[2]/fy;Eigen::Vector3d pointWorld = T*point;PointT p ;p.x = pointWorld[0];p.y = pointWorld[1];p.z = pointWorld[2];p.b = color.data[ v*color.step+u*color.channels() ];p.g = color.data[ v*color.step+u*color.channels()+1 ];p.r = color.data[ v*color.step+u*color.channels()+2 ];pointCloud->points.push_back( p );}}
对于每张图的每个像素,生成一个点云数据
点云的计算流程大致为:
对于每个有深度的像素点,将该点的坐标由相机坐标系转换到世界坐标系
并将颜色图中该像素点对应的颜色赋给该点云
运行程序,结果如图
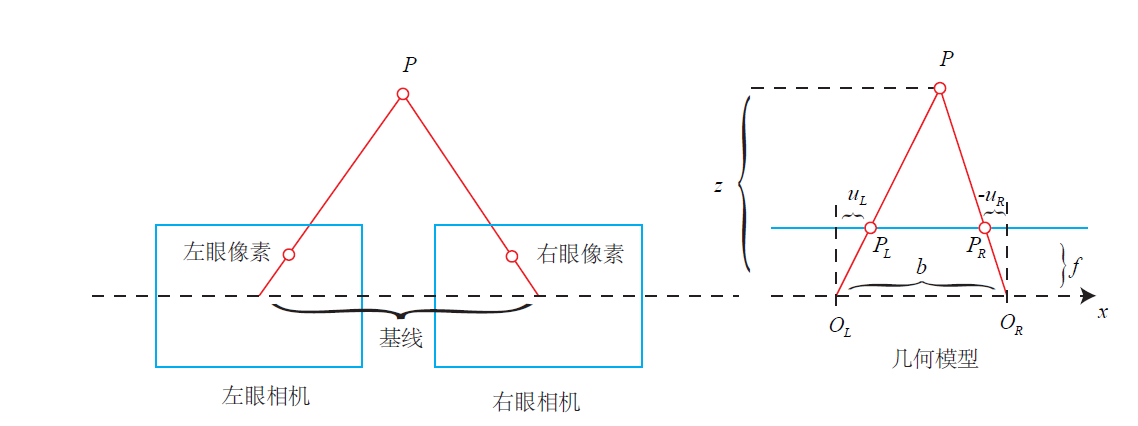
5.双目视觉系统标定与深度测量
双目测距原理:通过两个摄像头同时成像,可以确定物体在从相机光心到归一化平面连线上的具体位置
双目测距步骤:
1. 双目摄像机标定
2. 双目校正
3. 双目匹配(计算视差)
4. 计算深度
关键代码:
Mat alineImgL,alineImgR;ImageRectify imgRectify;imgRectify.run(&leftCam,&rightCam,&alineImgL,&alineImgR);cout<<"Start disparity!"<<endl;StereoDepth calcDepth;calcDepth.depthSGM(alineImgL,alineImgR);
实验总结
1.单目摄像头的内参和外参
内参和外参
内参:相机的固定参数,用于进行相机坐标系到成像坐标系的转换。包括相机焦距,像素大小等
外参:用于描述相机与世界坐标系的关系,包括旋转矩阵和平移向量
外参的矩阵表示:四元数和平移向量组成旋转矩阵和平移向量的4X4矩阵
2.双目摄像头的内参和外参
内参和外参
内参:即每个相机的内参
外参:每个相机的外参,相机间的基线,右摄像头相对于左摄像头的旋转矩阵和平移向量
本征矩阵:包含空间中摆布两个相机的扭转R和平移信息T,描述了摆布相机间的位姿关系;但不包罗相机自己的任何信息;
