@adonia
2016-10-09T16:40:57.000000Z
字数 13461
阅读 286
angular2(3): 构建简单的Reddit应用
angular2
在上一章节,介绍了开发angular2应用的基本流程---搭建环境、管理依赖、创建组件、编译运行等。
下面,将一步步构建一个稍复杂的应用,效果如下:
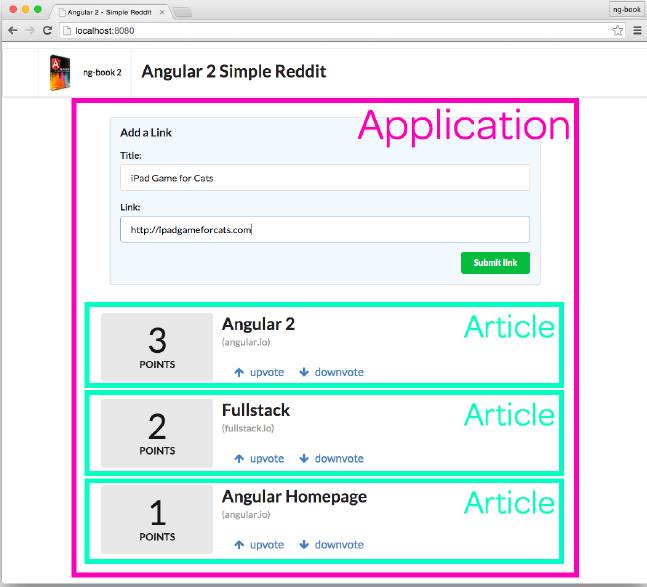
首先,将基于上一章节的代码为基础,一步步地介绍如何开发。
增加bootstrap样式
增加bootstrap依赖
在工程根目录,执行
cnpm install bootstrap@3 --save命令,下载bootstrap3依赖至node_modules目录,并将依赖声明添加至package.json中。增加Jquery依赖
由于bootstrap需要依赖jquery,同样,在工程根目录下,执行
cnpm install jquery --save。目前,
package.json中的依赖应该如下:"dependencies": {"angular2": "2.0.0-beta.0","bootstrap": "^3.3.7","es6-promise": "^3.0.2","es6-shim": "^0.33.3","jquery": "^3.1.0","reflect-metadata": "0.1.2","rxjs": "5.0.0-beta.0","systemjs": "0.19.6","zone.js": "0.5.10"}
增加bootstrap样式
修改index.html内容如下:
<!DOCTYPE html><html lang="zh-cn"><head><meta charset="UTF-8"><meta http-equiv="X-UA-Compatible" content="IE=edge"><meta name="viewport" content="width=device-width, initial-scale=1"><title>Reddit</title><script src="node_modules/es6-shim/es6-sham.js"></script><script src="node_modules/angular2/bundles/angular2-polyfills.js"></script><script src="node_modules/systemjs/dist/system.src.js"></script><script src="node_modules/rxjs/bundles/Rx.js"></script><script src="node_modules/angular2/bundles/angular2.dev.js"></script><script src="node_modules/jquery/dist/jquery.min.js"></script><script src="node_modules/bootstrap/dist/js/bootstrap.min.js"></script><link rel="stylesheet" href="node_modules/bootstrap/dist/css/bootstrap.min.css"></link></head><body><script>System.config({packages: {app: {format: 'register',defaultExtension: 'js'}}});System.import('app.js').then(null, console.error.bind(console));</script><div class="container"><reddit></reddit></div></body></html>
Tips:
第6,7行是为了适应IE浏览器和设备尺寸;
第16,17行为bootstrap的javascript依赖,需要注意的是,jquery的依赖,必须放置在bootstrap的上方;
第19行为bootstrap的样式文件
第35行中的
container是bootstrap的样式风格
运行 npm run go,访问localhost:8080查看页面样式是否正确。
开发Form表单
让我们修改app.ts中的内容,使用bootstrap来修饰上图效果中的form表单。代码如下:
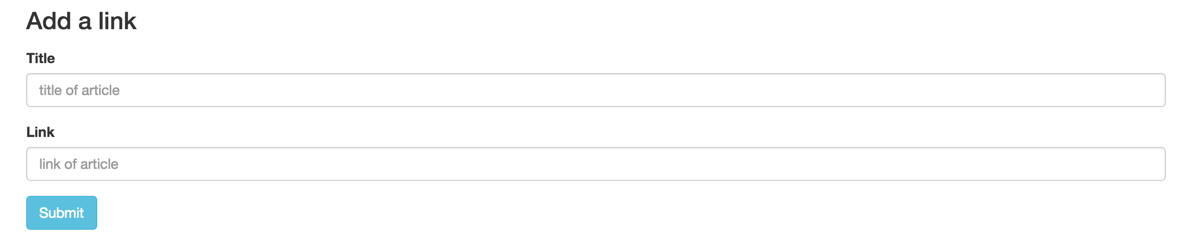
import {bootstrap} from "angular2/platform/browser";import {Component} from "angular2/core";@Component({selector: 'reddit',template: `<form role="form"><div class="form-group"><h3>Add a link</h3></div><div class="form-group"><label for="titleInput">Title</label><input type="text" class="form-control" id="titleInput" placeholder="title of article"></div><div class="form-group"><label for="linkInput">Link</label><input type="text" class="form-control" id="linkInput" placeholder="link of article"></div><button class="btn btn-info">Submit</button></form>`})class RedditApp {}bootstrap(RedditApp);
这里,我们创建了个RedditApp组件,其中包括了两个input,分别用来输入 ‘文章标题’ 和 ‘文章链接’;以及一个按钮,用于提交请求。保持npm run go命令处于运行状态,会自动检测到app.ts的变化,这时重新刷新页面,得到的结果如下图:
下面,为Submit按钮增加个事件---在点击按钮时,获取title和link两个input输入的内容,并做后续的处理。修改后的app.ts如下:
@Component({selector: 'reddit',template: `<form role="form"><div class="form-group"><h3>Add a link</h3></div><div class="form-group"><label for="title">Title</label><input type="text" class="form-control" name="title" placeholder="title of article" #newTitle></div><div class="form-group"><label for="link">Link</label><input type="text" class="form-control" name="link" placeholder="link of article" #newLink></div><button class="btn btn-info" (click)="addArticle(newTitle, newLink)">Submit</button></form>`})class RedditApp {addArticle(title: HTMLInputElement, link: HTMLInputElement) {console.log(`adding article, title: ${title.value}, link: ${link.value}`);}}
Notes:
在第10行,
title输入框中增加个属性#newTitle;在第14行,
link输入框中增加个属性#newLink;在第16行,
Submit按钮增加个事件---(click)="addArticle(newTitle, newLink)"。
<input type="text" #newTitle>还记得在angular1中有个概念---数据绑定,使用的是
ng-model指令,作用是能够将组件和变量绑定起来,同时,在组件的值发生变化时,能够同步至变量中。而此处的#newTitle的作用类似于ng-model,只不过,这里的#更像是C语言中的指针的概念。此处newTitle绑定的是title这个Input组件,意味着它代表的是一个HTML组件,是个Object对象,而不再是angular1中的值了。如果需要获取input中的值,就需要使用形如newTitle.value的方法了。(click)="addArticle(newTitle, newLink)"(click)是为组件绑定的点击事件,等同于onClick。(click)="addArticle(newTitle, newLink)"意味着,在组件触发点击事件时,会调用addArticle方法,该方法定义在类RedditApp中。方法传入的两个参数---newTitle和newLink,即为使用#绑定的两个input组件。定义事件逻辑
app.ts中的第22行,在类RedditApp中定义方法addArticle,传入两个参数,注意此处的参数类型为HTMLInputElement,正如上面介绍的,#绑定的是一个组件,Object对象。
方法中使用了ES6中的新特性---反引号括起的模板字符串。${title.value}则会得到Input组件中的输入值。
开发Article展示列表
开发Article展示列表(1)
在app.ts中增加用于展示文件列表的组件(追加在bootstrap(RedditApp);的下方),代码如下:
@Component({selector: 'reddit-article',host: {class: 'row'},template: `<div class="container"><div class="row"><div class="col-md-2 text-center" style="background-color: #eee;"><h2>{{votes}}</h2><h4>POINTS</h4></div><div class="col-md-10"><div style="margin-left: 16px;"><a href="{{link}}"><h4>{{title}}</h4></a></div><ul class="nav navbar-nav pull-left"><li><a href (click)="voteUp()"><li class="glyphicon glyphicon-arrow-up"></li>upvote</a></li><li><a href (click)="voteDown()"><li class="glyphicon glyphicon-arrow-down"></li>downvote</a></li></ul></div></div></div>`})class ArticleComponent {// 点赞数votes: number;title: string;link: string;constructor() {this.votes = 10;this.title = 'angular2';this.link = 'http://angular.io';}voteUp() {this.votes += 1;}voteDown() {if(this.votes > 0) {this.votes -= 1;}}}bootstrap(ArticleComponent);
这里呢,先做个简单的示例,定义了ArticleComponent类,在构造方法中对其进行了初始化。我们先用默认值来看下,如何去渲染预期效果图的Article中的一列。
首先,Article中包含了三个属性---votes(点赞数),title(文章标题),link(文章链接);两个操作---点赞和不喜欢。三个属性的对应关系与表单组件中的是一致的,这里就不提了。两个操作,分别对应的是类ArticleComponent中的voteUp和voteDown方法。
组件定义的选择器为reddit-article,将其增加至index.html中,如下:
<div class="container"><reddit></reddit><reddit-article></reddit-article></div>
执行npm run go命令,运行应用,效果如下:
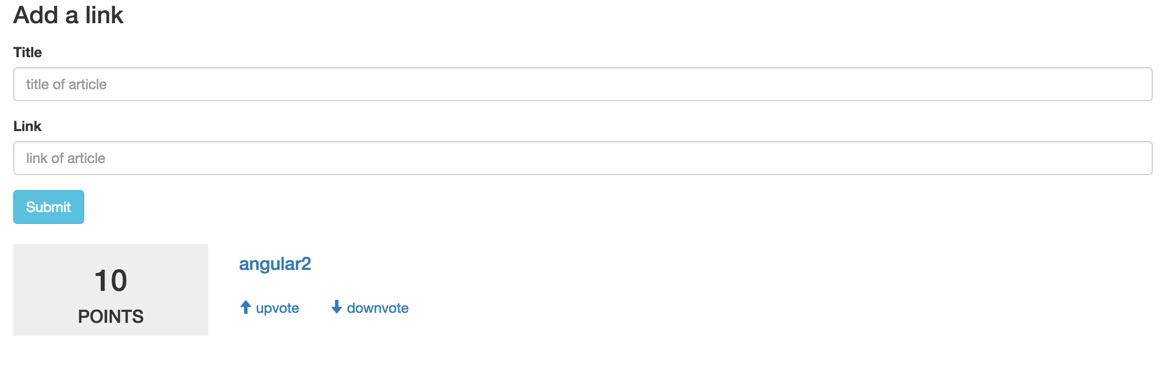
可以看出,跟预期的基本一致。点击upvote和downvote按钮发现,虽然点赞数跟着发生了变化,但是,紧跟着,整个页面自动刷新了,ArticleComponent组件被重新初始化,点赞数又回到了默认的10。这是为什么呢?
在Javascript中,点击事件的默认机制是会将事件处理向上转移。也就是说,在upvote按钮点击时,首先触发了voteUp方法,将点赞数加1;紧接着,点击事件被传递给父组件--- <a href></a>,页面跳转到空链接,整个页面重新刷新。
那么,为了解决这个问题,需要在两个事件处理方法中增加return false,如下:
voteUp() {this.votes += 1;return false;}voteDown() {if(this.votes > 0) {this.votes -= 1;}return false;}
修改app.ts,重新刷新页面,再次测试下。
再回到ArticleComponent组件的定义中,在注解中,增加个选项,如下:
host: {class: 'row'}
这里的作用呢,是相当于在组件中增加个样式,等同于<reddit-article class="row"><reddit-article>。其实,将该样式增加到template中的顶级div中,效果也是一样的。
可以将上述host配置移除,看看效果变化。
开发Article展示列表(2)
先来回顾下目前的实现,看下app.ts和index.html的代码结构:
--app.ts:
@Component({selector: 'reddit',template: `...`})class RedditApp {}bootstrap(RedditApp);@Component({selector: 'reddit-article',template: `...`})class ArticleComponent {}bootstrap(ArticleComponent);
--index.html:
<div class="container"><reddit></reddit><reddit-article></reddit-article></div>
app.ts中定义了两个组件---reddit和reddit-article,分别用来渲染 表单 和 文章列表项。两个组件都通过bootstrap引导。相应地,在index.html中,也使用两个标签。
但这样的使用方式并不好,表单和文章列表项对外应该是一体的,也就是说,在index.html中,应该只需要引用reddit标签就可以了。下面就看下如何将reddit-article组件合并至reddit。
首先,将reddit-article标签从index.html中移出,放置到RedditApp的template中的form标签下方,其余保持不变。此时,app.ts中的内容如下:
@Component({selector: 'reddit',template: `<form role="form"><div class="form-group"><h3>Add a link</h3></div><div class="form-group"><label for="title">Title</label><input type="text" class="form-control" name="title" placeholder="title of article" #newTitle></div><div class="form-group"><label for="link">Link</label><input type="text" class="form-control" name="link" placeholder="link of article" #newLink></div><button class="btn btn-info" (click)="addArticle(newTitle, newLink)">Submit</button></form><reddit-article></reddit-article>`})class RedditApp {addArticle(title: HTMLInputElement, link: HTMLInputElement) {console.log(`adding article, title: ${title.value}, link: ${link.value}`);}}bootstrap(RedditApp);@Component({selector: 'reddit-article',host: {class: 'row'},template: `<div class="container"><div class="row"><div class="col-md-2 text-center" style="background-color: #eee;"><h2>{{votes}}</h2><h4>POINTS</h4></div><div class="col-md-10"><div style="margin-left: 16px;"><a href="{{link}}"><h4>{{title}}</h4></a></div><ul class="nav navbar-nav pull-left"><li><a href (click)="voteUp()"><li class="glyphicon glyphicon-arrow-up"></li>upvote</a></li><li><a href (click)="voteDown()"><li class="glyphicon glyphicon-arrow-down"></li>downvote</a></li></ul></div></div></div>`})class ArticleComponent {// 点赞数votes: number;title: string;link: string;constructor() {this.votes = 10;this.title = 'angular2';this.link = 'http://angular.io';}voteUp() {this.votes += 1;return false;}voteDown() {if(this.votes > 0) {this.votes -= 1;}return false;}}bootstrap(ArticleComponent);
index.html中的内容如下:
<div class="container"><reddit></reddit></div>
在工程根目录下执行npm run go,访问http://localhost:8080查看是不是预期的效果。
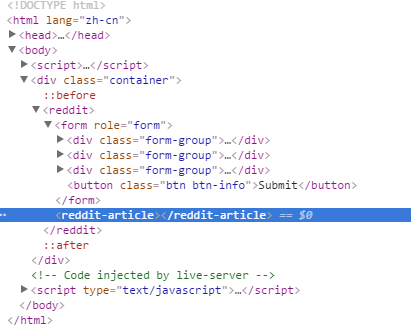
按照上面的修改,将组件reddit-article放置在组件reddit中,但是,依然有显式引导ArticleComponent类。如果注释bootstrap(ArticleComponent);,待重新编译app.ts后,再次访问http://localhost:8080,会发现文章列表模块不见了。在浏览器中按下F12,查看页面元素,会发现reddit-article组件并没有被解析:
之前通过bootstrap(ArticleComponent);方式来引导组件,这样在RedditApp能够识别组件ArticleComponent。通过bootstrap的方式引导的组件,是全局的;就如同在angular1中定义的指令一般。但是,在angular2中,如果要引用组件,就需要显式声明引用。那么,如果想要在RedditApp中使用ArticleComponent组件,需要在RedditApp中增加directives属性,如下:
@Component({selector: 'reddit',directives: [ArticleComponent],template: `...
重新编译app.ts后,再次访问http://localhost:8080,发现页面空白,打开F12,发现Console中有报错:

错误提示,RedditApp中的directive的值是undefined,说明directives: [ArticleComponent],中指明的组件ArticleComponent,在解析RedditApp的时候,并没有被初始化呢。现在要做的就是将ArticleComponent组件的定义移至RedditApp的上方。
现在的代码结构如下:
@Component({selector: 'reddit-article',host: {class: 'row'},template: `...`})class ArticleComponent {...}@Component({selector: 'reddit',directives: [ArticleComponent],template: `...`})class RedditApp {...}bootstrap(RedditApp);
这次,页面的渲染结果就是预期的了。 具体参考完整代码。
开发Article展示列表(3)
现在考虑如何在列表中展示多篇文章。
首先,Article包括三个属性---title、link和votes,就是现在ArticleComponent中的属性定义。那现在如果要在ArticleComponent中渲染多篇文章的话,就需要将Article抽象出来。在ArticleComponent的上方新建Article类:
class Article {title: string;link: string;votes: number;constructor(title: string, link: string, votes: number) {this.title = title;this.link = link;this.votes = votes || 0;}}
定义了Article类之后,那在ArticleComponent中,就可以直接引用Article对象了,如下:
class ArticleComponent {article: Article;constructor() {this.article = new Article('angular2', 'http://angular2.io', 10);}voteUp() {this.article.votes += 1;return false;}voteDown() {if(this.article.votes > 0) {this.article.votes -= 1;}return false;}}
这里定义了属性---article,类型是Article;定义的方式跟之前的title: string;相同,只不过这次,指定的类型是复杂对象。
注意,此时ArticleComponent中的属性变成了article,那么在template中的引用---title、link和votes,这些就无法直接解析了。需要分别以article.title、article.link和article.votes这种对象属性的方式引用了。如下:
<div class="container"><div class="row"><div class="col-md-2 text-center" style="background-color: #eee;"><h2>{{article.votes}}</h2><h4>POINTS</h4></div><div class="col-md-10"><div style="margin-left: 16px;"><a href="{{article.link}}"><h4>{{article.title}}</h4></a></div><ul class="nav navbar-nav pull-left"><li><a href (click)="voteUp()"><li class="glyphicon glyphicon-arrow-up"></li>upvote</a></li><li><a href (click)="voteDown()"><li class="glyphicon glyphicon-arrow-down"></li>downvote</a></li></ul></div></div></div>
待app.ts重新编译后,访问页面,应该是可以正常显示的。
再来审视下ArticleComponent类,其中的voteUp()和voteDown()方法是直接操作的Article对象的属性,这不符合面向对象的思想,最好的方式是在Article中定义相应的方法,在ArticleComponent中,通过调用Article的方法的方式来修改其属性。
在Article类中增加如下方法:
voteUp() {this.votes += 1;}voteDown() {if(this.votes > 0) {this.votes -= 1;}}
然后,将ArticleComponent类中的方法修改为:
voteUp() {this.article.voteUp();return false;}voteDown() {this.article.voteDown();return false;}
注意,此处方法的返回值不能丢 。
到现在为止,对照MVC框架中的概念,Article对应着Model,ArticleComponent对应着Controller。
具体参考完整代码。
开发Article展示列表(4)
下面看下怎样去存储文章列表。
在RedditApp中定义一个属性---articles,用来存储提交的文章列表,如下:
class RedditApp {articles: Article[];constructor() {this.articles = [new Article('angualr2', 'http://angular2.io', 3),new Article('Fullstack', 'http://fullstack.io', 2),new Article('angular1', 'http://angular1.io', 1)]}...}
RedditApp中定义的articles的类型是Article[],指的是元素类型为Article的数组。也可以定义为Array[Article]。
那如何将RedditApp中存储的Article集合传给ArticleComponent组件去渲染呢?
看下之前ArticleComponent的实现,接收的是单个Article对象。那是不是可以在<reddit-article>标签中增加个参数,然后通过标签的参数,将其传递给ArticleComponenet组件呢?例如:
<reddit-article [article]='article1'></reddit-article><reddit-article [article]='article2'></reddit-article>...
angular2中提供了inputs属性,来支持上述特性。在ArticleComponent中增加inputs属性,如下:
@Component({selector: 'reddit-article',inputs: ['article'],host: {class: 'row'},template: `...
那么现在,就可以使用<reddit-article [article]='myArticle'></reddit-article>的形式,将myArticle传递给ArticleComponent类了。
N.B. :
[article]中的article需要跟inputs中的保持一致。myArticle为传递的变量名,这里任意,只要跟后续使用到的保持一致即可。
通过[article]='myArticle'的方式,将外部Article对象作为参数的方式传给ArticleComponent类的话,之前的构造方法中的默认值就不需要了。需要将ArticleComponent类中的构造方法移除:
class ArticleComponent {article: Article;voteUp() {this.article.voteUp();return false;}voteDown() {this.article.voteDown();return false;}}
现在,就来考虑下将RedditApp中的Article数组中的元素,一个个地,通过[article]参数的方式传递给ArticleComponent组件。遍历数组,就需要用到之前提到过的NgFor组件了。
首先,在app.ts中引入NgFor,如下:
import {NgFor} from "angular2/common";
接着,将RedditApp中的template下的<reddit-article></reddit-article>标签替换成如下内容:
<reddit-article *ngFor="#myArticle of articles" [article]="myArticle"></reddit-article>
Note:
*ngFor表示NgFor组件,跟之前介绍的一样;
[article]="myArticle"中,article需要跟inputs中的对应起来;myArticle即为NgFor中的变量名。也就是说,上述语句写成<reddit-article *ngFor="#foo of articles" [article]="foo"></reddit-article>也是可以的。但是不能写成<reddit-article *ngFor="#myArticle of articles" [foo]="myArticle"></reddit-article>。
- 完成
addArticle动作
按照预期,可以在Form表单中输入title和link信息,然后,点击submit按钮增加文章。对应的事件处理在RedditApp中的addArticle方法。
其实,addArticle方法的逻辑很简单,只需要将title和link中的值取出,然后构造一个Article对象,放到articles数组中就可以了。如下:
addArticle(title: HTMLInputElement, link: HTMLInputElement) {console.log(`adding article, title: ${title.value}, link: ${link.value}`);this.articles.push(new Article(title.value, link.value, 0));title.value = '';link.value = '';}
待app.ts重新编译后,再次访问http://localhost:8080,验证下,应该可以正常处理的。
- 一点优化
现在呢,想将点赞数较多的文章放在靠前的区域,类似一个排行榜的感觉。也就意味着,在每次点赞数发生变化时,按照点赞数从多到少进行排序,从而来展示文章列表。
首先,实现排序的功能,在RedditApp类中增加如下方法:
sortedArticles(): Article[] {return this.articles.sort((a: Article, b: Article) => b.votes - a.votes);}
之前是对articles进行遍历展示---<reddit-article *ngFor="#myArticle of articles" [article]="myArticle"></reddit-article>。那现在要遍历的对象应该是排序后的结果,也就是sortedArticles()的返回值。那么,template中的遍历代码片段应该更改为:
<reddit-article *ngFor="#myArticle of sortedArticles()" [article]="myArticle"></reddit-article>
N.B.: 此处是方法调用,不要忘记
()。
可参考完整代码。
