@huangyichun
2017-08-30T07:50:18.000000Z
字数 16247
阅读 1244
设计模式
设计模式
- 装饰者
- 适配器
- 工厂方法
- 组合
- 策略模式
- 责任链模式
- 单例
- 模板方法
观察者
状态
- 迭代器
- 外观
- 代理
- 抽象工厂
面向对象原则
通过封装、继承、多态把程序的耦合度降低。
UML类图: 依赖、组合、继承、实现、聚合、关联
单一职责原则
- 就一个类而言,应该仅有一个引起它变化的原因。
职员类例子:
比如在职员类里,将工程师、销售人员、销售经理这些情况都放在职员类里考虑,其结果将会非常混乱,在这个假设下,职员类里的每个方法都要if else判断是哪种情况,从类结构上来说将会十分臃肿,并且上述三种的职员类型,不论哪一种发生需求变化,都会改变职员类!这个是大家所不愿意看到的!
开放闭合原则
- 对拓展开放,对修改关闭。
- 一个类、模块、函数等应该对于扩展是开放的,但是对于修改是封闭的,简单说就是当你的系统要升级维护需要对原有的代码进行修改时,可能会将错误引入到了原来的旧代码中,因此,在软件升级维护时,应该尽可能的通过扩展的方式而不是修改原有的代码,虽然在实际开发中,修改原本的代码跟扩展代码都是同时存在的,但是为了程序的可扩展性,在制作初期,应该遵循开闭原则。
依赖倒置原则
- 针对接口编程,不要对实现编程
- 第一:高层模块不应该直接依赖低层模块,两者应该依赖其抽象
- 第二:抽象不应该依赖细节
- 第三:细节应该依赖抽象
里氏替换原则
:子类必须能够替换掉他们的父类型。
面向对象的语言有三大特性:封装、继承、多态,里氏替换原则就是依赖于继承、多态这两大特性,它的原则就是只要父类能出现的地方子类就能出现,而且不会报错,但是子类能出现的地方,父类不一定能出现,术语就是 —— 抽象。
一个软件实体如果使用的时一个父类的话,那么一定适用于其子类,而且它察觉不出父类和子类的区别。
接口隔离原则
使用多个专门的接口,而不使用单一的总接口,即客户端不应该依赖那些它不需要的接口。
根据接口隔离原则,当一个接口太大时,我们需要将它分割成一些更细小的接口,使用该接口的客户端仅需知道与之相关的方法即可。每一个接口应该承担一种相对独立的角色,不干不该干的事,该干的事都要干。这里的“接口”往往有两种不同的含义:一种是指一个类型所具有的方法特征的集合,仅仅是一种逻辑上的抽象;另外一种是指某种语言具体的“接口”定义,有严格的定义和结构,比如Java语言中的interface。
迪米特法则
也叫最小知识原则,如果两个类不必彼此直接通信,那么这两个类就不应当发生直接的互相作用。如果其中一个类需要调用另一个类的某一个方法的话,可以通过第三者转发这个调用。
简单工厂模式
简单工厂模式解决的问题是如何去实例化一个合适的对象。
简单工厂模式的核心思想就是:有一个专门的类来负责创建实例的过程。
   具体来说,把产品看着是一系列的类的集合,这些类是由某个抽象类或者接口派生出来的一个对象树。而工厂类用来产生一个合适的对象来满足客户的要求。
   如果简单工厂模式所涉及到的具体产品之间没有共同的逻辑,那么我们就可以使用接口来扮演抽象产品的角色;如果具体产品之间有功能的逻辑或,我们就必须把这些共同的东西提取出来,放在一个抽象类中,然后让具体产品继承抽象类。为实现更好复用的目的,共同的东西总是应该抽象出来的。
设计一个计算器的,完成加减乘除操作。
public class Operation {//父类private double numberA = 0;private double numberB = 0;public double getNumberA() {return numberA;}public void setNumberA(double numberA) {this.numberA = numberA;}public double getNumberB() {return numberB;}public void setNumberB(double numberB) {this.numberB = numberB;}public double getResult(){double result =0;return result;}}
public class OperationAdd extends Operation {//加法操作@Overridepublic double getResult() {return getNumberA() + getNumberB();}}
public class OperationDiv extends Operation {//除法操作@Overridepublic double getResult() {if(getNumberB() == 0){throw new RuntimeException("除数不能为0");}return getNumberA() / getNumberB();}}
public class OperationMul extends Operation {//乘法操作@Overridepublic double getResult() {return getNumberA() * getNumberB();}}
public class OperationSub extends Operation{//减法操作@Overridepublic double getResult() {return getNumberA() - getNumberB();}}
public class OperationFactory {//简单工厂模式/*** 采用多态,根据传入的参数,返回父类引用子类对象* @param operate* @return*/public static Operation createOperate(String operate) {Operation operation;switch (operate) {case "+":operation = new OperationAdd();break;case "-":operation = new OperationDiv();break;case "*":operation = new OperationMul();break;case "/":operation = new OperationDiv();break;default:throw new RuntimeException("输入的符号不正确");}return operation;}}
public class Main {//测试方法public static void main(String[] args) {Operation operation = OperationFactory.createOperate("*");operation.setNumberA(10);operation.setNumberB(2);System.out.println(operation.getResult());}}
策略模式
定义了算法家族,分别封装起来,让他们之间可以互相替换,此模式让算法的变化,不会影响到使用算法的客户。
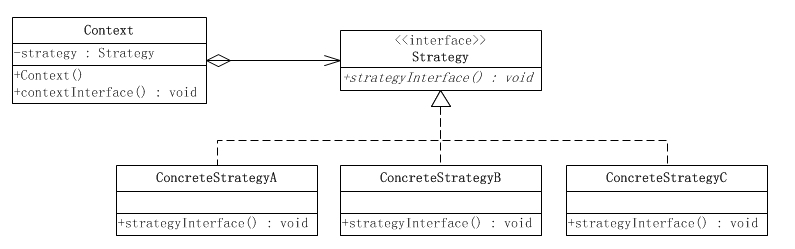
这个模式涉及到三个角色:
● 环境(Context)角色:持有一个Strategy的引用。
● 抽象策略(Strategy)角色:这是一个抽象角色,通常由一个接口或抽象类实现。此角色给出所有的具体策略类所需的接口。
● 具体策略(ConcreteStrategy)角色:包装了相关的算法或行为。
商场打折案例:
/*** 抽象算法类*/public interface CashStrategy {double acceptCash(double money);}
/*** 返利200返100等*/public class CashReturnStrategy implements CashStrategy {private double moneyCondition = 0.0d;private double moneyReturn = 0.0d;public CashReturnStrategy(double moneyCondition, double moneyReturn) {this.moneyCondition = moneyCondition;this.moneyReturn = moneyReturn;}@Overridepublic double acceptCash(double money) {if(money >= moneyCondition){money = money - (int)(money / moneyCondition) * moneyReturn;}return money;}}
/*** 打折*/public class CashRebateStrategy implements CashStrategy {private double moneyRebate = 1d;//打折额度public CashRebateStrategy(double moneyRebate) {this.moneyRebate = moneyRebate;}@Overridepublic double acceptCash(double money) {return money * moneyRebate;}}
/*** 正常价格*/public class CashNomalStrategy implements CashStrategy{@Overridepublic double acceptCash(double money) {return money;}}
/*** 策略模式初始版本* Created by huang on 17-4-12.*/public class CashContext {private CashStrategy cashStrategy;public CashContext(CashStrategy cashStrategy) {this.cashStrategy = cashStrategy;}public double getResult(double money){return cashStrategy.acceptCash(money);}}
/*** 策略模式与简单工厂模式结合*/public class CashContext_2 {CashStrategy cashStrategy;public CashContext_2(String type) {switch (type){case "正常收费":cashStrategy = new CashNomalStrategy();break;case "满300返100":cashStrategy = new CashReturnStrategy(300, 100);break;case "打8折":cashStrategy = new CashRebateStrategy(0.8);break;}}public double getResult(double money){return cashStrategy.acceptCash(money);}}
public class Main {public static void main(String[] args) {CashStrategy cashStrategy = new CashReturnStrategy(500,200);CashContext cashContext = new CashContext(cashStrategy);double money = cashContext.getResult(750.6);System.out.println(money);System.out.println("----------------------");//策略模式与简单工厂模式结合CashContext_2 cashContext_2 = new CashContext_2("打8折");money = cashContext_2.getResult(300);System.out.println(money );}}
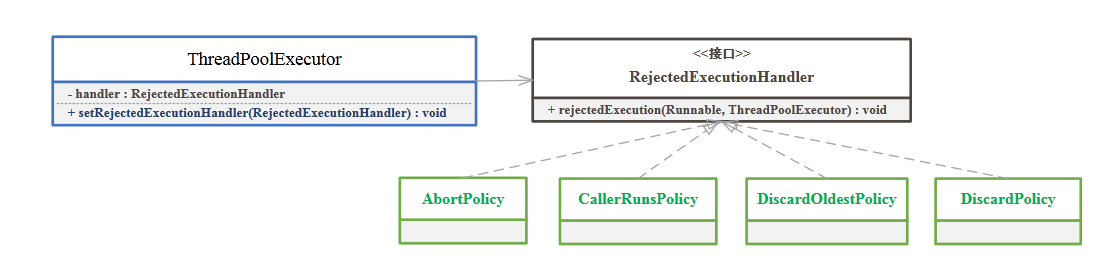
Jdk中使用策略模式:
线程池中当等待队列满时,处理策略有很多种,可以根据需求传入。
装饰模式
动态的给一个对象添加一些额外的职责,就增加功能来说,装饰模式比生成子类更为灵活。

在装饰模式中的各个角色有:
(1)抽象构件(Component)角色:给出一个抽象接口,以规范准备接收附加责任的对象。
(2)具体构件(Concrete Component)角色:定义一个将要接收附加责任的类。
(3)装饰(Decorator)角色:持有一个构件(Component)对象的实例,并实现一个与抽象构件接口一致的接口。
(4)具体装饰(Concrete Decorator)角色:负责给构件对象添加上附加的责任。

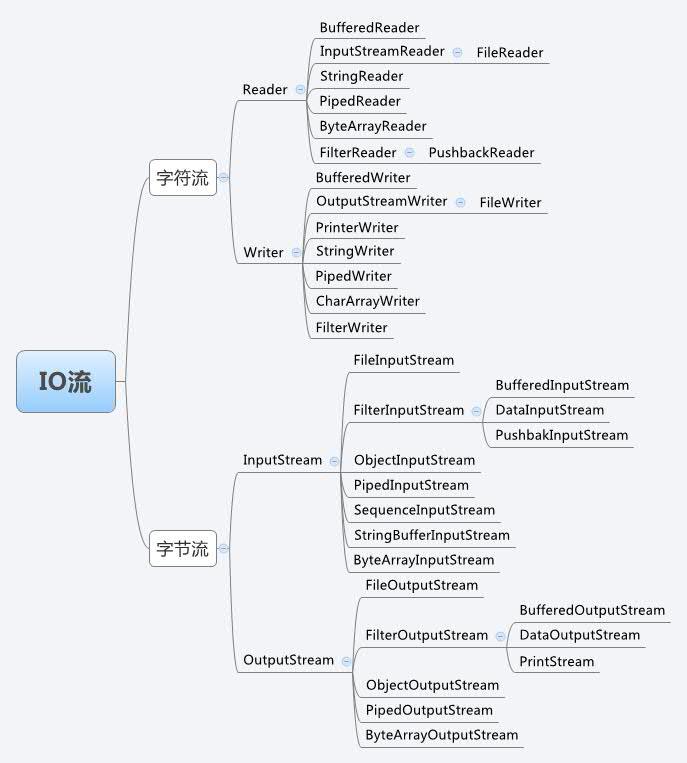
IO流采用了装饰者模式,其中InputStream为抽象构件,而FileInputStream, ObjectInputStream等为具体构件,FilterInputStream为装饰角色,它下面的子类,BufferedInputStream,DateInputStream等为具体装饰角色。
/*** 抽象对象,如果只有一个具体对象可以不要这个类*/public interface Componet {void operation();}
/*** 具体对象*/public class PersonComponent implements Componet{private String name;public PersonComponent(String name) {this.name = name;}@Overridepublic void operation() {System.out.println("装扮对象是"+name);}}
/*** 抽象装饰类*/public class FineryDecorator implements Componet {private Componet componet;public FineryDecorator(Componet componet) {//装饰对象this.componet = componet;}@Overridepublic void operation() {componet.operation();}}
/*** 具体装饰类*/public class LeatherDecorator extends FineryDecorator {public LeatherDecorator(Componet componet) {super(componet);}@Overridepublic void operation() {super.operation();System.out.println("穿皮鞋");}}
/***具体装饰类*/public class BigTrouserDecorator extends FineryDecorator {public BigTrouserDecorator(Componet componet) {super(componet);}@Overridepublic void operation() {super.operation();System.out.println("穿上垮库");}}
/***具体装饰类*/public class TShirtsDecorator extends FineryDecorator{public TShirtsDecorator(Componet componet) {super(componet);}@Overridepublic void operation() {super.operation();System.out.println("穿上T恤");}}
/*** 测试装饰模式*/public class Main {public static void main(String[] args) {PersonComponent person = new PersonComponent("小菜");FineryDecorator decorator = new LeatherDecorator(new TShirtsDecorator(new BigTrouserDecorator(person)));decorator.operation();}}
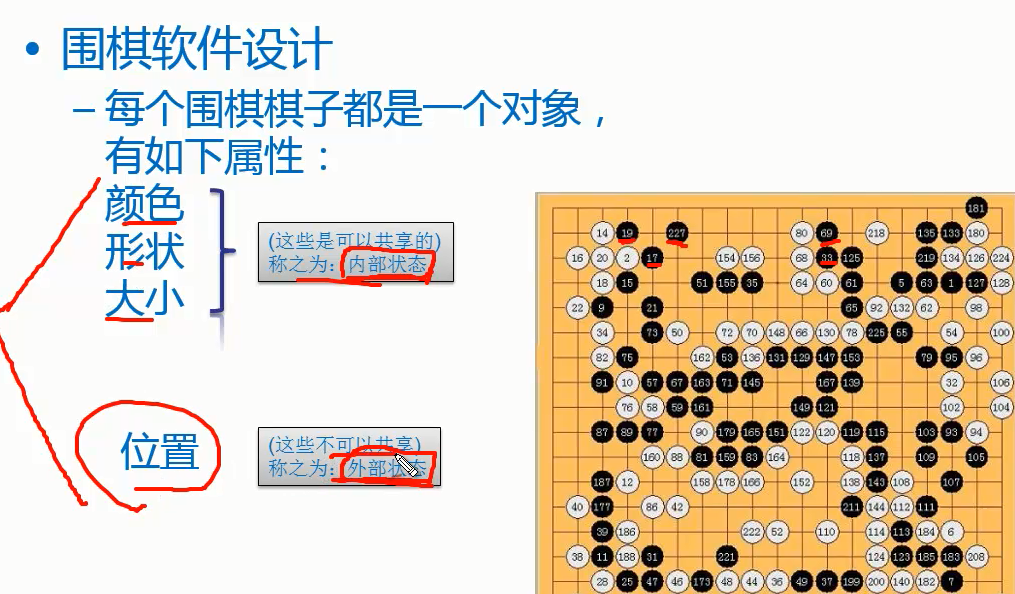
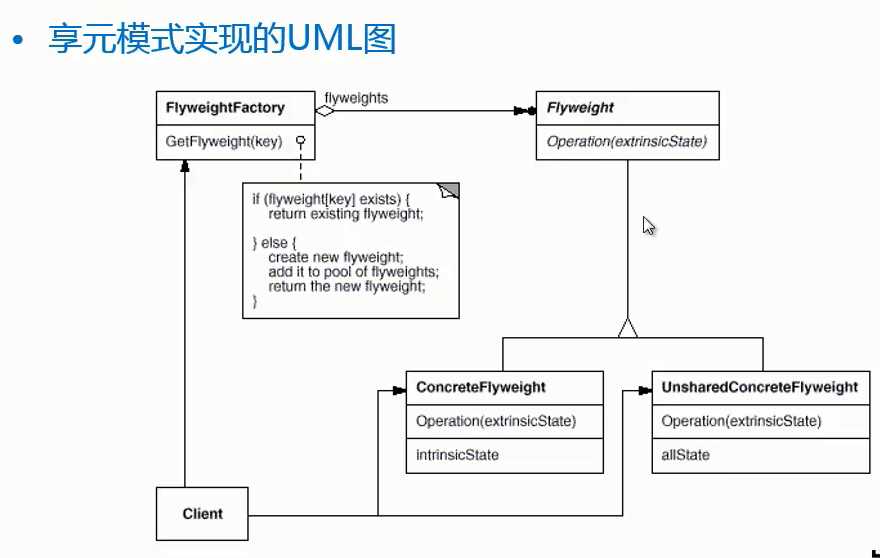
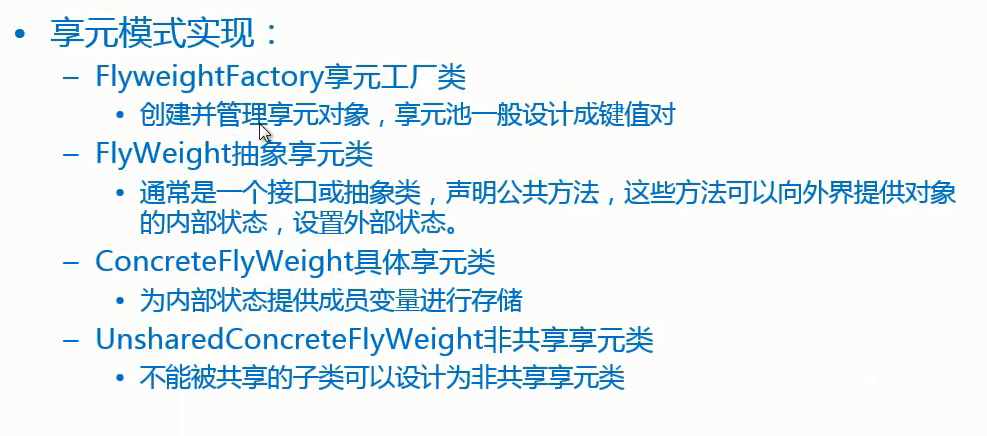
享元模式
- 场景:
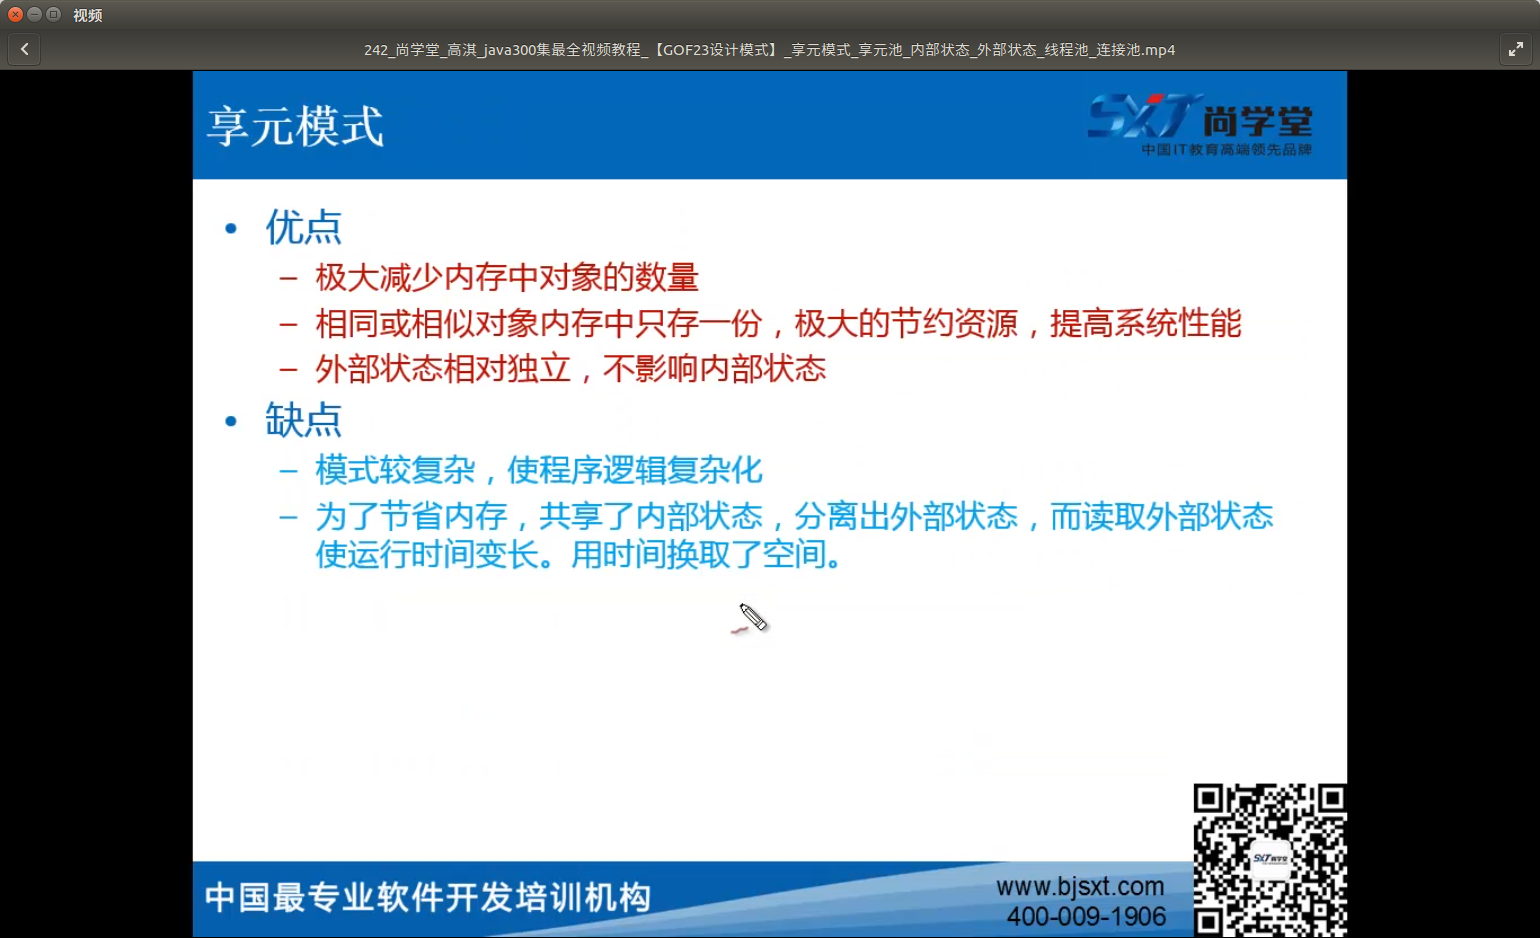
内存属于稀缺资源,不要随便浪费。如果有多个完全相同或者相似的对象,我们可以通过享元模式,节省内存。 - 核心
- 享元模式以共享的方式高效地支持大量细粒度对象的重用。
- 享元对象能做到共享的关键是区分了内部状态和外部状态
- 内部状态:可以共享,不会随环境变化而改变
- 外部状态:不可以共享,会随环境变化而变化
 2
2
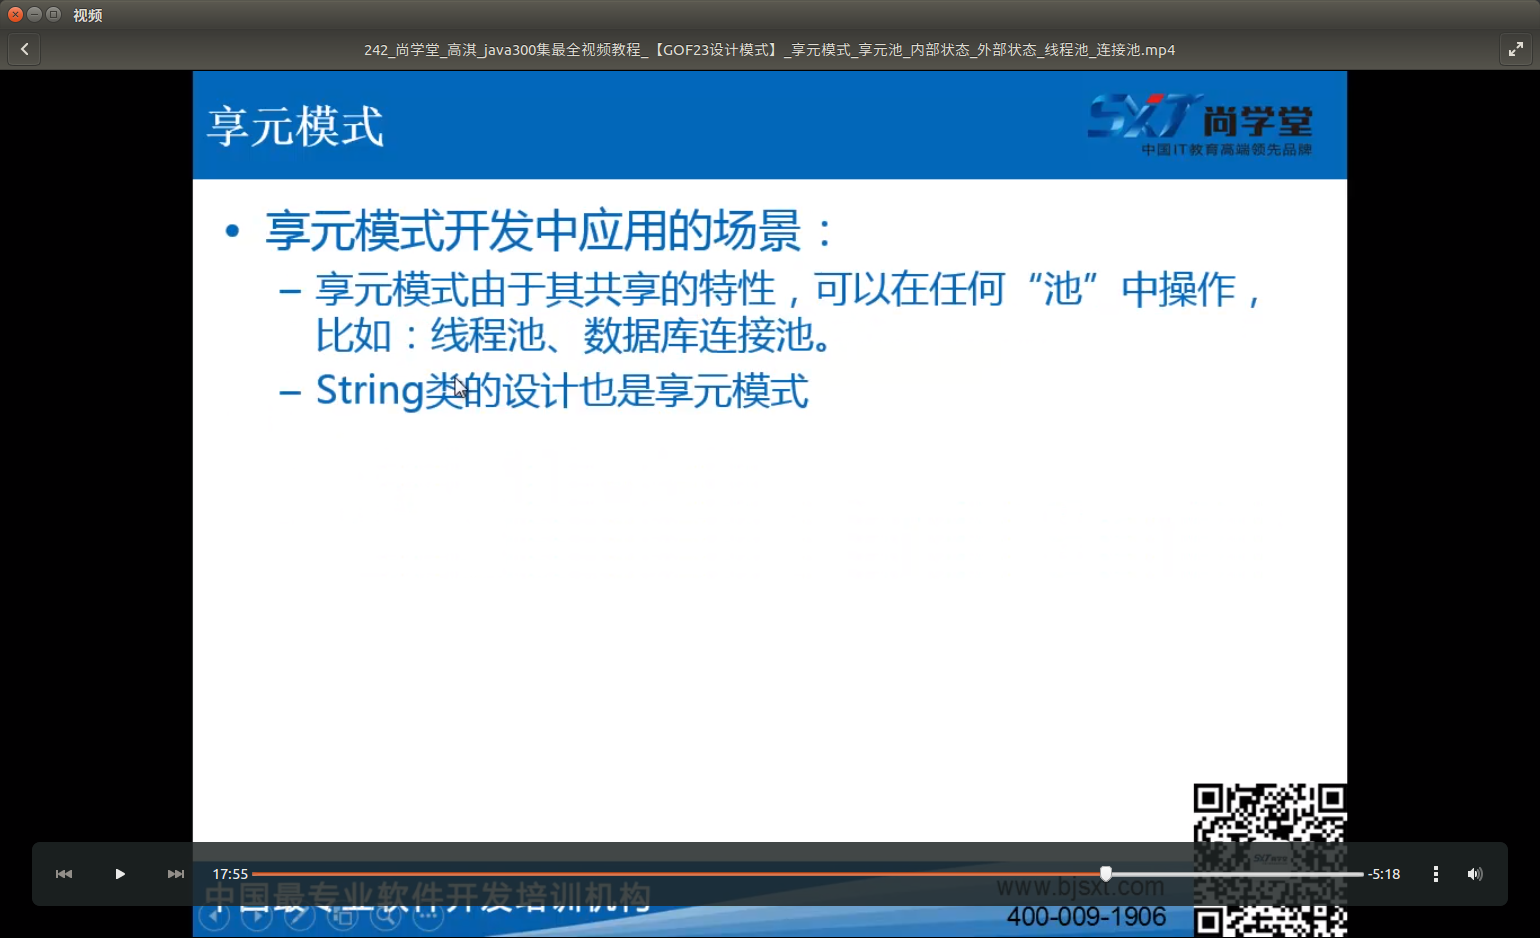
String类设计使用了享元模式,例如常量池,当获取多个相同字符串常量时,返回同一个对象
线程池使用了享元模式,其中ThreadPoolExecutor等于享元模式中的FlyWeightFactory,其中线程相当于享元类,线程的具体执行相当于享元模式中的外部状态
package flyWeight;
/*** 享元类*/public interface FlyWeight {String getColor();void display(Coordinate c);}
package flyWeight;/*** Created by huang on 17-5-12.*/public class ConcreteFlyWeight implements FlyWeight {private String color;public ConcreteFlyWeight(String color) {this.color = color;}@Overridepublic String getColor() {return color;}@Overridepublic void display(Coordinate c) {System.out.println("棋子颜色"+color);System.out.println("棋子位置"+c.getX() + " "+ c.getY());}}
package flyWeight;/*** 外部状态UnSharedConcreteFlyWeight*/public class Coordinate {private int x, y;public Coordinate(int x, int y) {this.x = x;this.y = y;}public int getX() {return x;}public void setX(int x) {this.x = x;}public int getY() {return y;}public void setY(int y) {this.y = y;}}
package flyWeight;import java.util.HashMap;import java.util.Map;/*** 享元工厂类*/public class FlyWeightFactory {// ThreadPoolExecutor 线程池,相当于享元工厂//享元池private static Map<String, FlyWeight> map = new HashMap<>();public static FlyWeight getChess(String color){if(map.get(color) != null)return map.get(color);else{FlyWeight flyWeight = new ConcreteFlyWeight(color);map.put(color, flyWeight);return flyWeight;}}}
package flyWeight;import org.junit.Test;/*** Created by huang on 17-5-12.*/public class Client {@Testpublic void test(){FlyWeight flyWeight1 = FlyWeightFactory.getChess("红色");FlyWeight flyWeight2 = FlyWeightFactory.getChess("红色");System.out.println(flyWeight1 == flyWeight2);//添加外部状态flyWeight1.display(new Coordinate(3, 4));}}
观察者模式
- 观察者模式主要用于1:N的通知。当一个对象(目标对象或Observerable)的状态变化时,他需要及时告知一系列对象(观察对象,Observer),令他们作出响应
- 通知观察者的方式:
- 推
每次都会把通知以广播方式发送给所有观察者,所有观察者只能被动接收 - 拉
观察者只要知道有情况即可。至于什么时候获取内容,获取什么内容,都可以自主决定。
- 推
package observer;import java.util.ArrayList;import java.util.List;/*** 主题*/public class Subject {protected List<Observer> list = new ArrayList<>();public void registerObserver(Observer observer){list.add(observer);}public void removeObserver(Observer observer){list.remove(observer);}public void notifyAllObserver(){list.forEach(observer -> observer.update(this));}}
package observer;/*** 观察者*/public interface Observer {void update(Subject subject);}
package observer;/*** 具体主题*/public class ConcreteSubject extends Subject{private int state;public int getState() {return state;}public void setState(int state) {this.state = state;notifyAllObserver();}}
package observer;/*** 具体观察者*/public class ObserverA implements Observer {private int myState;public int getMyState() {return myState;}public void setMyState(int myState) {this.myState = myState;}@Overridepublic void update(Subject subject) {setMyState(((ConcreteSubject)subject).getState());}}
package observer;/***客户端*/public class Client {public static void main(String[] args) {ConcreteSubject subject = new ConcreteSubject();ObserverA obs1 = new ObserverA();ObserverA obs2 = new ObserverA();ObserverA obs3 = new ObserverA();subject.registerObserver(obs1);subject.registerObserver(obs2);subject.registerObserver(obs3);subject.setState(100);System.out.println("-------------------");System.out.println(obs1.getMyState());System.out.println(obs2.getMyState());System.out.println(obs3.getMyState());subject.setState(200);System.out.println("-------------------");System.out.println(obs1.getMyState());System.out.println(obs2.getMyState());System.out.println(obs3.getMyState());}}
工厂模式
工厂方法模式,定义一个用于创建对象的接口,让子类决定实例化哪一个类。工厂方法使一个类的实例化延续到其子类。
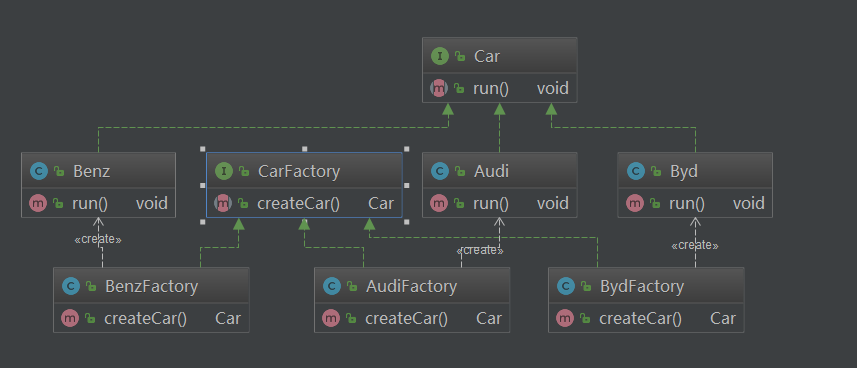
public interface Car {void run();}public class Audi implements Car {@Overridepublic void run() {System.out.println("奥迪再跑!");}}public class Benz implements Car{@Overridepublic void run() {System.out.println("奔驰再跑");}}public class Byd implements Car {@Overridepublic void run() {System.out.println("比亚迪在跑");}}public interface CarFactory {Car createCar();}public class AudiFactory implements CarFactory {@Overridepublic Car createCar() {return new Audi();}}public class BenzFactory implements CarFactory {@Overridepublic Car createCar() {return new Benz();}}public class BydFactory implements CarFactory {@Overridepublic Car createCar() {return new Byd();}}public class Client {public static void main(String[] args) {Car c1 = new AudiFactory().createCar();c1.run();Car c2 = new BydFactory().createCar();c2.run();}}
适配器模式
适配器模式,将一个类的接口转换成客户希望的另外一个接口。Adapter模式使得原本由接口不兼容而不能一起工作的那些类可以一起工作。
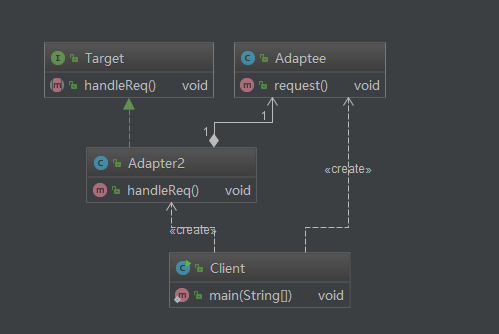
组成:
1)Target(目标抽象类):目标抽象类定义客户所需接口,可以是一个抽象类或接口,也可以是具体类。
2)Adapter(适配器类):适配器可以调用另一个接口,作为一个转换器,对Adaptee和Target进行适配,适配器类是适配器模式的核心,在对象适配器中,它通过继承Target并关联一个Adaptee对象使二者产生联系。
3)Adaptee(适配者类):适配者即被适配的角色,它定义了一个已经存在的接口,这个接口需要适配,适配者类一般是一个具体类,包含了客户希望使用的业务方法,在某些情况下可能没有适配者类的源代码。
/*** 目标抽象类*/public interface Target {void handleReq();}/*** 被适配的类,* 相当于例子中的,PS/2键盘* Created by huangyichun on 2017/2/7.*/public class Adaptee {public void request(){System.out.println("可以完成用户的需求");}}/** 适配器*/public class Adapter2 implements Target {private Adaptee adaptee;public Adapter2(Adaptee adaptee) {this.adaptee = adaptee;}@Overridepublic void handleReq() {adaptee.request();}}/*** 适配器(类适配器方式)* 相当于usb和ps/2转接口* Created by huangyichun on 2017/2/7.*/public class Adapter extends Adaptee implements Target{@Overridepublic void handleReq() {super.request();}}/*** 被适配的类,* 相当于例子中的,PS/2键盘* Created by huangyichun on 2017/2/7.*/public class Adaptee {public void request(){System.out.println("可以完成用户的需求");}}/*** 客户端类* 相当于例子中的笔记本,只有USB接口* Created by huangyichun on 2017/2/7.*/public class Client {public static void main(String[] args) {Client c = new Client();Adaptee a = new Adaptee();// Target t = new Adapter();Target t = new Adapter2(a);t.handleReq();}}
在JDK中使用了适配器模式,如下图
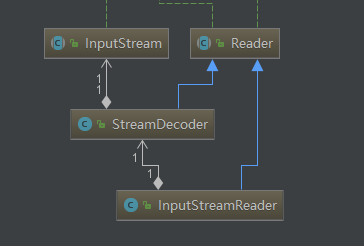
将InputStream类型通过InputStreamReader转换成Reader类型,StreamDecoder中包含着InputStream的引用,可以通过源码查看,这是因为Byte类型到char类型需要经过编码。
组合模式
组合模式,将对象组合成树形结构以表示‘部分-整体’的层次结构。组合模式使得用户对单个对象和组合对象的使用具有一致性。
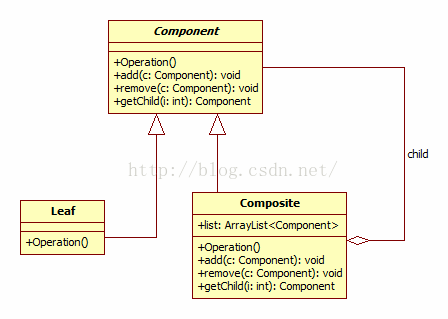
JDK中AWT包和Swing包的设计是基于组合模式,在这些界面包中为用户提供了大量的容器构件(如Container)和成员构件(如Checkbox、Button和TextComponent等),他们都是继承、关联自抽象组件类Component。
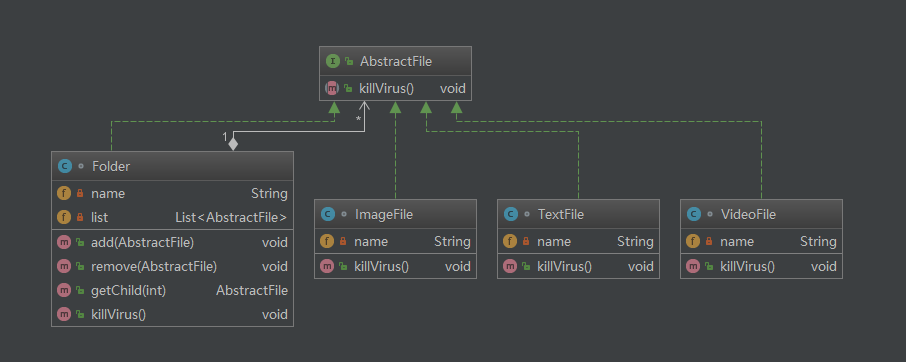
*** 抽象组件* Created by huangyichun on 2017/2/8.*/public interface AbstractFile {void killVirus();//杀毒}class ImageFile implements AbstractFile{private String name;public ImageFile(String name) {this.name = name;}@Overridepublic void killVirus() {System.out.println("---图像文件:"+name+",进行查杀!");}}class TextFile implements AbstractFile{private String name;public TextFile(String name) {this.name = name;}@Overridepublic void killVirus() {System.out.println("---文本文件:"+name+",进行查杀!");}}class VideoFile implements AbstractFile{private String name;public VideoFile(String name) {this.name = name;}@Overridepublic void killVirus() {System.out.println("---视频文件:"+name+",进行查杀!");}}/*** 文件夹*/class Folder implements AbstractFile{private String name;//定义容器,用来存放本容器下的子节点private List<AbstractFile> list = new ArrayList<>();public Folder(String name) {this.name = name;}public void add(AbstractFile file){list.add(file);}public void remove(AbstractFile file){list.remove(file);}public AbstractFile getChild(int index){return list.get(index);}@Overridepublic void killVirus() {System.out.println("---文件夹:"+name+",进行查杀");for(AbstractFile file : list){file.killVirus();}}}public static void main(String[] args) {AbstractFile f2, f3, f4, f5, f6;Folder f1 = new Folder("我的收藏");f2 = new ImageFile("我的大头像.jpg");f3 = new TextFile("Hello.txt");f1.add(f2);f1.add(f3);Folder f11 = new Folder("电影");f4 = new VideoFile("笑傲江湖.avi");f5 = new VideoFile("神雕侠侣.avi");f11.add(f4);f11.add(f5);f1.add(f11);f1.killVirus();}
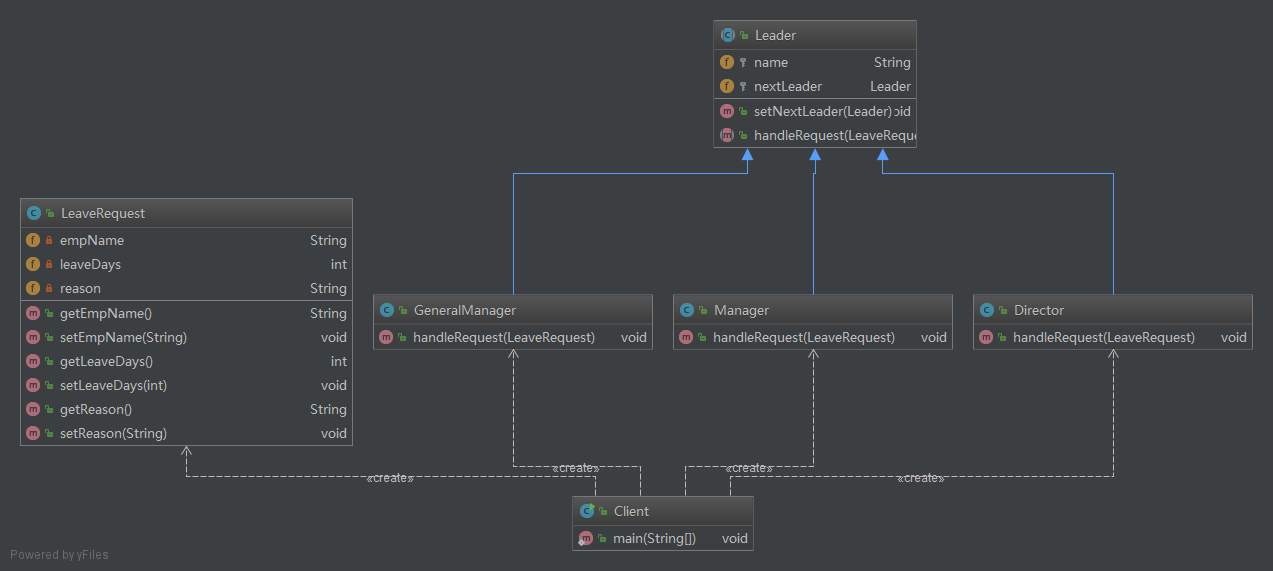
责任链模式
责任链模式: 使多个对象都有机会处理请求,从而避免请求的发送者和接受者之间的耦合关系。将这个对象连成一条链,并沿着这条链传递请求,直到有一个对象处理它为止。
package chainOfResponse;
/*** 抽象类* Created by huangyichun on 2017/2/8.*/public abstract class Leader {//使用protected让子类能够使用protected String name;protected Leader nextLeader;//设定责任链后序处理者public Leader(String name) {this.name = name;}public void setNextLeader(Leader nextLeader) {this.nextLeader = nextLeader;}/*** 处理请求的核心业务** @param request*/public abstract void handleRequest(LeaveRequest request);}
package chainOfResponse;/*** 主任* Created by huangyichun on 2017/2/8.*/public class Director extends Leader {public Director(String name) {super(name);}@Overridepublic void handleRequest(LeaveRequest request) {if (request.getLeaveDays() < 3) {System.out.println("员工:" + request.getEmpName() + " 请假" + request.getLeaveDays() + " " +"理由:" + request.getReason());System.out.println("主任:" + name + "审批通过");} else {if (this.nextLeader != null) {this.nextLeader.handleRequest(request);}}}}package chainOfResponse;/*** 经理* Created by huangyichun on 2017/2/8.*/public class Manager extends Leader {public Manager(String name) {super(name);}@Overridepublic void handleRequest(LeaveRequest request) {if(request.getLeaveDays() >= 3 && request.getLeaveDays() < 10){System.out.println("员工:"+request.getEmpName()+" 请假"+request.getLeaveDays()+" " +"理由:"+request.getReason());System.out.println("经理:"+name+"审批通过");}else{if(this.nextLeader != null){this.nextLeader.handleRequest(request);}}}}package chainOfResponse;/*** 总经理* Created by huangyichun on 2017/2/8.*/public class GeneralManager extends Leader {public GeneralManager(String name) {super(name);}@Overridepublic void handleRequest(LeaveRequest request) {if(request.getLeaveDays() >= 10 && request.getLeaveDays() < 30){System.out.println("员工:"+request.getEmpName()+" 请假"+request.getLeaveDays()+" " +"理由:"+request.getReason());System.out.println("总经理:"+name+"审批通过");}else{System.out.println("莫非想辞职居然请假"+request.getLeaveDays());}}}
package chainOfResponse;/*** 封装请假的基本信息* Created by huangyichun on 2017/2/8.*/public class LeaveRequest {private String empName;private int leaveDays;private String reason;public LeaveRequest(String empName, int leaveDays, String reason) {this.empName = empName;this.leaveDays = leaveDays;this.reason = reason;}public String getEmpName() {return empName;}public void setEmpName(String empName) {this.empName = empName;}public int getLeaveDays() {return leaveDays;}public void setLeaveDays(int leaveDays) {this.leaveDays = leaveDays;}public String getReason() {return reason;}public void setReason(String reason) {this.reason = reason;}}
package chainOfResponse;/*** Created by huangyichun on 2017/2/8.*/public class Client {public static void main(String[] args) {Leader a = new Director("张三");Leader b = new Manager("李四");Leader c = new GeneralManager("王五");//组织责任链对象的关系a.setNextLeader(b);b.setNextLeader(c);//开始请假操作LeaveRequest request = new LeaveRequest("Tom",1,"回家过年");a.handleRequest(request);}}
