@tony-yin
2017-10-10T11:12:50.000000Z
字数 3510
阅读 949
Python Profilers
性能优化
OSD启用过程耗时较长,需要进行性能优化。期间通过python profilers对代码进行性能分析和数据统计,有坑,有收获,总而言之,这是一个不错的工具
Profilers简介
python profilers内置的主要有三种cprofile, profile和hotshot,cprofile是基于profile之上做的扩展,性能要比后者好很多,所以我用的就是cprofile
更详细的介绍可以查看官网,python profilers的好处在于不用看教程,只要看着官网简短的概述,就能掌握其使用方法
Cprofile快速使用
官网例子
代码
import cProfileimport recProfile.run('re.compile("foo|bar")')
分析结果
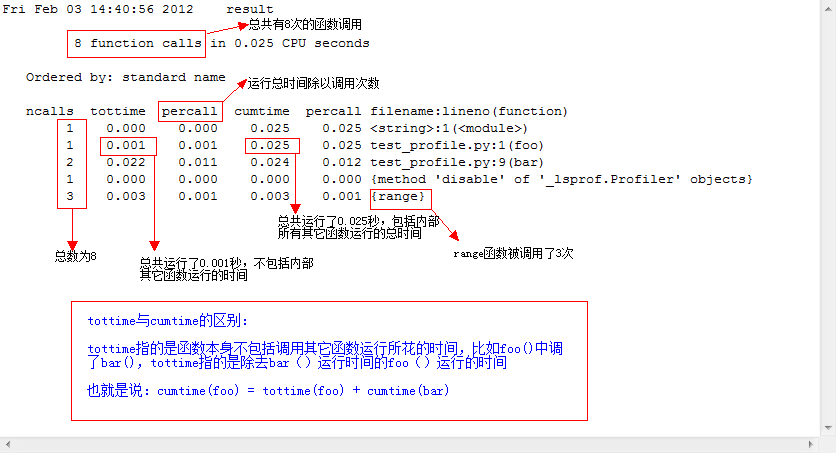
197 function calls (192 primitive calls) in 0.002 secondsOrdered by: standard namencalls tottime percall cumtime percall filename:lineno(function)1 0.000 0.000 0.001 0.001 <string>:1(<module>)1 0.000 0.000 0.001 0.001 re.py:212(compile)1 0.000 0.000 0.001 0.001 re.py:268(_compile)1 0.000 0.000 0.000 0.000 sre_compile.py:172(_compile_charset)1 0.000 0.000 0.000 0.000 sre_compile.py:201(_optimize_charset)4 0.000 0.000 0.000 0.000 sre_compile.py:25(_identityfunction)3/1 0.000 0.000 0.000 0.000 sre_compile.py:33(_compile)
图解

Cprofile深入
上面的基本用法可以在脚本中测试某个语句或者函数,然后打印到控制台。cprofile也可以将结果输出到文件中,这是比较常见的做法,因为打印到控制台,第一不能保存结果,第二如果数据量多没法全部浏览,并且影响阅读效果。而放在文件中还可以对结果进行按需排序、筛选等操作
输出文件
- 参数方式
import cProfileimport recProfile.run('re.compile("foo|bar")', 'restats')
- CLI方式
python -m cProfile [-o output_file] [-s sort_order] myscript.py
Cprofile优雅使用
上述方式可以使得cprofile在一些测试环境中受用,但是在一些复杂的环境中不能很好的work。由于cprofile是根据python在每个事件中存放的hook进行性能分析,所以在cprofile.run()的时候,要保证他就是最上层,他是调用的源头。
但是实际场景中,我们经常会对一些API中的某个方法进行性能分析,如果在被调用处使用cprofile,会出现变量或者模块undefined的现象,模块不能识别还可以在run方法中引入,然后通过分号分隔,例如cprofile.run(import re, re.compile("foo|bar")),具体可以参考这篇文章:Python Profile 工具性能分析
变量无法识别更是让人头疼,所以为了达到测试效果,你会不得不修改一些并不是很少量的源代码,并且测一个方法就要搞一次很麻烦。还有一些多进程或者跨机器的场景导致代码异步执行,这样cprofile更不能达到用户的需求
还好我们可以通过python装饰器的机制来做,这样既不用改动源代码,也可以很方便的切换函数分析
装饰器接口
这里要注意设置全局变量
export PROFILING=y
接口定义:
import cProfileimport pstatsimport os# 性能分析装饰器定义def do_cprofile(filename):"""Decorator for function profiling."""def wrapper(func):def profiled_func(*args, **kwargs):# Flag for do profiling or not.DO_PROF = os.getenv("PROFILING")if DO_PROF:profile = cProfile.Profile()profile.enable()result = func(*args, **kwargs)profile.disable()# Sort stat by internal time.sortby = "tottime"ps = pstats.Stats(profile).sort_stats(sortby)ps.dump_stats(filename)else:result = func(*args, **kwargs)return resultreturn profiled_funcreturn wrapper
分析使用
这时候只需要在调用的函数上面加一个装饰器即可
@do_cprofile('filename')def run():print 'hello world'
pstats分析工具
pstats可以根据cprofile生成的文件进行排序、筛选等处理,呈现更主要的结果
import pstats# 创建Stats对象p = pstats.Stats("result.out")# strip_dirs(): 去掉无关的路径信息# sort_stats(): 排序,支持的方式和上述的一致# print_stats(): 打印分析结果,可以指定打印前几行# 和直接运行cProfile.run("test()")的结果是一样的p.strip_dirs().sort_stats(-1).print_stats()# 按照函数名排序,只打印前3行函数的信息, 参数还可为小数,表示前百分之几的函数信息p.strip_dirs().sort_stats("name").print_stats(3)# 按照运行时间和函数名进行排序p.strip_dirs().sort_stats("cumulative", "name").print_stats(0.5)# 如果想知道有哪些函数调用了sum_nump.print_callers(0.5, "sum_num")# 查看test()函数中调用了哪些函数p.print_callees("test")
上述代码摘自:使用cProfile分析Python程序性能,原文还提供了pstats命令行交互工具方式
图形可视化
上面的命令行界面的确是有点反人类,不易一下子清晰地分析性能瓶颈,有很多图形可视化工具可以帮助我们生成简洁明了的图片
工具有:
- gprof2dot
- vprof
- RunSnakeRun
- KCacheGrind & pyprof2calltree
最终我选择了gprof2dot,比较符合我的口味
安装
我的机器是ubuntu,其他类型机器找对应方式,具体参考:Github gprof2dot
apt-get install python graphvizpip install gprof2dot
注意:
如果pip安装软件包报错:'Cannot fetch index base URL http://pypi.python.org/simple/'
解决办法
1.windows下创建/%user%/pip/pop.ini,并添加以下内容。[global]index-url=http://pypi.douban.com/simple/2.linux创建文件~/.pip/pip.conf,并添加一下内容。[global]index-url=http://pypi.douban.com/simple/3.再次使用pip安装相应的包即可。
使用
根据cpofile输出的文件生成图片,这边输出的文件名为osd.out,生成的图片名为osd.png
gprof2dot -f pstats osd.out | dot -Tpng -o osd.png
具体参考这篇文章:Python优化第一步: 性能分析实践,写的很好,也很具体
效果图
这是我进行性能分析产生的两张图
Picture 1:

Picture 2:

继续深入
pstats深入了解gprof2dot深入了解- 其他的可视化工具
不过最终的目的都是通过性能分析找到性能瓶颈,然后进行优化,适合自己的就好
