@TryLoveCatch
2022-05-04T08:43:13.000000Z
字数 44358
阅读 1526
Android知识体系之应用启动流程
Android知识体系

应用的安装过程
应用安装的时候,通过PMS解析apk的AndroidManifest.xml文件,提取出这个apk的信息写入到packages.xml文件中,这些信息包括:权限、应用包名、icon、APK的安装位置、版本、userID等等。packages.xml文件位于系统目录下/data/system/packages.xml。
系统启动开启的服务
系统的会在启动时也可以认为开机时启动常用的服务,如ActivityManagerService(AMS),PackageManagerService(PMS),WindowManagerService(WMS),以及ServiceManager(SM),用于管理各种服务。
同时桌面Launcher会为安装过的应用生成不同的应用入口,对应桌面上的应用图标,下面分析点击应用图标的到应用启动的过程。
基础知识
AIDL
首先我们要理解AIDL的基础知识,AIDL的用法我们必须了然于胸,然后可以通过用法,来记住他们的关系。
- AIDL是标准的cs架构,所以分为c端和s端
- s端
- 新建一个MyAidlInterface.aidl文件,点击make project,生成一个IMyAidlInterface.java文件
- IMyAidlInterface.java的结构
—— IMyAidlInterface extends android.os.IInterface
—— abstract Stub extends Binder implements IMyAidlInterface Stub是一个抽象类,里面是没有实现IMyAidlInterface的相关接口的,需要子类来实现,如MyBinder
—— Proxy implements IMyAidlInterface
主要包含这三部分 - MyBinder extends IMyAidlInterface.Stub
- MyService extends Service,并在onBind()回调的时候返回MyBinder
- c端
- 复制MyAidlInterface.aidl文件到相同目录,并且也make project
- bindService(tIntent, mServiceConnection, BIND_AUTO_CREATE);
- IBinder转换为IMyAidlInterface,然后使用IMyAidlInterface调用相关接口即可
java

@Override

public void onServiceConnected(ComponentName name, IBinder service) {

IMyAidlInterface mAidlInterface = IMyAidlInterface.Stub.asInterface(service);

}
在c端调用asInterface()返回得意Proxy对象
通过这些用法,我们来看他们的关系
- s端使用的是IMyAidlInterface.Stub,其实就是MyBinder
- s端提供具体的能力实现MyBinder extends IMyAidlInterface.Stub
- c端最后调用调用的是IMyAidlInterface.Stub.Proxy
- IMyAidlInterface.Stub.Proxy是MyBinder extends IMyAidlInterface.Stub在c端使用的s端代理
- MyBinder是IMyAidlInterface.Stub的具体实现,都是extends Binder
也就是说,IMyAidlInterface.Stub是c端和s端的桥梁。
启动过程
- ActivityManagerService,简称AMS,服务端对象,负责系统中所有Activity的生命周期。相当于MyBinder extends IMyAidlInterface.Stub,自己在服务端写的那个具体提供服务的
- ActivityManagerNative继承Java的Binder类,同时实现了IActivityManager接口,即ActivityManagerNative将作为Binder通信的服务端为用户提供支持。相当于IMyAidlInterface.Stub,AIDL系统生成的
- ActivityManagerProxy:在ActivityManagerNative类中定义了内部类ActivityManagerProxy,该类同样实现了IActivityManager接口,将作为客户端使用的服务端代理。相当于IMyAidlInterface.Stub.Proxy,AIDL系统生成的
- ActivityThread,App的真正入口。当开启App之后,会调用main()开始运行,开启消息循环队列,这就是传说中的UI线程或者叫主线程。与ActivityManagerServices配合,一起完成Activity的管理工作
- ApplicationThread,用来实现ActivityManagerService与ActivityThread之间的交互。在ActivityManagerService需要管理相关Application中的Activity的生命周期时,通过ApplicationThread的代理对象与ActivityThread通讯。AIDL中类似于ActivityManagerService
- ApplicationThreadNative继承Java的Binder类,同时实现了IApplicationThread接口,即ApplicationThreadNative将作为Binder通信中客户端与服务端的桥梁。AIDL中类似于ActivityManagerNative
- ApplicationThreadProxy,是ApplicationThread在服务器端的客户端代理,负责和客户端的ApplicationThread通讯。AMS就是通过该代理与ActivityThread进行通信的。AIDL中类似于ActivityManagerProxy
- Instrumentation,每一个应用程序只有一个Instrumentation对象,每个Activity内都有一个对该对象的引用。Instrumentation可以理解为应用进程的管家,ActivityThread要创建或暂停某个Activity时,都需要通过Instrumentation来进行具体的操作。
- ActivityStack,Activity在AMS的栈管理,用来记录已经启动的Activity的先后关系,状态信息等。通过ActivityStack决定是否需要启动新的进程。
- ActivityRecord,ActivityStack的管理对象,每个Activity在AMS对应一个ActivityRecord,来记录Activity的状态以及其他的管理信息。其实就是服务器端的Activity对象的映像。
- TaskRecord,AMS抽象出来的一个”任务”的概念,是记录ActivityRecord的栈,一个”Task”包含若干个ActivityRecord。AMS用TaskRecord确保Activity启动和退出的顺序。如果你清楚Activity的4种launchMode,那么对这个概念应该不陌生。。
系统的AIDL
IMyAidlInterface.aidl
interface IMyAidlInterface {String getName();}
平常生成的AIDL
package io.github.trylovecatch.aidlserver;// Declare any non-default types here with import statementspublic interface IMyAidlInterface extends android.os.IInterface {/*** Local-side IPC implementation stub class.*/public static abstract class Stub extends android.os.Binderimplements io.github.trylovecatch.aidlserver.IMyAidlInterface {private static final java.lang.String DESCRIPTOR = "io.github.trylovecatch.aidlserver.IMyAidlInterface";/*** Construct the stub at attach it to the interface.*/public Stub() {this.attachInterface(this, DESCRIPTOR);}/*** Cast an IBinder object into an io.github.trylovecatch.aidlserver.IMyAidlInterface interface,* generating a proxy if needed.*/public static io.github.trylovecatch.aidlserver.IMyAidlInterface asInterface(android.os.IBinder obj) {if ((obj == null)) {return null;}android.os.IInterface iin = obj.queryLocalInterface(DESCRIPTOR);if (((iin != null) && (iin instanceof io.github.trylovecatch.aidlserver.IMyAidlInterface))) {return ((io.github.trylovecatch.aidlserver.IMyAidlInterface) iin);}return new io.github.trylovecatch.aidlserver.IMyAidlInterface.Stub.Proxy(obj);}@Overridepublic android.os.IBinder asBinder() {return this;}@Overridepublic boolean onTransact[træn'zækt](int code, android.os.Parcel data, android.os.Parcel reply, int flags)throws android.os.RemoteException {switch (code) {case INTERFACE_TRANSACTION: {reply.writeString(DESCRIPTOR);return true;}case TRANSACTION_getName: {data.enforceInterface(DESCRIPTOR);java.lang.String _result = this.getName();reply.writeNoException();reply.writeString(_result);return true;}}return super.onTransact(code, data, reply, flags);}private static class Proxy implements io.github.trylovecatch.aidlserver.IMyAidlInterface {private android.os.IBinder mRemote;Proxy(android.os.IBinder remote) {mRemote = remote;}@Overridepublic android.os.IBinder asBinder() {return mRemote;}public java.lang.String getInterfaceDescriptor() {return DESCRIPTOR;}@Overridepublic java.lang.String getName() throws android.os.RemoteException {android.os.Parcel _data = android.os.Parcel.obtain();android.os.Parcel _reply = android.os.Parcel.obtain();java.lang.String _result;try {_data.writeInterfaceToken(DESCRIPTOR);mRemote.transact(Stub.TRANSACTION_getName, _data, _reply, 0);_reply.readException();_result = _reply.readString();} finally {_reply.recycle();_data.recycle();}return _result;}}static final int TRANSACTION_getName = (android.os.IBinder.FIRST_CALL_TRANSACTION + 0);}public java.lang.String getName() throws android.os.RemoteException;}
服务端的能力:
class MyBinder extends IMyAidlInterface.Stub {@Overridepublic String getName() throws RemoteException{return "哈哈哈";}}
ActivityManager
IActivityManager
public interface IActivityManager extends IInterface {public int startActivity(...) throws RemoteException;public void activityPaused(IBinder token) throws RemoteException;public void attachApplication(IApplicationThread app) throws RemoteException;...}
ActivityManagerNative
注意:这是一个抽象类
public abstract class ActivityManagerNative extends Binder implements IActivityManager{public ActivityManagerNative() {attachInterface(this, descriptor);}static public IActivityManager asInterface(IBinder obj) {if (obj == null) {return null;}IActivityManager in =(IActivityManager)obj.queryLocalInterface(descriptor);if (in != null) {return in;}return new ActivityManagerProxy(obj);}static public IActivityManager getDefault() {return gDefault.get();}private static final Singleton<IActivityManager> gDefault = new Singleton<IActivityManager>() {protected IActivityManager create() {IBinder b = ServiceManager.getService("activity");if (false) {Log.v("ActivityManager", "default service binder = " + b);}IActivityManager am = asInterface(b);if (false) {Log.v("ActivityManager", "default service = " + am);}return am;}};}@Overridepublic boolean onTransact(int code, Parcel data, Parcel reply, int flags)throws RemoteException {switch (code) {case START_ACTIVITY_TRANSACTION:{...int result = startActivity(app, callingPackage, intent, resolvedType, resultTo, resultWho, requestCode, startFlags, profilerInfo, options);...}case ACTIVITY_PAUSED_TRANSACTION: {data.enforceInterface(IActivityManager.descriptor);IBinder token = data.readStrongBinder();activityPaused(token);reply.writeNoException();return true;}case ATTACH_APPLICATION_TRANSACTION: {data.enforceInterface(IActivityManager.descriptor);IApplicationThread app = ApplicationThreadNative.asInterface(data.readStrongBinder());if (app != null) {attachApplication(app);}reply.writeNoException();return true;}...}return super.onTransact(code, data, reply, flags);}public IBinder asBinder() {return this;}}
ActivityManagerProxy
ActivityManagerProxy是ActivityManagerNative的一个内部类,这里单独拿出来。跟咱们系统生产的AIDL是一样的。
class ActivityManagerProxy implements IActivityManager{public ActivityManagerProxy(IBinder remote){mRemote = remote;}public IBinder asBinder(){return mRemote;}public int startActivity(...) throws RemoteException {Parcel data = Parcel.obtain();Parcel reply = Parcel.obtain();...mRemote.transact(START_ACTIVITY_TRANSACTION, data, reply, 0);reply.readException();int result = reply.readInt();reply.recycle();data.recycle();return result;}public void activityPaused(IBinder token) throws RemoteException{Parcel data = Parcel.obtain();Parcel reply = Parcel.obtain();data.writeInterfaceToken(IActivityManager.descriptor);data.writeStrongBinder(token);mRemote.transact(ACTIVITY_PAUSED_TRANSACTION, data, reply, 0);reply.readException();data.recycle();reply.recycle();}public void attachApplication(IApplicationThread app) throws RemoteException{Parcel data = Parcel.obtain();Parcel reply = Parcel.obtain();data.writeInterfaceToken(IActivityManager.descriptor);data.writeStrongBinder(app.asBinder());mRemote.transact(ATTACH_APPLICATION_TRANSACTION, data, reply, 0);reply.readException();data.recycle();reply.recycle();}....}
ActivityManagerService
public final class ActivityManagerService extends ActivityManagerNative {...@Overridepublic final int startActivity(...) {return startActivityAsUser(...);}@Overridepublic final void activityPaused(IBinder token) {final long origId = Binder.clearCallingIdentity();synchronized(this) {ActivityStack stack = ActivityRecord.getStackLocked(token);if (stack != null) {stack.activityPausedLocked(token, false);}}Binder.restoreCallingIdentity(origId);}@Overridepublic final void attachApplication(IApplicationThread thread) {synchronized (this) {int callingPid = Binder.getCallingPid();final long origId = Binder.clearCallingIdentity();attachApplicationLocked(thread, callingPid);Binder.restoreCallingIdentity(origId);}}...}
ApplicationThread
IApplicationThread
public interface IApplicationThread extends IInterface {void schedulePauseActivity(IBinder token, boolean finished, boolean userLeaving, int configChanges, boolean dontReport) throws RemoteException;void scheduleStopActivity(IBinder token, boolean showWindow, int configChanges) throws RemoteException;void scheduleLaunchActivity(...) throws RemoteException;void bindApplication(...) throws RemoteException;}
ApplicationThreadNative
注意:这是一个抽象类
public abstract class ApplicationThreadNative extends Binderimplements IApplicationThread {static public IApplicationThread asInterface(IBinder obj) {if (obj == null) {return null;}IApplicationThread in =(IApplicationThread)obj.queryLocalInterface(descriptor);if (in != null) {return in;}return new ApplicationThreadProxy(obj);}public ApplicationThreadNative() {attachInterface(this, descriptor);}@Overridepublic boolean onTransact(int code, Parcel data, Parcel reply, int flags) throws RemoteException {switch (code) {case SCHEDULE_PAUSE_ACTIVITY_TRANSACTION:{data.enforceInterface(IApplicationThread.descriptor);IBinder b = data.readStrongBinder();boolean finished = data.readInt() != 0;boolean userLeaving = data.readInt() != 0;int configChanges = data.readInt();boolean dontReport = data.readInt() != 0;schedulePauseActivity(b, finished, userLeaving, configChanges, dontReport);return true;}case SCHEDULE_STOP_ACTIVITY_TRANSACTION:{data.enforceInterface(IApplicationThread.descriptor);IBinder b = data.readStrongBinder();boolean show = data.readInt() != 0;int configChanges = data.readInt();scheduleStopActivity(b, show, configChanges);return true;}case SCHEDULE_LAUNCH_ACTIVITY_TRANSACTION:{...scheduleLaunchActivity(intent, b, ident, info, curConfig, overrideConfig, compatInfo,referrer, voiceInteractor, procState, state, persistentState, ri, pi,notResumed, isForward, profilerInfo);return true;}case BIND_APPLICATION_TRANSACTION:{...bindApplication(...);return true;}}public IBinder asBinder(){return this;}}
ApplicationThreadProxy
同样的,ApplicationThreadProxy也是ApplicationThreadNative的内部类
class ApplicationThreadProxy implements IApplicationThread {private final IBinder mRemote;public ApplicationThreadProxy(IBinder remote) {mRemote = remote;}public final IBinder asBinder() {return mRemote;}public final void schedulePauseActivity(IBinder token, boolean finished, boolean userLeaving, int configChanges, boolean dontReport) throws RemoteException {Parcel data = Parcel.obtain();data.writeInterfaceToken(IApplicationThread.descriptor);data.writeStrongBinder(token);data.writeInt(finished ? 1 : 0);data.writeInt(userLeaving ? 1 :0);data.writeInt(configChanges);data.writeInt(dontReport ? 1 : 0);mRemote.transact(SCHEDULE_PAUSE_ACTIVITY_TRANSACTION, data, null, IBinder.FLAG_ONEWAY);data.recycle();}public final void scheduleStopActivity(IBinder token, boolean showWindow, int configChanges) throws RemoteException {Parcel data = Parcel.obtain();data.writeInterfaceToken(IApplicationThread.descriptor);data.writeStrongBinder(token);data.writeInt(showWindow ? 1 : 0);data.writeInt(configChanges);mRemote.transact(SCHEDULE_STOP_ACTIVITY_TRANSACTION, data, null, IBinder.FLAG_ONEWAY);data.recycle();}public final void scheduleLaunchActivity(...) throws RemoteException {...mRemote.transact(SCHEDULE_LAUNCH_ACTIVITY_TRANSACTION, data, null, IBinder.FLAG_ONEWAY);data.recycle();}public final void bindApplication(...) throws RemoteException {mRemote.transact(BIND_APPLICATION_TRANSACTION, data, null,IBinder.FLAG_ONEWAY);data.recycle();}...}
ApplicationThread
ActivityThread的源码
ApplicationThread是ActivityThread的内部类
private class ApplicationThread extends ApplicationThreadNative {public final void schedulePauseActivity(IBinder token, boolean finished, boolean userLeaving, int configChanges, boolean dontReport) {sendMessage(finished ? H.PAUSE_ACTIVITY_FINISHING : H.PAUSE_ACTIVITY,token,(userLeaving ? 1 : 0) | (dontReport ? 2 : 0),configChanges);}public final void scheduleStopActivity(IBinder token, boolean showWindow, int configChanges) {sendMessage(showWindow ? H.STOP_ACTIVITY_SHOW : H.STOP_ACTIVITY_HIDE,token, 0, configChanges);}public final void scheduleLaunchActivity(...) {updateProcessState(procState, false);ActivityClientRecord r = new ActivityClientRecord();r.token = token;r.ident = ident;r.intent = intent;r.referrer = referrer;r.voiceInteractor = voiceInteractor;r.activityInfo = info;r.compatInfo = compatInfo;r.state = state;r.persistentState = persistentState;r.pendingResults = pendingResults;r.pendingIntents = pendingNewIntents;r.startsNotResumed = notResumed;r.isForward = isForward;r.profilerInfo = profilerInfo;r.overrideConfig = overrideConfig;updatePendingConfiguration(curConfig);sendMessage(H.LAUNCH_ACTIVITY, r);}public final void bindApplication(...) {if (services != null) {// Setup the service cache in the ServiceManagerServiceManager.initServiceCache(services);}setCoreSettings(coreSettings);IPackageManager pm = getPackageManager();android.content.pm.PackageInfo pi = null;try {pi = pm.getPackageInfo(appInfo.packageName, 0, UserHandle.myUserId());} catch (RemoteException e) {}if (pi != null) {boolean sharedUserIdSet = (pi.sharedUserId != null);boolean processNameNotDefault =(pi.applicationInfo != null &&!appInfo.packageName.equals(pi.applicationInfo.processName));boolean sharable = (sharedUserIdSet || processNameNotDefault);// Tell the VMRuntime about the application, unless it is shared// inside a process.if (!sharable) {VMRuntime.registerAppInfo(appInfo.packageName, appInfo.dataDir, appInfo.processName);}}AppBindData data = new AppBindData();data.processName = processName;data.appInfo = appInfo;data.providers = providers;data.instrumentationName = instrumentationName;data.instrumentationArgs = instrumentationArgs;data.instrumentationWatcher = instrumentationWatcher;data.instrumentationUiAutomationConnection = instrumentationUiConnection;data.debugMode = debugMode;data.enableOpenGlTrace = enableOpenGlTrace;data.restrictedBackupMode = isRestrictedBackupMode;data.persistent = persistent;data.config = config;data.compatInfo = compatInfo;data.initProfilerInfo = profilerInfo;sendMessage(H.BIND_APPLICATION, data);}...}
总结
- IActivityManager 都继承IInterface,等价于生成的AIDL文件的最外层IMyAidlInterface
- ActivityManagerNative extends Binder implements IActivityManager
等价于IMyAidlInterface.Stub,提供了跨进程的能力。它这是一个抽象类。- ActivityManagerProxy implements IActivityManager
等价于IMyAidlInterface.Stub.Proxy,这个是在客户端存在的,客户端调用它的方法,然后通过BinderProxy的transact()来实现IPC通信,并回调ActivityManagerNative的onTransact(),最终调用ActivityManagerService的对应方法。- ActivityManagerService extends ActivityManagerNative
等价于MyBinder extends IMyAidlInterface.Stub,是具体的服务端能提供的能力
ApplicationThread相关的也同理。
- IApplicationThread 对应 IActivityManager
- ApplicationThread 对应 ActivityManagerService
- ApplicationThreadNative 对应 ActivityManagerNative
- ApplicationThreadProxy 对应 ActivityManagerProxy
他俩的不同在于:ApplicationThread是App进程是服务端,system_server进程是客户端;ActivityManager是system_server进程是服务端,App进程是客户端。
asBinder
在ActivityManagerProxy里面
public void attachApplication(IApplicationThread app) throws RemoteException{Parcel data = Parcel.obtain();Parcel reply = Parcel.obtain();data.writeInterfaceToken(IActivityManager.descriptor);data.writeStrongBinder(app.asBinder());mRemote.transact(ATTACH_APPLICATION_TRANSACTION, data, reply, 0);reply.readException();data.recycle();reply.recycle();}
ActivityManagerProxy是在App进程使用的,所以app.asBinder()其实是调用了IApplicationThread的asBinder(),相当于返回了ApplicationThread.this;
然后通过进程间通信,会回调ActivityManagerNative里面的onTransact(),如下:
case ATTACH_APPLICATION_TRANSACTION: {data.enforceInterface(IActivityManager.descriptor);IApplicationThread app = ApplicationThreadNative.asInterface(data.readStrongBinder());if (app != null) {attachApplication(app);}reply.writeNoException();return true;}
又调用了ApplicationThreadNative.asInterface静态方法,这样就返回了ApplicationThreadProxy对象了。
一般情况下,我们是通过调用bindService,然后ServiceConnection里面asInterface来获取Proxy对象的。不过我们也可以通过这种传递Binder对象的方式来获取到Proxy对象,就是需要手动调用asBinder对象。
Binder
平常,我们Binder的获取,是客户端调用bindService(),服务器onBinder返回的一个IBinder。
而这里,是通过客户端调用ActivityManagerNative.getDefault(),如下:
private static final Singleton<IActivityManager> gDefault = new Singleton<IActivityManager>() {protected IActivityManager create() {IBinder b = ServiceManager.getService("activity");if (false) {Log.v("ActivityManager", "default service binder = " + b);}IActivityManager am = asInterface(b);if (false) {Log.v("ActivityManager", "default service = " + am);}return am;}};
通过IBinder b = ServiceManager.getService("activity");这种方式获取的。这也是一个IPC通信,是App进程去service_manager进程查询服务,因为系统开机的时候,system_server进程已经去service_manager进程注册了一些服务,查询到之后会返回BinderProxy对象给App进程,然后调用asInterface得到ActivityManagerProxy对象。
bindService()
上面我们说:
平常,我们Binder的获取,是客户端调用bindService(),服务器onBinder返回的一个IBinder。
bindService()也是一个IPC过程,涉及到是三个进程 App进程、system_server进程、Service对应的服务进程。
App进程通知system_server进程要启动一个Service,system_server进程去启动这个服务进程(如果该进程不存在),类似于Activity启动流程,我们假设服务进程已经启动,那么我们需要启动Service,服务进程启动并且调用了onBind(),返回一个IBinder对象,因为就是在本地,所以应该是MyService对象;
然后会调用system_server进程AMS的publishService(),这个时候应该已经是BinderProxy对象了;
最后这个方法会IPC到App进程,调用onServiceConnected(),这个时候传入的是BinderProxy。
Task和Stack
ActivityRecord、TaskRecord、ActivityStack以及Activity启动模式详解
Android系统中的每一个Activity都位于一个Task中。一个Task可以包含多个Activity,同一个Activity也可能有多个实例。 在AndroidManifest.xml中,我们可以通过android:launchMode来控制Activity在Task中的实例。
另外,在startActivity的时候,我们也可以通过setFlag 来控制启动的Activity在Task中的实例。
Task管理的意义还在于近期任务列表以及Back栈。 当你通过多任务键(有些设备上是长按Home键,有些设备上是专门提供的多任务键)调出多任务时,其实就是从ActivityManagerService获取了最近启动的Task列表。
Back栈管理了当你在Activity上点击Back键,当前Activity销毁后应该跳转到哪一个Activity的逻辑。关于Task和Back栈,请参见这里:Tasks and Back Stack。
其实在ActivityManagerService与WindowManagerService内部管理中,在Task之外,还有一层容器,这个容器应用开发者和用户可能都不会感觉到或者用到,但它却非常重要,那就是Stack。 下文中,我们将看到,Android系统中的多窗口管理,就是建立在Stack的数据结构上的。 一个Stack中包含了多个Task,一个Task中包含了多个Activity(Window),下图描述了它们的关系:

进程的创建
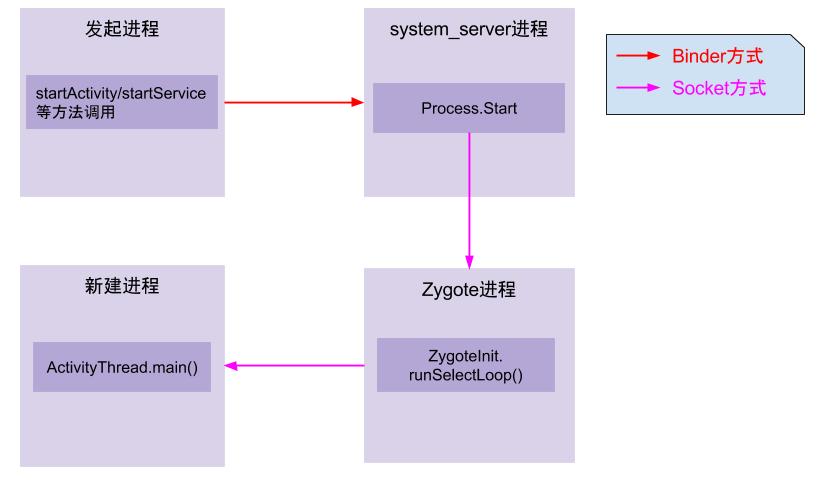
图解:
App发起进程:当从桌面启动应用,则发起进程便是Launcher所在进程;当从某App内启动远程进程,则发送进程便是该App所在进程。发起进程先通过binder发送消息给system_server进程;
system_server进程:调用Process.start()方法,通过socket向zygote进程发送创建新进程的请求;
zygote进程:在执行ZygoteInit.main()后便进入runSelectLoop()循环体内,当有客户端连接时便会执行ZygoteConnection.runOnce()方法,再经过层层调用后fork出新的应用进程;
新进程:执行handleChildProc方法,最后调用ActivityThread.main()方法。
Zygote进程:是Android系统的首个Java进程,Zygote是所有Java进程的父进程,包括 system_server进程以及所有的App进程都是Zygote的子进程,注意这里说的是子进程,而非子线程。
点击应用图标

主要分为Launcher进程,system_server进程,Zygote进程,APP进程。
Launcher进程
在Launcher点击App图标:
Launcher.startActivitySafely|Launcher.startActivity|Activity.startActivity|Activity.startActivityForResult|Instrumentation.execStartActivity|ActivityManagerProxy.startActivity|mRemote.transact() mRemote为BinderProxy
Instrumentation.execStartActivity
我们来看下Instrumentation.execStartActivity
Android 6.0 Launcher 启动 Activity 过程源码分析
public ActivityResult execStartActivity(Context who, IBinder contextThread, IBinder token, Activity target, Intent intent, int requestCode, Bundle options) {IApplicationThread whoThread = (IApplicationThread) contextThread;// 省略部分代码try {intent.migrateExtraStreamToClipData();intent.prepareToLeaveProcess();int result = ActivityManagerNative.getDefault().startActivity(whoThread, who.getBasePackageName(), intent, intent.resolveTypeIfNeeded(who.getContentResolver()),token, target != null ? target.mEmbeddedID : null,requestCode, 0, null, options);checkStartActivityResult(result, intent);} catch (RemoteException e) {throw new RuntimeException("Failure from system", e);}return null;}
| 参数类型 | 实际参数 | 含义 |
|---|---|---|
| Context who | this | Context 类 |
| IBinder contextThread | mMainThread.getApplicationThread() | 自己的Binder本地对象 |
| IBinder token | mToken | ActivityManagerService 中的ActivityRecord 代理对象 |
| Activity target | this | 目标 |
| Intent intent | intent | 组件信息 |
| int requestCode | requestCode | 请求码 |
| Bundle options | options | 附件信息 |
- contextThread 参数是一个 IBinder 类型,实际参数为mMainThread.getApplicationThread()。
ApplicationThread类是一个 Binder 类,那么它的作用是用来与 ActivityManagerService 通信的。
之前在 Binder 学习的时候,bindService 操作会在 onServiceConnected 返回 Service 的一个 Binder 对象,通过该 Binder 对象便可以执行 Service 中的函数,此时便完成的了 Activity 与 Service 的通信。
而现在,我们在 execStartActivity() 方法中把自己的 Binder 对象传递给 ActivityManagerService,不就是相当于 onServiceConnected 中回调 Binder 了嘛。
有了这个 Binder 对象,ActivityManagerService 才能够通知 Launcher 组件进入 Paused 状态。
- mToken类也是一个 Binder 类型,它是一个 Binder代理对象,它指向了 ActivityManagerService 中一个类型为 ActivityRecord的 Binder本地对象。每一个已经启动的 Activity 组件在 ActivityManagerService 中都有一个对应的ActivityRecord对象,用来维护对应的 Activity 组件的运行状态。将它传递给 ActivityManagerService,以便 ActivityManagerService 获得 Launcher 组件的详细信息了。
单例知识点
ActivityManagerProxy是AMS的本地代理,实际的工作是在远程AMS完成的
public abstract class Singleton<T> {private T mInstance;protected abstract T create();public final T get() {synchronized (this) {if (mInstance == null) {mInstance = create();}return mInstance;}}}
public abstract class ActivityManagerNative extends Binder implements IActivityManager{static public IActivityManager asInterface(IBinder obj) {if (obj == null) {return null;}IActivityManager in =(IActivityManager)obj.queryLocalInterface(descriptor);if (in != null) {return in;}return new ActivityManagerProxy(obj);}static public IActivityManager getDefault() {return gDefault.get();}private static final Singleton<IActivityManager> gDefault = new Singleton<IActivityManager>() {protected IActivityManager create() {// 通过 ServiceManager 来获得 ActivityServiceManager 的代理对象。// 再通过 asInterface 方法判断是否为同一进程,不是,则封装成 ActivityManagerProxy 代理对象。// ActivityManagerProxy 代理对象的操作都是由 ActivityServiceManager 的代理对象 Binder 来完成的。// ActivityManagerProxy 只是在之上对数据封装了一层。IBinder b = ServiceManager.getService("activity");if (false) {Log.v("ActivityManager", "default service binder = " + b);}IActivityManager am = asInterface(b);if (false) {Log.v("ActivityManager", "default service = " + am);}return am;}};}
ActivityManagerProxy.startActivity()
public int startActivity(IApplicationThread caller, String callingPackage, Intent intent, String resolvedType, IBinder resultTo, String resultWho, int requestCode, int startFlags, ProfilerInfo profilerInfo, Bundle options) throws RemoteException {Parcel data = Parcel.obtain();Parcel reply = Parcel.obtain();data.writeInterfaceToken(IActivityManager.descriptor);// caller 参数为 Launcher 组件所运行的应用程序进程的 ApplicationThread Binder 本地对象。data.writeStrongBinder(caller != null ? caller.asBinder() : null);// Launcher 组件的包名data.writeString(callingPackage);// 需要启动的 Activity 组件的信息intent.writeToParcel(data, 0);data.writeString(resolvedType);// ActivityManagerService 内部的 ActivityRecord 对象,保存了 Launcher 组件的详细信息。data.writeStrongBinder(resultTo);data.writeString(resultWho);data.writeInt(requestCode);data.writeInt(startFlags);if (profilerInfo != null) {data.writeInt(1);profilerInfo.writeToParcel(data, Parcelable.PARCELABLE_WRITE_RETURN_VALUE);} else {data.writeInt(0);}if (options != null) {data.writeInt(1);options.writeToParcel(data, 0);} else {data.writeInt(0);}mRemote.transact(START_ACTIVITY_TRANSACTION, data, reply, 0);reply.readException();int result = reply.readInt();reply.recycle();data.recycle();return result;}
system_server进程
ActivityManagerNative.onTransact()|ActivityManagerService.startActivity()|ActivityStarter.startActivityMayWait()|ActivityStarter.startActivityLocked()|ActivityStarter.startActivityUnchecked()|ActivityStackSupervisor.resumeFocusedStackTopActivityLocked()|ActivityStack.resumeTopActivityUncheckedLocked()|ActivityStack.resumeTopActivityInnerLocked()|[if (mResumedActivity != null)]ActivityStackSupervisor.pauseBackStacks()|ActivityStack.startPausingLocked()|[if (mResumedActivity == null)]ActivityStack.startSpecificActivityLocked()
ActivityManagerNative.onTransact()
public boolean onTransact(int code, Parcel data, Parcel reply, int flags)throws RemoteException {switch (code) {case START_ACTIVITY_TRANSACTION:{......int result = startActivity(app, callingPackage, intent, resolvedType,resultTo, resultWho, requestCode, startFlags, profilerInfo, options);......}......}
startActivity,就会调用我们自己实现的XXXService里面,也就是ActivityManagerService。
ActivityStack.resumeTopActivityInnerLocked()
private boolean resumeTopActivityInnerLocked(ActivityRecord prev, ActivityOptions options) {......// We need to start pausing the current activity so the top one can be resumed...final boolean dontWaitForPause = (next.info.flags & FLAG_RESUME_WHILE_PAUSING) != 0;boolean pausing = mStackSupervisor.pauseBackStacks(userLeaving, next, dontWaitForPause);if (mResumedActivity != null) {pausing |= startPausingLocked(userLeaving, false, next, dontWaitForPause);}......else {......mStackSupervisor.startSpecificActivityLocked(next, true, true);}}
启动一个新Activity时,如果界面还存在其它的Activity,那么必须先中断其它的Activity。
因此,除了第一个启动的Home界面对应的Activity外,其它的Activity均需要进行此操作,当系统启动第一个Activity,即Home时,mResumedActivity的值才会为null。
经过一系列处理逻辑之后最终调用了startPausingLocked方法,这个方法作用就是让系统中栈中的Activity执行onPause方法。
ActivityStack.startPausingLocked()
final boolean startPausingLocked(boolean userLeaving, boolean uiSleeping, ActivityRecord resuming, boolean dontWait) {......try {......mService.updateUsageStats(prev, false);prev.app.thread.schedulePauseActivity(prev.appToken, prev.finishing, userLeaving, prev.configChangeFlags, dontWait);}......}
可以看到这里执行了pre.app.thread.schedulePauseActivity方法,pre.app.thread就是ApplicationThreadProxy,根据以前的知识,很明显时一个IPC操作,这样就又切回了Launcher进程了。
Launcher进程
ApplicationThread.schedulePauseActivity()|ActivityThread.sendMessage()|ActivityThread.H.sendMessage()|ActivityThread.H.handleMessage()|ActivityThread.handlePauseActivity()|ActivityThread.performPauseActivity()|ActivityThread.performPauseActivityIfNeeded()|Instrumentation.callActivityOnPause()|Activity.performPause()|Activity.onPause()|ActivityManagerProxy.activityPaused()|mRemote.transact() mRemote为BinderProxy
ApplicationThread.schedulePauseActivity()
public final void schedulePauseActivity(IBinder token, boolean finished, boolean userLeaving, int configChanges, boolean dontReport) {int seq = getLifecycleSeq();if (DEBUG_ORDER) Slog.d(TAG, "pauseActivity " + ActivityThread.this + " operation received seq: " + seq);sendMessage( finished ? H.PAUSE_ACTIVITY_FINISHING : H.PAUSE_ACTIVITY, token, (userLeaving ? USER_LEAVING : 0) | (dontReport ? DONT_REPORT : 0), configChanges, seq);}
ActivityThread.sendMessage()
private void sendMessage(int what, Object obj, int arg1, int arg2, int seq) {......mH.sendMessage(msg);}
最终调用了mH的sendMessage方法,mH是在ActivityThread中定义的一个Handler对象,主要处理SystemServer进程的消息.
ActivityThread.H.handleMessage()
public void handleMessage(Message msg) {switch (msg.what) {......case PAUSE_ACTIVITY: {Trace.traceBegin(Trace.TRACE_TAG_ACTIVITY_MANAGER, "activityPause");SomeArgs args = (SomeArgs) msg.obj;handlePauseActivity((IBinder) args.arg1, false,(args.argi1 & USER_LEAVING) != 0, args.argi2,(args.argi1 & DONT_REPORT) != 0, args.argi3);maybeSnapshot();Trace.traceEnd(Trace.TRACE_TAG_ACTIVITY_MANAGER);}break;....}....}
可以发现其调用了handlePauseActivity方法
ActivityThread.handlePauseActivity()
private void handlePauseActivity(IBinder token, boolean finished,boolean userLeaving, int configChanges, boolean dontReport, int seq) {ActivityClientRecord r = mActivities.get(token);......performPauseActivity(token, finished, r.isPreHoneycomb(), "handlePauseActivity");......// Tell the activity manager we have paused.if (!dontReport) {try {ActivityManagerNative.getDefault().activityPaused(token);} catch (RemoteException ex) {throw ex.rethrowFromSystemServer();}}mSomeActivitiesChanged = true;}}
方法体内部通过调用performPauseActivity方法来实现对栈顶Activity的onPause生命周期方法的回调.
ActivityThread.performPauseActivity()
final Bundle performPauseActivity(ActivityClientRecord r, boolean finished, boolean saveState, String reason) {......performPauseActivityIfNeeded(r, reason);......}private void performPauseActivityIfNeeded(ActivityClientRecord r, String reason) {......try {r.activity.mCalled = false;mInstrumentation.callActivityOnPause(r.activity);......}
Instrumentation.callActivityOnPuase()
public void callActivityOnPause(Activity activity) {activity.performPause();}
最终回调到了Activity的performPause方法:
Activity.performPause()
final void performPause() {mDoReportFullyDrawn = false;mFragments.dispatchPause();mCalled = false;onPause();mResumed = false;if (!mCalled && getApplicationInfo().targetSdkVersion>= android.os.Build.VERSION_CODES.GINGERBREAD) {throw new SuperNotCalledException("Activity " + mComponent.toShortString() +" did not call through to super.onPause()");}mResumed = false;}
太不容易了,回调到了Activity的onPause方法,也就是说我们在启动一个Activity的时候最先被执行的是栈顶的Activity的onPause方法。记住这点吧,面试的时候经常会问到类似的问题。
然后回到我们的handlePauseActivity方法,在该方法的最后面执行了ActivityManagerNative.getDefault().activityPaused(token);方法,这是应用进程告诉服务进程,栈顶Activity已经执行完成onPause方法了,通过前面我们的分析,我们知道这句话会调用ctivityManagerProxy.activityPaused(),并最终会被ActivityManagerService的activityPaused方法执行。
ActivityManagerProxy.activityPaused()
public void activityPaused(IBinder token) throws RemoteException {Parcel data = Parcel.obtain();Parcel reply = Parcel.obtain();data.writeInterfaceToken(IActivityManager.descriptor);data.writeStrongBinder(token);mRemote.transact(ACTIVITY_PAUSED_TRANSACTION, data, reply, 0);reply.readException();data.recycle();reply.recycle();}
system_server进程
ActivityManagerService.activityPaused()|ActivityStack.activityPausedLocked()|ActivityStack.completePauseLocked()|ActivityStackSupervisor.resumeFocusedStackTopActivityLocked()|ActivityStack.resumeTopActivityUncheckedLocked()|ActivityStack.resumeTopActivityInnerLocked()|ActivityStackSupervisor.startSpecificActivityLocked()
ActivityManagerService.activityPaused()
public final void activityPaused(IBinder token) {final long origId = Binder.clearCallingIdentity();synchronized(this) {ActivityStack stack = ActivityRecord.getStackLocked(token);if (stack != null) {stack.activityPausedLocked(token, false);}}Binder.restoreCallingIdentity(origId);}
ActivityStack.completePauseLocked()
private void completePauseLocked(boolean resumeNext, ActivityRecord resuming) {......if (resumeNext) {final ActivityStack topStack = mStackSupervisor.getFocusedStack();if (!mService.isSleepingOrShuttingDownLocked()) {mStackSupervisor.resumeFocusedStackTopActivityLocked(topStack, prev, null);} else {mStackSupervisor.checkReadyForSleepLocked();ActivityRecord top = topStack.topRunningActivityLocked();if (top == null || (prev != null && top != prev)) {// If there are no more activities available to run, do resume anyway to start// something. Also if the top activity on the stack is not the just paused// activity, we need to go ahead and resume it to ensure we complete an// in-flight app switch.mStackSupervisor.resumeFocusedStackTopActivityLocked();}}}......}
经过了一系列的逻辑之后,又调用了resumeTopActivityInnerLocked方法,又回到了这里,而这个时候
mResumedActivity != null,所以调用了ActivityStackSupervisor.startSpecificActivityLocked()
ActivityStackSupervisor.startSpecificActivityLocked()
void startSpecificActivityLocked(ActivityRecord r, boolean andResume, boolean checkConfig) {// Is this activity's application already running?ProcessRecord app = mService.getProcessRecordLocked(r.processName, r.info.applicationInfo.uid, true);r.task.stack.setLaunchTime(r);if (app != null && app.thread != null) {try {......realStartActivityLocked(r, app, andResume, checkConfig);return;} catch (RemoteException e) {Slog.w(TAG, "Exception when starting activity "+ r.intent.getComponent().flattenToShortString(), e);}// If a dead object exception was thrown -- fall through to// restart the application.}mService.startProcessLocked(r.processName, r.info.applicationInfo, true, 0,"activity", r.intent.getComponent(), false, false, true);}
可以发现在这个方法中,首先会判断一下需要启动的Activity所需要的应用进程是否已经启动,若启动的话,则直接调用realStartAtivityLocked方法,否则调用startProcessLocked方法,用于启动应用进程。
zygote进程
刚开始的时候,我们说过进程的创建,再来看一下,这张图:
ActivityManagerService.startProcessLocked()|Process.start()|Process.startViaZygote()|Process.zygoteSendArgsAndGetResult(openZygoteSocketIfNeeded(abi), argsForZygote)|ZygoteInit.runSelectLoop()|ZygoteConnection.runOnce()|fork()
ActivityManagerService.startProcessLocked()
private final void startProcessLocked(ProcessRecord app, String hostingType,String hostingNameStr, String abiOverride, String entryPoint, String[] entryPointArgs) {......// Start the process. It will either succeed and return a result containing// the PID of the new process, or else throw a RuntimeException.boolean isActivityProcess = (entryPoint == null);if (entryPoint == null) entryPoint = "android.app.ActivityThread";Trace.traceBegin(Trace.TRACE_TAG_ACTIVITY_MANAGER, "Start proc: " + app.processName);checkTime(startTime, "startProcess: asking zygote to start proc");Process.ProcessStartResult startResult = Process.start(entryPoint, app.processName, uid, uid, gids, debugFlags, mountExternal, app.info.targetSdkVersion, app.info.seinfo, requiredAbi, instructionSet, app.info.dataDir, entryPointArgs);checkTime(startTime, "startProcess: returned from zygote!");......}
注意:这个是在system_server进程里面
Process.start()
private static ProcessStartResult startViaZygote(final String processClass,final String niceName,final int uid, final int gid,final int[] gids,int debugFlags, int mountExternal,int targetSdkVersion,String seInfo,String abi,String instructionSet,String appDataDir,String[] extraArgs)throws ZygoteStartFailedEx {synchronized(Process.class) {......return zygoteSendArgsAndGetResult(openZygoteSocketIfNeeded(abi), argsForZygote);}}
Process.openZygoteSocketIfNeeded
private static ZygoteState openZygoteSocketIfNeeded(String abi) throws ZygoteStartFailedEx {if (primaryZygoteState == null || primaryZygoteState.isClosed()) {try {//向主zygote发起connect()操作primaryZygoteState = ZygoteState.connect(ZYGOTE_SOCKET);} catch (IOException ioe) {...}}if (primaryZygoteState.matches(abi)) {return primaryZygoteState;}if (secondaryZygoteState == null || secondaryZygoteState.isClosed()) {//当主zygote没能匹配成功,则采用第二个zygote,发起connect()操作secondaryZygoteState = ZygoteState.connect(SECONDARY_ZYGOTE_SOCKET);}if (secondaryZygoteState.matches(abi)) {return secondaryZygoteState;}...}
openZygoteSocketIfNeeded通过connect,来跟服务器建立socket链接,很类似我们自己写的socket。
注意:这个是在system_server进程里面。
后面的几个Process就不细说了,总之,接下来的流程就是,通过socket通道向Zygote进程发送一个参数列表,然后进入阻塞等待状态,直到远端的socket服务端发送回来新创建的进程pid才返回。
ZygoteInit.runSelectLoop()
说这个之前,我们先说下为什么会执行到这里。
Zygote进程是由由init进程而创建的,进程启动之后调用ZygoteInit.main()方法,预加载资源后,便调用runSelectLoop()方法。
就类似于咱们写的sorket,这个方法就是一个while(true)循环,一直等待着客户端连接
public static void main(String argv[]) {try {runSelectLoop(abiList);....} catch (MethodAndArgsCaller caller) {caller.run();} catch (RuntimeException ex) {closeServerSocket();throw ex;}}
特别注意这里的catch (MethodAndArgsCaller caller),后面反射调用ActivityThread.main(),就是通过抛出这个异常来做的。
ZygoteConnection.runOnce()
boolean runOnce() throws ZygoteInit.MethodAndArgsCaller {String args[];Arguments parsedArgs = null;FileDescriptor[] descriptors;try {//读取socket客户端发送过来的参数列表args = readArgumentList();descriptors = mSocket.getAncillaryFileDescriptors();} catch (IOException ex) {closeSocket();return true;}PrintStream newStderr = null;if (descriptors != null && descriptors.length >= 3) {newStderr = new PrintStream(new FileOutputStream(descriptors[2]));}int pid = -1;FileDescriptor childPipeFd = null;FileDescriptor serverPipeFd = null;try {//将binder客户端传递过来的参数,解析成Arguments对象格式parsedArgs = new Arguments(args);...int [] fdsToClose = { -1, -1 };FileDescriptor fd = mSocket.getFileDescriptor();if (fd != null) {fdsToClose[0] = fd.getInt$();}fd = ZygoteInit.getServerSocketFileDescriptor();if (fd != null) {fdsToClose[1] = fd.getInt$();}fd = null;// 重点方法pid = Zygote.forkAndSpecialize(parsedArgs.uid, parsedArgs.gid, parsedArgs.gids,parsedArgs.debugFlags, rlimits, parsedArgs.mountExternal, parsedArgs.seInfo,parsedArgs.niceName, fdsToClose, parsedArgs.instructionSet,parsedArgs.appDataDir);} catch (Exception e) {...}try {if (pid == 0) {//子进程执行IoUtils.closeQuietly(serverPipeFd);serverPipeFd = null;//【见小节13】handleChildProc(parsedArgs, descriptors, childPipeFd, newStderr);// 不应到达此处,子进程预期的是抛出异常ZygoteInit.MethodAndArgsCaller或者执行exec().return true;} else {//父进程执行IoUtils.closeQuietly(childPipeFd);childPipeFd = null;return handleParentProc(pid, descriptors, serverPipeFd, parsedArgs);}} finally {IoUtils.closeQuietly(childPipeFd);IoUtils.closeQuietly(serverPipeFd);}}
- Zygote.forkAndSpecialize()这个是比较重要的方法,它会调用nativeForkAndSpecialize(),最后会调用我们熟悉的fork()来创建子进程。
- pid==0,说明是在子进程里面,就会调用handleChildProc,也就是说,这个是会在新进程里面执行的,后面会说到。
fork()
Android进程系列第一篇---进程基础
理解fork()的一次调用两次执行
fork函数执行一次,返回两次
返回值有3种类型。
- 父进程中,fork返回新创建的子进程的pid;
- 子进程中,fork返回0;
- 当出现错误时,fork返回负数。(当进程数超过上限或者系统内存不足时会出错)
怎么理解呢?我们看一个例子:
#include <unistd.h>#include <stdio.h>#include <wait.h>int a;int main() {int count = 0;pid_t fpid = fork();if (fpid < 0) {printf("创建父子进程失败!");} else if (fpid == 0) {printf("子进程ID:%d\n", getpid());count++;a = 0;} else {printf("父进程ID:%d\n", getpid());count=10;a = 1;}printf("count=%d\n", count);printf("a=%d\n", a);waitpid(fpid, NULL, 0);return 0;}***************************************************************/home/wangjing/CLionProjects/untitled/cmake-build-debug/untitled父进程ID:15229count=10a=1子进程ID:15230count=1a=0Process finished with exit code 0
通过打印的结果,可以发现一些重要信息:
- fork函数执行一次,返回两次
- a是全局变量,count是局部变量,子进程和父进程同时操作,但是互相不受影响
- 进程id不一样了
所以说:
1、fork之后,会有两个进程,fork出了一个子进程
2、fork调用完成后,我们的main函数接下来要执行的代码,已经处于了两个不同的进程了,这两个进程都会继续执行剩下的代码,而且不同进程fork的返回值也不一样。
2、两个进程代码是同一份,但是数据却不是同一份
接下来,我们来解释为什么会共享代码?
进程在内存里有三部分的数据——代码段、堆栈段和数据段。这三个部分是构成一个完整的执行序列的必要的部分。
- 代码段,存放了程序代码的内存空间。
- 堆栈段,存放的返回地址、参数以及局部变量
- 数据段,存放程序的全局变量,常数以及动态数据分配的数据空间
int a;void main(){int b;int c=func();}int func(){int d;return 0;}
上面这个例子里面,变量b,c,d都是会存放在堆栈段里面,而a则会存放在数据段里
fork()总结:
- fork函数执行一次,返回两次
- fork函数之后的代码,子进程和父进程会同时执行,理解为从fork之后,子进程和父进程运行的是同一个程序
- fork出来的子进程和父进程,共用代码段,但是会拥有各自的数据段和堆栈段
App进程
我们前面说过,pid==0(即运行在子进程)继续开始执行handleChildProc()方法,所以我们从它开始。
ZygoteConnection.handleChildProc()|RuntimeInit.zygoteInit()|RuntimeInit.commonInit()|RuntimeInit.nativeZygoteInit()|RuntimeInit.applicationInit()|RuntimeInit.invokeStaticMain()|ZygoteInit.MethodAndArgsCaller()|MethodAndArgsCaller.run()
RuntimeInit.commonInit()
private static final void commonInit() {// 设置默认的未捕捉异常处理方法Thread.setDefaultUncaughtExceptionHandler(new UncaughtHandler());// 设置市区,中国时区为"Asia/Shanghai"TimezoneGetter.setInstance(new TimezoneGetter() {public String getId() {return SystemProperties.get("persist.sys.timezone");}});TimeZone.setDefault(null);//重置log配置LogManager.getLogManager().reset();new AndroidConfig();// 设置默认的HTTP User-agent格式,用于 HttpURLConnection。String userAgent = getDefaultUserAgent();System.setProperty("http.agent", userAgent);// 设置socket的tag,用于网络流量统计NetworkManagementSocketTagger.install();}
- 设置默认的未捕捉异常处理方法
- 设置时区
- 设置默认的HTTP User-agent格式
RuntimeInit.nativeZygoteInit()
native方法
- 调用open()打开/dev/binder驱动设备,再利用mmap()映射内核的地址空间,将Binder驱动的fd赋值ProcessState对象中的变量mDriverFD,用于交互操作。
- 启动Binder线程池
RuntimeInit.applicationInit()
private static void applicationInit(int targetSdkVersion, String[] argv, ClassLoader classLoader) throws ZygoteInit.MethodAndArgsCaller {//true代表应用程序退出时不调用AppRuntime.onExit(),否则会在退出前调用nativeSetExitWithoutCleanup(true);//设置虚拟机的内存利用率参数值为0.75VMRuntime.getRuntime().setTargetHeapUtilization(0.75f);VMRuntime.getRuntime().setTargetSdkVersion(targetSdkVersion);final Arguments args;try {args = new Arguments(argv); //解析参数} catch (IllegalArgumentException ex) {return;}Trace.traceEnd(Trace.TRACE_TAG_ACTIVITY_MANAGER);//调用startClass的static方法 main() 【见流程15】invokeStaticMain(args.startClass, args.startArgs, classLoader);}
此处args.startClass为”android.app.ActivityThread”。
RuntimeInit.invokeStaticMain()
private static void invokeStaticMain(String className, String[] argv, ClassLoader classLoader) throws ZygoteInit.MethodAndArgsCaller {Class<?> cl = Class.forName(className, true, classLoader);Method m = cl.getMethod("main", new Class[] { String[].class });int modifiers = m.getModifiers();...//通过抛出异常,回到ZygoteInit.main()。这样做好处是能清空栈帧,提高栈帧利用率。throw new ZygoteInit.MethodAndArgsCaller(m, argv);}
这里m是main方法
上面我们说过:
public static void main(String argv[]) {try {runSelectLoop(abiList);....} catch (MethodAndArgsCaller caller) {caller.run();} catch (RuntimeException ex) {closeServerSocket();throw ex;}}
通过抛出异常,回到ZygoteInit.main()。这样做好处是能清空栈帧,提高栈帧利用率。
这样,catch到之后,会调用MethodAndArgsCaller.run()。
MethodAndArgsCaller.run()
public static class MethodAndArgsCaller extends Exception implements Runnable {public void run() {try {//根据传递过来的参数,此处反射调用ActivityThread.main()方法mMethod.invoke(null, new Object[] { mArgs });} catch (IllegalAccessException ex) {throw new RuntimeException(ex);} catch (InvocationTargetException ex) {Throwable cause = ex.getCause();if (cause instanceof RuntimeException) {throw (RuntimeException) cause;} else if (cause instanceof Error) {throw (Error) cause;}throw new RuntimeException(ex);}}}
根据传递过来的参数,此处反射调用ActivityThread.main()方法。
总算是进入到了ActivityThread类的main()方法。
App进程
ActivityThread.main()|ActivityThread.attach()|ActivityManagerProxy.attachApplication()|ActivityManagerNative.onTransact()|ActivityManagerService.attachApplication()|ActivityManagerService.attachApplicationLocked()|ApplicationThreadNative.ApplicationThreadProxy.bindApplication()|ApplicationThreadNative.onTransact()|ActivityThread.ApplicationThread.bindApplication()|ActivityThread.sendMessage()|ActivityThread.H.sendMessage()|ActivityThread.H.handleMessage()|ActivityThread.handleBindApplication()
ActivityThread.main()
public static void main(String[] args) {Looper.prepareMainLooper();//又新建一个ActivityThread并调用attach(false)ActivityThread thread = new ActivityThread();thread.attach(false);if (sMainThreadHandler == null) {sMainThreadHandler = thread.getHandler();}}
注意此时只创建了应用程序的ActivityThread和ApplicationThread,和开启了Handler消息循环机制,其他的都还未创建。
ActivityThread.attach(false)又会最终到AMS的attachApplication,而attachApplication的主要作用就是将本地的ApplicationThread传递到AMS。
AMS通过ApplicationThread的代理ApplicationThreadProxy,来调用应用程序ApplicationThread.bindApplication,通知应用程序的ApplicationThread已和AMS绑定,可以不借助其他进程帮助直接通信了。此时Launcher的任务也算是完成了。
将信息放到应用里的消息队列里,通过Handler消息机制,在ActivityThread.handleMeaasge里处理H.BIND_APPLICATION的信息,调用AplicationThread.handleBindApplication
handleBindApplication(AppBindData data) {Process.setArgV0(data.processName);//设置进程名...//初始化mInstrumentationif(data.mInstrumentation!=null) {mInstrumentation = (Instrumentation) cl.loadClass(data.instrumentationName.getClassName()).newInstance();}else {mInstrumentation = new Instrumentation();}//创建Application,data.info是个LoadedApk对象。Application app = data.info.makeApplication(data.restrictedBackupMode, null);mInitialApplication = app;//调用Application的onCreate()方法。mInstrumentation.callApplicationOnCreate(app);}LoadedApk类:public Application makeApplication(boolean forceDefaultAppClass,Instrumentation instrumentation) {if (mApplication != null) {return mApplication;}String appClass = mApplicationInfo.className;java.lang.ClassLoader cl = getClassLoader();//此时新建一个Application的ContextImpl对象,ContextImpl appContext = ContextImpl.createAppContext(mActivityThread, this);//通过在handleBindApplication创建的mInstrumentation对象新建一个Application对象,同时进行attach。app = mActivityThread.mInstrumentation.newApplication(cl, appClass, appContext);appContext.setOuterContext(app);}Instrumentation类:public Application newApplication(ClassLoader cl, String className, Context context) {return newApplication(cl.loadClass(className), context);}Instrumentation类:static public Application newApplication(Class<?> clazz, Context context) {//实例化ApplicationApplication app = (Application)clazz.newInstance();// Application和context绑定app.attach(context);return app;}//attach就是将新建的ContextImpl赋值到mBase,这个ContextImpl对象就是所有Application内Context的具体//实现,同时赋值一些其他的信息如mLoadedApk。final void attach(Context context) {mBase = base;mLoadedApk = ContextImpl.getImpl(context).mPackageInfo;}
可以看出来,Instrumentation和Application,都是反射调用的:
//初始化mInstrumentationif(data.mInstrumentation!=null) {mInstrumentation = (Instrumentation) cl.loadClass(data.instrumentationName.getClassName()).newInstance();}else {mInstrumentation = new Instrumentation();}//实例化ApplicationApplication app = (Application)clazz.newInstance();
Application创建完成之后,就会调用onCreate():
//调用Application的onCreate()方法。mInstrumentation.callApplicationOnCreate(app);
Activity启动
ActivityThread.main()|ActivityThread.attach()|ActivityManagerProxy.attachApplication()|ActivityManagerNative.onTransact()|ActivityManagerService.attachApplication()|ActivityManagerService.attachApplicationLocked()|ActivityStackSupervisor.attachApplicationLocked()|ActivityStackSupervisor.realStartActivityLocked()|ClientLifecycleManager.scheduleTransaction()|ClientTransaction.schedule()|ApplicationThreadNative.ApplicationThreadProxy.scheduleTransaction()|ApplicationThreadNative.onTransact()|ActivityThread.ApplicationThread.scheduleTransaction()|ActivityThread.scheduleTransaction()|ClientTransactionHandler.scheduleTransaction()|ActivityThread.H.sendMessage(EXECUTE_TRANSACTION)|ActivityThread.H.handleMessage()|TransactionExecutor.execute()|LaunchActivityItem.execute()|ActivityThread.handleLaunchActivity()|ActivityThread.performLaunchActivity()
在ActivityManagerService.attachApplicationLocked()不仅仅会执行ApplicationThreadNative.ApplicationThreadProxy.bindApplication(),还会执行启动Activity的流程。
小结

参考
https://www.jianshu.com/p/d6562ac93767
https://zhuanlan.zhihu.com/p/433901409
https://juejin.cn/post/6844904116561379341
Android-7-1-2-Android-N-Activity启动流程分析
一篇文章看明白 Android 从点击应用图标到界面显示的过程
Android进程启动流程(App启动)
Android 应用点击图标到Activity界面显示的过程分析
