@Lxyour
2017-10-31T13:48:24.000000Z
字数 3977
阅读 2693
SVG的使用方式
CSS3
什么是SVG
SVG是一种可缩放矢量图形(Scalable Vector Graphics,SVG),是用来描述二维矢量图形的XML 标记语言。
简单地说,SVG面向图形,XHTML面向文本。由于SVG也是一种XML文件,所以SVG也继承了XML的开放性、可移植性和交互性的优点。SVG与Flash类似,都是用于二维矢量图形,二者的区别在于,SVG是一个W3C标准,基于XML,是开放的,而Flash是封闭的基于二进制格式的。
如今几乎所有主流的浏览器都支持SVG,大家可以从这里得到更多的兼容信息,其中包括:
- 使用或者元素来显示基本的SVG图形;
- 使用来显示SVG图形;
- 将SVG图形应用为CSS背景图;
- 直接在HTML文档中使用标签(需要HTML5支持);
- 对使用CSS或者外部对象元素的HTML元素使用SVG变换、滤镜等特效;
- 对SVG对象使用类似photoshop的效果,包括模糊和色彩处理;
- 对SVG图像使用动画;
- 使用SVG格式的字体;
计算机中图形系统
- 栅格图形 (像素图形)
- 矢量图形
创建一个SVG图形
使用Ai等软件创建矢量图,然后导出svg格式的图片
使用SVG的方式
包含在标签内部
这是一种最直接的方法,但是需要浏览器支持HTML5中的标签,如:
<!DOCTYPE HTML>2 <html lang="en-US">3 <head>4 <meta charset="UTF-8">5 <title>SVG DEMO</title>6 </head>7 <body>8 <svg width="140" height="170">9 <title>cat</title>10 <desc>Stick Figure of a Cat</desc>11 <circle cx="70" cy="95" r="50" style="stroke: black; fill: none;"/>12 <circle cx="55" cy="80" r="5" style="stroke: black; fill: #339933"/>13 <circle cx="85" cy="80" r="5" style="stroke: black; fill: #339933"/>14 <g id="whiskers">15 <link x1="75" y1="95" x2="135" y2="85" style="stroke: black;"/>16 <link x1="75" y1="95" x2="135" y2="105" style="stroke: black;"/>17 </g>18 <use xlink:href="#whiskers" transform="scale(-1,1) translate(-140,0)" />19 <!-- ears -->20 <polyline points="108 62, 90 10,70 45, 50 10, 32 62" style="stroke: black; fill: none;" />21 <!-- mouth -->22 <polyline points="35 110, 45 120, 95 120, 105 110" style="stroke: black; fill: none;" />23 <!-- nose -->24 <path d="M 75 90 L 65 90 A 5 10 0 0 0 75 90" style="stroke: black; fill: #ffcccc;" />25 <text x="60" y="165" style="font-family:sans-serif; font-size:14pt;">Cat</text>26 </svg>27 </body>28 </html>
通过或者标签嵌入
其中svg-demo.svg是先前创建的SVG文件。
<embed src="svg-demo.svg" type="image/svg+xml" width="48" height="48"><object data="svg-demo.svg" type="image/svg+xml" width="48" height="48"></object>
通过标签的src属性
<img src="svg-demo.svg" width="48" height="48" alt="">
通过CSS背景
<div class="svg-class"></div>.svg-class {width: 140px;height: 170px;background: url(svg-demo.svg) no-repeat;}
React中的优雅方式
定义组件
在React中使用时为了方便我们先定义好一个组件,如下:
// @fileoverview svg sprite 封装调用组件'use strict';import React from 'react';var Svg = React.createClass({render: function () {let {glyph, ...others} = this.props;return (<svg {...others}><use xlinkHref={glyph}/></svg>);}});export default Svg;
使用示例
//@fileoverview wap Loading组件import React from 'react';import './index.scss';import Svg from 'component/svg';import svgIcon from './icon-loading.svg';const Loading = React.createClass({getInitialState() {return {};},componentDidMount() {},render () {return (<div className="loading-shadow"><Svg className="loading-svg" glyph={svgIcon} width={24} height={24}/></div>)}});export default Loading;
SVG复用
<defs>元素用于预定义一个元素使其能够在SVG图像中重复使用。【更多】
<symbol>元素用于定义可重复使用的符号。【更多】嵌入在
<defs>或<symbol>元素中的图形是不会被直接显示的,除非你使用<use>元素来引用它。
xlink定义了一套标准的在 XML 文档中创建超级链接的方法
use标签的transform属性
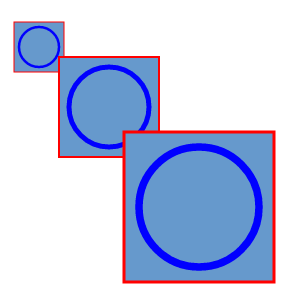
<svg xmlns="http://www.w3.org/2000/svg" xmlns:xlink="http://www.w3.org/1999/xlink" width="300" height="400"><defs><g id="ShapeGroup"><rect x="50" y="50" width="100" height="100" fill="#69C" stroke="red" stroke-width="2"/><circle cx="100" cy="100" r="40" stroke="#00f" fill="none" stroke-width="5"/></g></defs><use xlink:href="#ShapeGroup" transform="translate(-10,0) scale(0.5)"/><use xlink:href="#ShapeGroup" transform="translate(10,10) scale(1)"/><use xlink:href="#ShapeGroup" transform="translate(50,60) scale(1.5)"/></svg>
示例图:

use的x、y属性
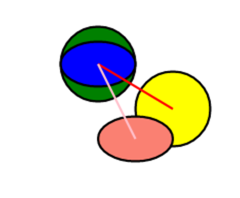
<svg xmlns="http://www.w3.org/2000/svg" xmlns:xlink="http://www.w3.org/1999/xlink" width="300" height="300"><circle cx = "100" cy = "100" r = "50" fill = "green" stroke = "black" stroke-width = "3"/><ellipse cx = "100" cy = "100" rx = "50" ry = "30" fill = "blue" stroke = "black" stroke-width = "3"/><defs><circle id="s1" cx="100" cy="100" r="50" fill="yellow" stroke="black" stroke-width = "3"/><ellipse id="s2" cx="100" cy = "100" rx="50" ry="30" fill="salmon" stroke="black" stroke-width = "3"/></defs><use x="100" y="60" xlink:href="#s1"/><use x="50" y="100" xlink:href="#s2"/><line x1="100" y1="100" x2="200" y2="160" stroke="red" stroke-width="3"/><line x1="100" y1="100" x2="150" y2="200" stroke="pink" stroke-width="3"/></svg>

如下图可以看出,<use> 中的 x 和 y 相当于 <text> 标签中的 dx 和 dy。
但是注意:<use>标签并不支持 dx 和 dy。
