@superpigy
2020-03-30T02:07:38.000000Z
字数 5663
阅读 110
翔创交接文档
采集SDK
A. WRAPPERS
1. NotificationCenter
目标位置: baselibrary/src/NotificationCenter
作用: 跨线程订阅者和发布者,可以在任意位置发起线程安全的通信
使用方法
1. 注册订阅者
NotificationCenter.defaultCenter().registerNotificationWithName({sub_name}, callback)
- 向订阅者发布通知与传值
NotificationCenter.defaultCenter().postNotificationWithName({sub_name}, object)
- 清理订阅通知
NotificationCenter.defaultCenter().deactivateNotificationWithName({sub_name})
2. MultiThreading
目标位置: baselibrary/src/Threading
作用: 创建并维护可伸缩的线程池
使用方法
创建多个线程并指定优先级
ThreadManager.defaultManager().CreateThreadsFromThreadIds(new String[]{"thead1:low", "thread2:high", "thread3"})
将事件分发到指定线程
ThreadManager.defaultManager().PostProcess({thead_name}, runnable)
清理多个线程
ThreadManager.defaultManager().DeactivateBackgroundWorkers(new String[]{"thead1", "thread2", "thread3"})
线程锁
ThreadSafeLocker locker = new ThreadSafeLocker();// 定义锁定事件locker.Lock(()->{onExecute(ThreadSafeLocker _locker){}onError(ThreadSafeLocker _locker){}onFinal(ThreadSafeLocker _locker){}})// 加锁locker.Block({need_lock}, {can_unlock})// 锁释放, 加锁时can_unlock设置为false的不可解锁locker.Unblock({need_lock})
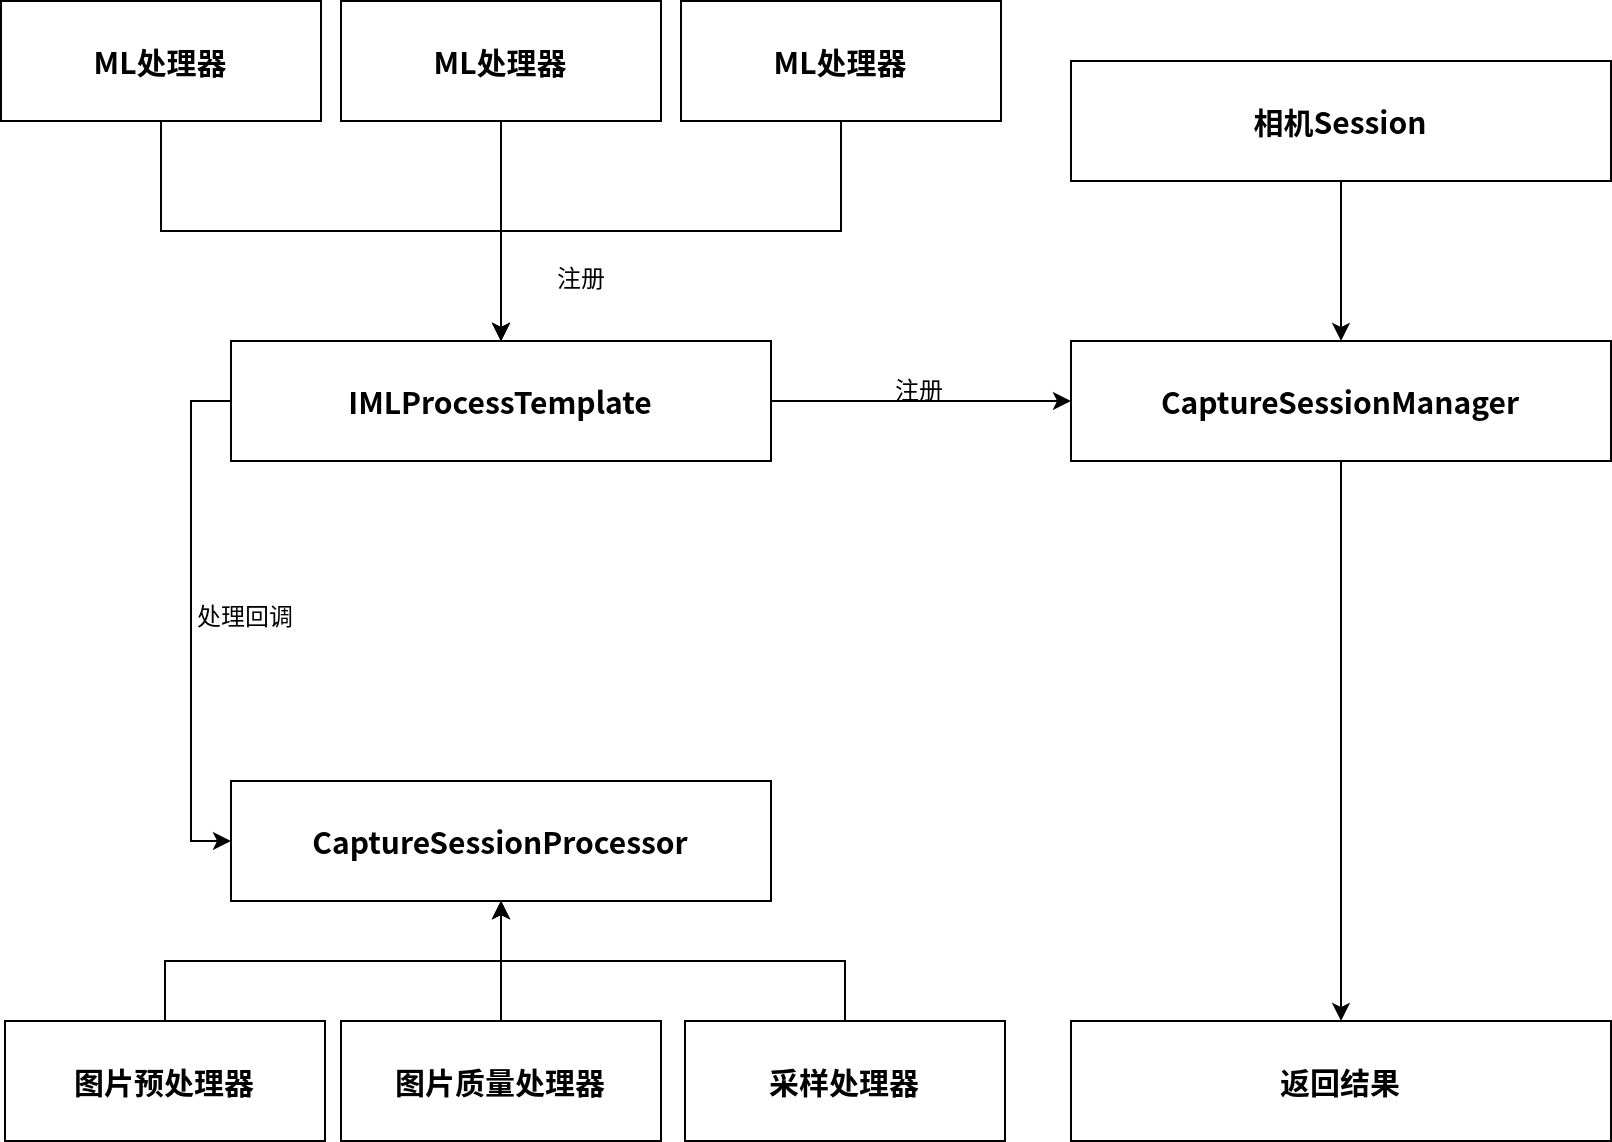
相机Session管理器
目标位置: baselibrary/src/Session
作用: 维护相机Session以及其内部注册的处理器
额外说明: 如果有特殊需求可以继承该类并重写内部_process方法
captureManager = new BasicCaptureSessionManager({此处传入需要处理的模板, 继承于IMLProcessTemplate}, new CaptureSessionManager.CaptureSessionCallback() {//发现检测框回调@Overridepublic void onDraw(ArrayList<TrackItem> items) {}// 点数回调@Overridepublic void onDrawItemCount(int count) {}// 目标角度采集成功回调@Overridepublic void onAngleCountRefresh(int[] counts) {}// 强制对焦回调@Overridepublic void onForceRefocus(TrackItem item) {}// 采集完成回调@Overridepublic void onAllDone(CaptureSessionManager manager) {}}, true); //是否以单线程运行
处理模板IMLProcessTemplate
目标位置: baselibrary/src/MachineLearning
作用: 处理串行AI任务
额外说明: 不同的任务通过继承方式重写Interface内部方法,并传入CaptureSessionManager即可. 处理模板基础设计架构为流水线Pipeline架构, 所有ML请求依次执行. 不同的请求间可以用pipeline.pipelineBag来进行传值. 回调需返回当前处理是否成功的信号(true/false), 返回true则进行下一个请求,否则中断请求.
需重写方法
// 返回整个流程所用到的模型请求protected ArrayList MLRequests() {ArrayList<MLProcessRequest> requests = new ArrayList<>();int nTops = 10;Map detectMap = getDetectMap(nTops);Map keyRoMap = getKeyRoMap();MLProcessRequest detectRequest = new MLProcessRequest(RecogParams.DETECT_STR, "cow_detect.tflite", detectMap, this._pipeline.requestInputSize, 3, 1, true, null, true);MLProcessRequest keyroRequest = new MLProcessRequest(RecogParams.ANGLE_RO_STR, "cow_kero.tflite", keyRoMap, this._pipeline.requestInputSize, 3, 1, true, null, true);requests.add(detectRequest);requests.add(keyroRequest);return requests;}// 模型请求开始前回调protected boolean onMLRequestStart(MLProcessPipeline pipe) {return true;}// 模型请求执行完毕回调protected boolean onMLRequestDone(MLProcessPipeline pipe) {return true;}// 所有模型执行完毕回调protected boolean onPipelineDone(MLProcessPipeline pipe) {return true;}
其他还有很多图像处理, 质量处理以及队列处理的Wrapper,请自行查看源代码.
B. Workflow
ArSDK
A. WRAPPERS
1. PlaneFinder
目标位置: baselibrary/src/PlaneFinderHelper
作用: 找到猪身平面以及地面平面
_finder = new PlaneFindingHelper()public void onDrawFrame(Frame frame){_finder.update(frame, {location_point})}//判断是否检测到平面boolean success = _finder.success()// 获取尸体高度_finder.body_length// 获取手机距地面高度_finder.ground_dist// 获取近平面转换系数_finder.decay_rate()// 获取最近平面GLPlane plane = _finder.surface;// 获取地面平面GLPlane plane = _finder.ground;// 判断Anchor是否在某一平面boolean yes = _finder.isAnchorOnSurfacePlane(anchor)
2. 猪身检测
目标位置: baselibrary/src/GlobalProcessor
作用: 检测猪身位置并预测关键点
// 创建监听的关键点IDsArrayList<Integer> measure_point_idx = new ArrayList<Integer>();measure_point_idx.add(1);measure_point_idx.add(5);_processor = new GlobalProcessor(measure_point_idx, 15 //关键点数量, new GlobalProcessor.GlobalProcessorCallback() {@Overridepublic void onDataCallback(Object data, String linelength) {}// 结果回调@RequiresApi(api = Build.VERSION_CODES.M)@Overridepublic void onResultCallback(float pixel_ratio, float decay_ratio, TrackItem item, ArrayList<KeypointProjector> keypoints, String img_filepath, String bodydeep, String phonedeep) {}@Overridepublic void onNotRightPlaceCallback() {}});
3. 长度计算
目标位置: baselibrary/src/GlobalProcessor
作用: 通过点位创建Anchor并计算实际长度
Anchor a1 = _processor.fakePointAnchor(frame, x1, y1)Anchor a2 = _processor.fakePointAnchor(frame, x2, y2)float distance = GlobalProcess.calculate_distance(a1, a2) * _finder.decay_ratio()
TorchML
A. 散养牛采集
根据粗粒度+细粒度分层聚类来区分不同的牛并自动合并相同的牛脸数据
路径位置
在根目录执行
python start_process.py
B. 通道门采集
项目位置: http://innovation.opush.xyz:8880/liudapeng/video_capture
项目分为Python消费者端和C++生产者端.
使用方式: 在树莓派上假设好摄像头,分别执行两端文件即可.
路径位置
在根目录执行
python start_process.py
C. 树莓派小车采集
由于树莓派机型性能限制, 本部分分为三块:
- 视频流推送器
在根目录ip_cam.py中通过多进程读写摄像头数据,并将数据推送到Redis订阅服务器(可自行设定). - 视频流处理器
在根目录ip_cam_processor.py中有Redis订阅监控,负责将订阅内容处理成牛脸 - 牛脸追踪器
在object_metrics目录中的iou_calc.py中负责追踪不同帧中相同的牛脸同时技术,最终输出保存质量最佳的牛脸.
D. 多角度牛脸识别模型
1. CMC Encoder
目标位置: /networks/classification/multiview.py
Class: CMC
2. MVCNN Encoder(牦牛)
目标位置: /networks/classification/multiview.py
Class: MVCNN
3. Part-based meta-learner(牦牛)
目标位置: /networks/classification/multiview.py
Class: HornFaceCNN
E. 目标检测
1. CenterNet
目标位置: /networks/object_detection/centernet/model
Class: CenterNet
Backbone支持: MobileNetV2, MobileNetV3, DLA-34, GhostNet
默认检测: DLAUp上采样
小目标增强检测: FPN + CFE Module + FEM Module
支持训练方式:
1. fp16 半精度训练
2. uint8 量化训练
3. Multiscale多尺度训练
4. Mixup 混合训练
5. 多姿态训练(关键点与角度回归)
2. ThunderNet
目标位置: /networks/object_detection/thundernet/model
Class: ThunderNet
Backbone支持: Snet42
支持训练方式:
1. fp16 半精度训练
2. Multiscale多尺度训练
3. Mixup 混合训练
3. Centernet based Deepsort
目标位置: /networks/object_detection/deepsort/deep_sort
Class: DeepSort
Backbone支持: CenterNet
支持训练方式:
1. fp16 半精度训练
2. uint8 量化训练
3. Multiscale多尺度训练
4. Mixup 混合训练
F. TorchML WRAPPER
1. 所支持的Loss(networks/losses)
Classification Focalloss, ObjectDetection FocalLoss, NCELoss, CenterLoss, TripletLoss, DiceLoss, RegL1Loss
2. 所支持的优化器(networks/optimizers/extra.py)
Yogi, Adabound, Nadam, Radam, AdamW, Ranger, RangerLars, Shampoo
3. 所支持的学习率调度器(networks/scheduler/sched.py)
CosineLR, CycleAnnealScheduler, GradualWarmupScheduler, DelayerScheduler, CosineAnnealingWithRestartsLR等等
4. 额外支持的特性
- PGD对抗学习
- FMix混合学习
- SWA均匀梯度学习
- SyncBN自动替代多卡学习
G. 数据集
数据集都在1001上/media/hdd0/SharedData中,可自行查阅
