@File
2019-10-11T12:55:29.000000Z
字数 6844
阅读 142
vue 部署和组件化
web
相关连接
vue 官方文档
axios 官方文档
elementUi 官方文档
一、 vue-cli构建项目与打包部署
使用vue-cli能够快速的帮助我们构建项目,它就如同一个脚手架,提供了可选的模板。在使用vue-cli之前需要先安装nodejs。
1. 使用npm构建项目
# 安装vue-cli,该步骤需要等一段时间npm i -g @vue/cli# 查看vue-cli的版本vue -V# 创建名为my-app的项目vue create my-app
2. 项目的结构介绍
- public: 存放静态文件。
- src: 源码文件,开发就在此目录下。
- .gitignore: git的配置文件。
- babel.config.js: babel的配置文件,在创建项目的时候才用的脚手架为bable。
- package-lock.json:定义了依赖库的下载位置,保证了在项目迁移部署环境的一致性。
- package.json: 定义了该项目依赖的类库。
3. 运行调试
# 项目启动命令npm run serve
- 终止运行:
ctrl+c
4. 项目的打包部署
执行命令:
npm run build
将生成的dist目录下的文件放入到tomcat或者nginx下,启动服务器,即可访问。
二、 组件化开发
和原始写法差不多,只是把一个页面再拆分成多块,然后拼接起来
1. 代码结构
<!-- html 内容 --><template></template><!-- js 代码块 --><script>// vue 代码块,类似 new Vue({})export default {}</script><!-- css 样式块 --><style></style>
2. 引入模块
js实现:
import...from引入文件components:注册组件
<script>// import <别名> from <路径>import HelloWorld from './components/HelloWorld.vue'// vue 代码块,类似 new Vue({})export default {// 注册后可以在 template 中调用components: {// 调用格式: <HelloWorld></HelloWorld>HelloWorld}}</script>
html实现:
<HelloWorld/>和<hello-world/>写法都可以
<template>// 把引入的 html 引用到这里<hello-world/></template>
3. 跨模块传参
父模块:
- 给子类传参
- 传字符串:
<参数名>="<字符串>"- 传属性::
<参数名>="<属性名>"- 传方法:
@<参数名>="<方法名>"- 取子类参数
- 声明取值:
ref="<取值属性命名>"- vue调用:
this.$refs.<取值属性>.<子类定义的属性名>
<template><!--传字符串:<参数名>="<字符串>"传属性::<参数名>="<属性名>"传方法:@<参数名>="<方法名>"声明赋值:ref="<取值属性命名>"--><hello-world str="传入字符串" :name="name" @setName="setName" ref="helloWorld"/></template><!-- js --><script>import HelloWorld from './components/HelloWorld.vue'export default {components: {HelloWorld},data() {// 设置属性return {name:'李大爷'}},methods: {// 设置方法setName(str) {this.name = str;// 配合 ref 直接获取 age 的参数this.age = this.$refs.helloWorld.age;}}}</script>
子模块:
props:中定义接收的参数this.$emit在自定义方法中调用父类方法
<template><input v-once v-model="str"><input v-model="name"></template><!-- js --><script>export default {// 接收父模块参数props: {// 参数名: 参数类型str: String,name: String,age: 18},methods: {// 创建一个方法setName(str){// 方法中调用父模块传来的方法this.$emit('setName', str);}}}</script>
三、 pubsub 订阅与发布
- publish 发布
- subscribe 订阅
1. 安装
npm i pubsub-js -S
2. 发布方
// 引入import PubSub from 'pubsub-js'export default {methods: {pub() {// 调用 publish('频道','发布的内容') 发布PubSub.publish('channel1', '张某人');}}}
3. 订阅方
// 引入import PubSub from 'pubsub-js'export default {mounted() {// 调用 subscribe('频道',回调函数) 接收内容PubSub.subscribe('channel1', (key, value) => {// 订阅频道,channel1window.console.log(key);// 发布的内容window.console.log(value);});}}
四、 slot 插槽
1. 设立槽位
<template><div><!-- 基本槽位 --><slot name="title"></slot><!-- 带属性的槽位 --><slot name="item" v-bind="person"></slot></div></template><!-- js --><script>export default {data() {return {person: {age: 10, name: 'zhangsan'}}}}</script>
2. 绑定槽位
<template><List><!-- v-slot 绑定 --><template v-slot:title><h2>插槽案例</h2><button class="btn btn-danger btn-sm">点击</button></template><!-- # 绑定,并取 props 参数 --><template #item="props"><h3>插槽属性</h3><p>属性值:{{props}}</p></template></List></template><!-- js --><script>// 引入带槽位的模块import List from './components/List.vue'export default {components: {List}}</script>
五、 axios 网络请求
1. 安装
npm i axios vue-axios -S
2. 配置全局请求地址
新建Base.vue文件,文件内容如下:
<script>const BASE_URL = "http://localhost:8081"export default {BASE_URL}</script>
3. main.js配置
import axios from 'axios'import VueAxios from 'vue-axios'import Base from './Base.vue'// 顺序有关系Vue.use(VueAxios, axios);// 配置基本地址axios.defaults.baseURL = Base.BASE_URL;
4. 发送请求
请求方式:
get:this.axios.get('请求地址')
post:this.axios.post('请求地址',{请求参数})
delete:this.axios.delete('请求地址')
axios:this.axios({自定义请求属性})统一回调:
.then(成功回调,失败回调)
<script>export default {methods: {// post演示,举一反三post() {// 默认使用 json 格式提交参数this.axios.post('/addUser', {name:'李大爷', id: 10}).then(// 成功回调(resp) => {// resp.data 才是后端传过来的数据resp.data;},// 错误回调(error) => {});},// axios 自定义普通表单提交axios() {this.axios({url: '/addUser'method: 'post',data: {name: '李大爷',id: 10}}).then(// 成功回调(resp) => {},// 错误回调(error) => {})}}}</script>
六、 elementUi
1. 安装
npm i element-ui -S
2. main.js 配置
import ElementUI from 'element-ui'import 'element-ui/lib/theme-chalk/index.css'Vue.use(ElementUI)
七、 VueRouter 路由
1. 安装
npm i vue-router -S
2. 配置路由信息
- 创建 router 文件夹,创建 index.js 文件并配置:
import Vue from 'vue'import Router from 'vue-router'const HOME = () => import('../views/Home');const ABOUT = () => import('../views/About');const HOME_INFO = () => import('../views/home/info');Vue.use(Router);export default new Router({mode: 'history',// 选中状态下默认添加的样式linkActiveClass: 'active',routes: [{path: '/home',component: HOME// 子路由children: [{// /:id 参数别名(非get提交(?id=2)时使用)path: '/home/info/:id'component: HOME_INFO,// 开启参数捕获(该属性get时默认false即可)props: true}]},{path: '/about',component: ABOUT_PATH},// 根路径默认会重定向到/about路径{path: '/',redirect: '/about'}]})
3. main.js 配置
import Router from './router'new Vue({render: h => h(App),Router}).$mount('#app')
4. 一级路由设置
<!-- 一级路由节点 --><router-link to="/home">Home</router-link><router-link to="/about">About</router-link><!-- 路由页面展示节点 --><router-view></router-view>
5. 二级路由设置
5.1 一级路由显示页面中设置二级路由节点
<!-- 方式一 --><router-link :to="'/user/'+user.id">{{user.name}}</router-link><!-- 方式二 --><router-link :to="`/user/${user.id}`">{{user.name}}</router-link><!-- 方式三 --><router-link :to="{path:'/user', query:{id:user.id}}">{{user.name}}</router-link>
5.2 二级路由显示页面中取参数
export default {// 方法一 和 方法二的取值props: {id: String}// 方法三 的取值mounted() {this.id = this.$route.query.id; //用户刷新的时候有用}}
6. 编程式路由(逻辑跳转)
6.1 实现跳转
this.$router.push({path: '/user',query: {id:id}});
6.2 取值
this.$route.query.id;
7. 路由守卫
7.1 全局
- 配置 main.js
import Router from './router'// 全局路由守卫Router.beforeEach((to,from,next) =>{// to: 当前的地址// from: 来源地址// next: 放行next();});
7.2 局部
export default {// 渲染该组件的对应路由被 confirm 前调用beforeRouteEnter (to, from, next) {// 组件实例还没创建,this 无效},// 导航离开当前路由时调用beforeRouteLeave (to, from, next) {}}
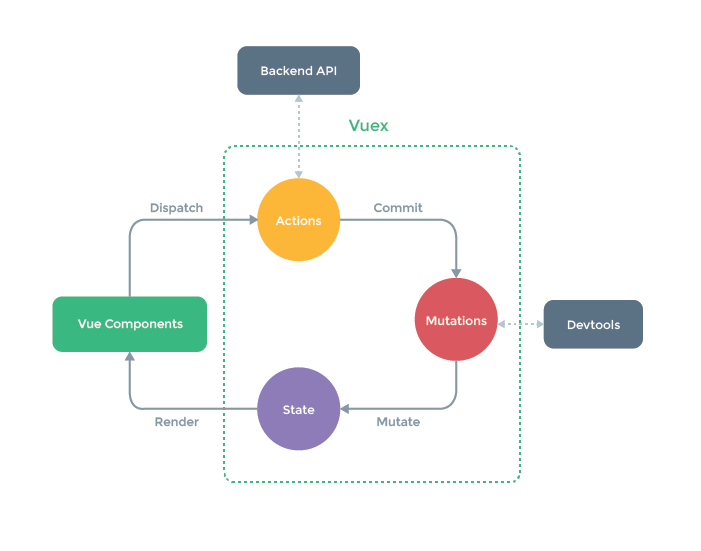
八、 Vuex 状态管理模式(集中式存储)
1. 安装
npm i vuex -S
2. 配置 store
- 创建 store 目录,创建 index.js文件
// index.js 基本格式import Vue from 'vue'import Vuex from 'vuex'Vue.use(Vuex);// 普通属性const state = {};// 根据state计算出来的属性const getters = {};// 修改state属性的方法const mutations = {};// 调用 mutations 方法const actions = {};export default new Vuex.Store({state,actions,getters,mutations});
3. main.js 配置
import store from './store'new Vue({// 引入storestore,render: h => h(App)}).$mount("#app");
4. 调用
4.1 引入vuex对象
// 按需引入import {mapState, mapActions, mapGetters, mapMutations} from 'vuex'
4.2 方法一:直接调用
methods: {test() {// 执行 mutations 中的 setTest 方法// 可行但不规范:this.$store.commit('setTest',10);// 执行 actions 中的 setTest 方法this.$store.dispatch('setTest',10);// 取 state 中的属性 testwindow.console.log(this.$store.state.test);// 取 getters 中的 testNumwindow.console.log(this.$store.getters.testNum);}}
4.2 方法二:把对象引入到组件再调用
computed: {// 引入属性...mapState(['test']),// 引入计算属性...mapGetters(['testNum'])},methods: {// 引入方法// 可行但不规范:...mapMutations(['setTest'])...mapActions(['setTest']),test() {// 调用 actions 中的 setTest 方法this.setTest(10);// 取 state 中的属性 testwindow.console.log(this.test);// 取 getters 中的 testNumwindow.console.log(this.testNum);}}
5. 模块化
5.1 创建模块目录
- 在 store 目录下创建模块目录,并创建 index.js
// store/demo/index.jsconst state = {};const getters = {};const mutations = {};const actions = {};export default ({state,actions,getters,mutations});
5.2 修改 store/index.js
// index.js 基本格式import Vue from 'vue'import Vuex from 'vuex'// 引入 demo 模块import demo from './demo'Vue.use(Vuex);export default new Vuex.Store({// 引入 demo 模块modules: {demo}});
5.3 state 调用方式调整
getters、actions、mutations都被注册到全局上,和之前的调用方式一样。
// 导入式调用...mapState({test: state => state.demo.test});// 直接调用this.$store.state.demo.test;
