@File
2020-01-16T06:21:37.000000Z
字数 8084
阅读 198
spring-boot
web java
相关连接
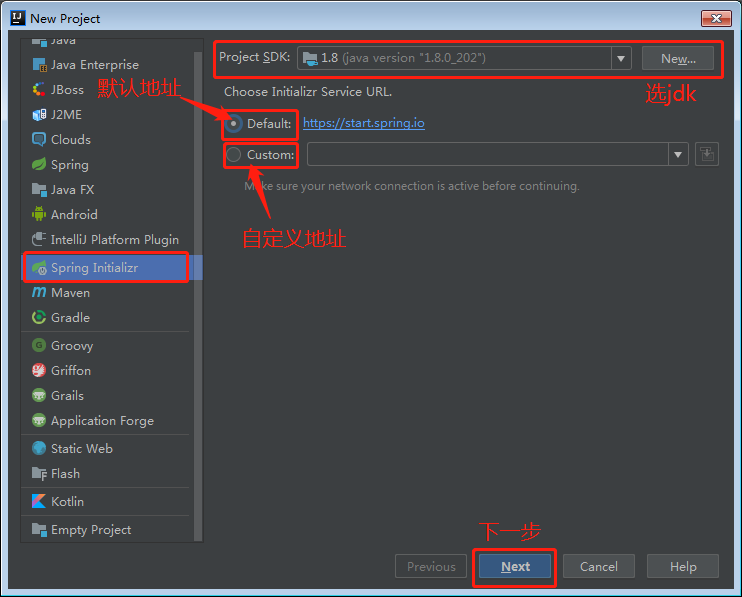
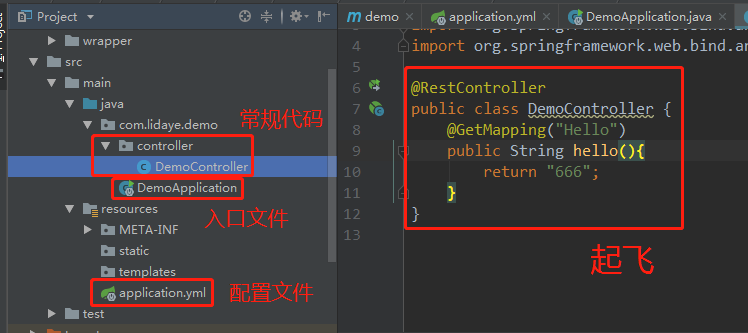
一、idea 搭建
1. 选择项目类型
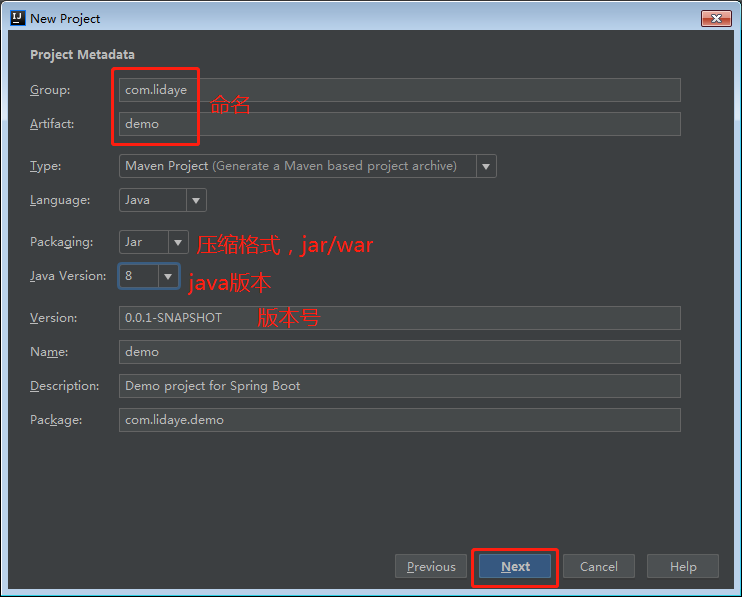
2. 设置项目信息
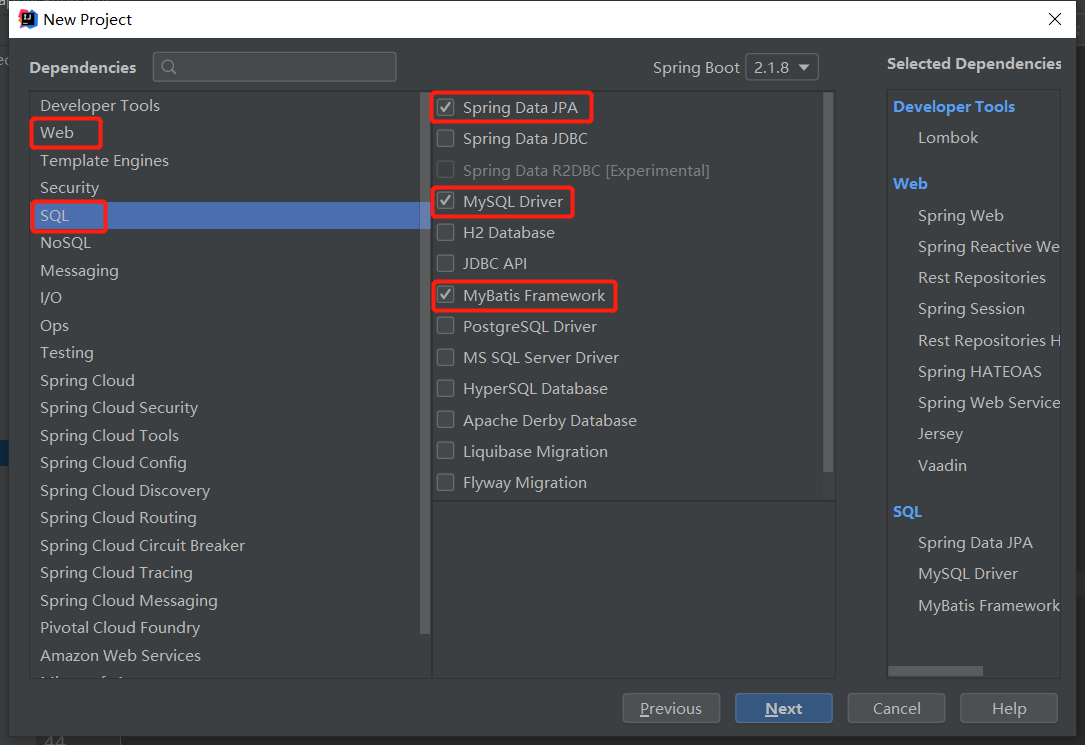
3. 选择依赖
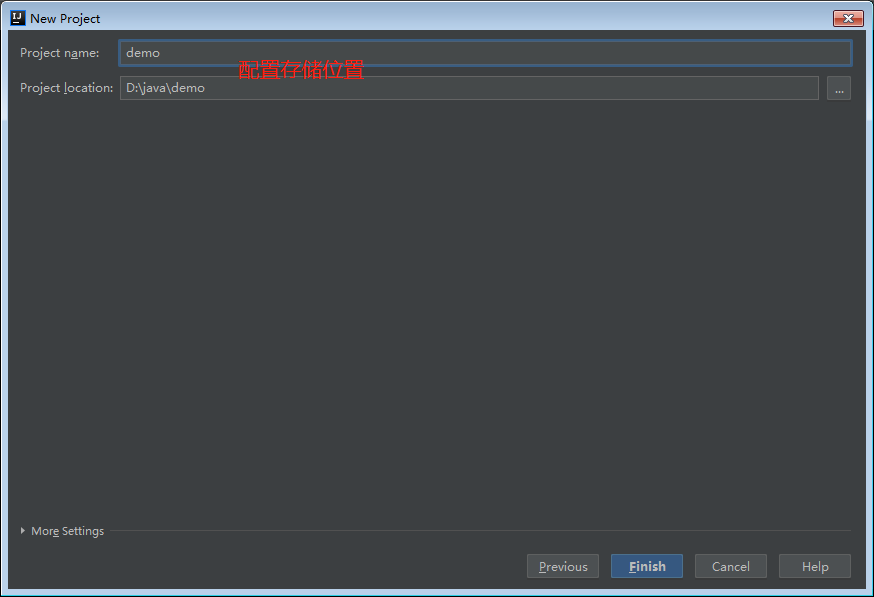
4. 存储位置
5. 等待配置完全加载(右下角 )

6. 起飞
二、 依赖
1. springboot(idea快捷创建时自带)
<!-- web服务包 --><dependency><groupId>org.springframework.boot</groupId><artifactId>spring-boot-starter-web</artifactId></dependency><!-- mysql --><dependency><groupId>mysql</groupId><artifactId>mysql-connector-java</artifactId><scope>runtime</scope></dependency><!-- mybaits --><dependency><groupId>org.mybatis.spring.boot</groupId><artifactId>mybatis-spring-boot-starter</artifactId><version>2.1.0</version></dependency><!-- lombok --><dependency><groupId>org.projectlombok</groupId><artifactId>lombok</artifactId><optional>true</optional></dependency>
2. druid
<!-- druid 连接池 --><dependency><groupId>com.alibaba</groupId><artifactId>druid-spring-boot-starter</artifactId><version>1.1.17</version></dependency>
3. fastjson
<!-- fastjson --><dependency><groupId>com.alibaba</groupId><artifactId>fastjson</artifactId><version>1.2.46</version></dependency>
三、yml配置
yml基本语法规则:
数字:
num: 1
字符串:str: 李大爷
布尔值:bool: true
空值:null: ~
数组:array: - value
行对象格式:inline-obj: {name: 李大爷,age: 10}
行数组格式:inline-list: [哈哈哈,啊啊啊,嗯嗯嗯]
1. druid 配置
spring:datasource:type: com.alibaba.druid.pool.DruidDataSourcedruid:driver-class-name: com.mysql.cj.jdbc.Driverusername: rootpassword: rooturl: jdbc:mysql://localhost:3306/boot?useUnicode=true&characterEncoding=UTF-8&serverTimezone=Asia/Shanghai# druid 配置initial-size: 5max-active: 20min-idle: 3# 配置监控统计拦截器 日志配置 Slf4j logback# stat监控数据库性能# wall 用于防火墙# 日志先关 slf4j logback log4j log4j2filter: stat,wall,slf4jweb-stat-filter:enabled: truelog-slow-sql: trueurl-pattern: '/*'# 排除不拦截的 请求exclusions: "*.js,*.png,/druid/*"stat-view-servlet:enabled: trueurl-pattern: /druid/*# 是否可以使用重置功能reset-enable: truelogin-username: adminlogin-password: admin# 允许访问的idallow: 127.0.0.1# 和名单deny: ""
2. mybatis整合
mybatis:# 别名type-aliases-package: com.vip.demo.domain.entitymapper-locations: classpath:mappers/**/*.xml# mybatis-plus
3. log日志
loggin:level:com.lidaye.domo: debug
4. 多配置切换
spring:# 指定到 application-dev.ymlprofiles:active: dev
四、json转换器配置
- fastjson依赖包
- 默认使用 jackson
- 以下提供 fastjson 配置案例,其他:参考文档
@Configurationpublic class MassageConverConfiguration {@Beanpublic HttpMessageConverters fastJsonHttpMessageConverters() {// 1、需要先定义一个 convert 转换消息的对象;FastJsonHttpMessageConverter fastConverter = new FastJsonHttpMessageConverter();// 2、添加fastJson 的配置信息,比如:是否要格式化返回的json数据;FastJsonConfig fastJsonConfig = new FastJsonConfig();fastJsonConfig.setSerializerFeatures(SerializerFeature.PrettyFormat);// 3、在convert中添加配置信息.fastConverter.setFastJsonConfig(fastJsonConfig);HttpMessageConverter<?> converter = fastConverter;return new HttpMessageConverters(converter);}}
五、跨域请求 CorsConfig
@Configurationpublic class CorsConfig implements WebMvcConfigurer {@Beanpublic WebMvcConfigurer corsConfigurer(){return new WebMvcConfigurer() {@Overridepublic void addCorsMappings(CorsRegistry registry) {registry.addMapping("/**")//允许跨域的域名,可以用*表示允许任何域名使用.allowedOrigins("*")//允许任何方法(post、get等).allowedMethods("*")//允许任何请求头.allowedHeaders("*")//带上cookie信息.allowCredentials(true)//maxAge(3600)表明在3600秒内,不需要再发送预检验请求,可以缓存该结果.exposedHeaders(HttpHeaders.SET_COOKIE).maxAge(3600L);}};}}
六、注解
- 案例配置(关联1/2)
// 注意:命名时不要与系统配置冲突lidaye:name: 李大爷
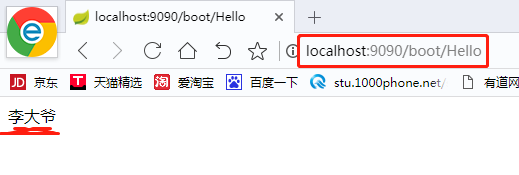
1. @Value 取一个配置
value: 配置名
- 调用测试代码
// 一个普通接口类@RestControllerpublic class DemoController {// 取配置值@Value("${lidaye.name}")private String name;// 测试接口@GetMapping("Hello")public String hello(){return name;}}
- 测试结果
2. @ConfigurationProperties 批量取配置
value: 前缀
ignoreInvalidFields:
ignoreUnknownFields:
- 依赖包
<dependency><groupId>org.springframework.boot</groupId><artifactId>spring-boot-configuration-processor</artifactId><optional>true</optional></dependency>
- 存储类
@Component@Data@ConfigurationProperties("lidaye")public class User {private String name;}
- 实现代码
@RestControllerpublic class DemoController {@Resourceprivate User user;@GetMapping("Hello")public String hello(){return user.getName();}}
- 测试结果
3. @MapperScan 指定 mapper 扫描范围
value: 指定的范围(数组)
basePackages:
basePackageClasses:
nameGenerator:
annotationClass:
markerInterface:
sqlSessionTemplateRef:
sqlSessionFactoryRef:
factoryBean:
lazyInitialization:
@SpringBootApplication@MapperScan("com.vip.demo.mapper")public class DemoApplication {public static void main(String[] args) {SpringApplication.run(DemoApplication.class, args);}}
4. @Configuration 声明配置类
value:
proxyBeanMethods:
5. @Bean 声明配置
value:
autowire:
autowireCandidate:
initMethod:
destroyMethod:
// 主要用在 @Configuration 注解声明的类里@Configurationpublic class AppConfig {// 方法名就是 id// 如:<bean id="transferService" class="com.acme.TransferServiceImpl"/>@Beanpublic TransferService transferService() {return new TransferServiceImpl();}}
6. @EnableScheduling 入口开启定时任务
@SpringBootApplication@EnableSchedulingpublic class Application {public static void main(String[] args) throws Exception {SpringApplication.run(Application.class);}}
7. @Scheduled 设置定时任务
cron: 通过cron表达式控制触发时间(常用)
fixedRate: 间隔多少毫秒再次触发(常用)
fixedDelay: 完成后延迟多少毫秒(常用)
initialDelay: 延迟多少毫秒后再触发(常用)
zone: 时区设置,默认当前时区
fixedRateString: 字符串形式的fixedRate
fixedDelayString: 字符串形式的fixedDelay
initialDelayString: 字符串形式的initialDelay
@Scheduled("0 0 10,14,16 * * ?") // 每天上午10点,下午2点,4点@Scheduled(0 0/30 9-17 * * ?) // 朝九晚五工作时间内每半小时@Scheduled(0 0 12 ? * WED) // 表示每个星期三中午12点@Scheduled("0 0 12 * * ?") // 每天中午12点触发@Scheduled("0 15 10 ? * *") // 每天上午10:15触发@Scheduled("0 15 10 * * ?") // 每天上午10:15触发@Scheduled("0 15 10 * * ? *") // 每天上午10:15触发@Scheduled("0 15 10 * * ? 2005") // 2005年的每天上午10:15触发@Scheduled("0 * 14 * * ?") // 在每天下午2点到下午2:59期间的每1分钟触发@Scheduled("0 0/5 14 * * ?") // 在每天下午2点到下午2:55期间的每5分钟触发@Scheduled("0 0/5 14,18 * * ?") // 在每天下午2点到2:55期间和下午6点到6:55期间的每5分钟触发@Scheduled("0 0-5 14 * * ?") // 在每天下午2点到下午2:05期间的每1分钟触发@Scheduled("0 10,44 14 ? 3 WED") // 每年三月的星期三的下午2:10和2:44触发@Scheduled("0 15 10 ? * MON-FRI") // 周一至周五的上午10:15触发@Scheduled("0 15 10 15 * ?") // 每月15日上午10:15触发@Scheduled("0 15 10 L * ?") // 每月最后一日的上午10:15触发@Scheduled("0 15 10 ? * 6L") // 每月的最后一个星期五上午10:15触发@Scheduled("0 15 10 ? * 6L 2002-2005") // 2002年至2005年的每月的最后一个星期五上午10:15触发@Scheduled("0 15 10 ? * 6#3") // 每月的第三个星期五上午10:15触发
8. @PostConstruct 构造方法后执行的方法
9. @PropertySource 读取配置文件
10. @SpringBootApplication 入口声明(不用改)
六、 通过 Aware 接口取容器对象
- 创建一个实现
ApplicationContextAware接口的类
@Componentpublic class ApplicationContextHolder implements ApplicationContextAware {private static ApplicationContext applicationContext;@Overridepublic void setApplicationContext(ApplicationContext applicationContext) throws BeansException {ApplicationContextHolder.applicationContext = applicationContext;}public static ApplicationContext getApplicationContext() {return applicationContext;}/*** 获取已注册的对象*/public static Object getBean(String name) {return getApplicationContext().getBean(name);}public static <T> T getBean(Class<T> clazz) {return getApplicationContext().getBean(clazz);}public static <T> T getBean(String name, Class<T> clazz) {return getApplicationContext().getBean(name, clazz);}}
七、集成redis
- 内容有点多,也不是必要的,所以独立出另一个文档。
八、生成 war 包
1. 入口文件继承 SpringBootServletInitializer
@SpringBootApplication// 继承 SpringBootServletInitializerpublic class SecKillFrontedApplication extends SpringBootServletInitializer {public static void main(String[] args) {SpringApplication.run(SecKillFrontedApplication.class, args);}// 重写 configure 方法@Overrideprotected SpringApplicationBuilder configure(SpringApplicationBuilder builder) {// 指定打包当前项目资源信息return builder.sources(SecKillFrontedApplication.class);}}
2. 修改依赖
<!-- 修改打包方式 --><packaging>war</packaging><!-- jar包排除 --><dependencies><dependency><groupId>org.springframework.boot</groupId><artifactId>spring-boot-starter-web</artifactId><exclusions><!-- 排除tomcat --><exclusion><groupId>org.springframework.boot</groupId><artifactId>spring-boot-starter-tomcat</artifactId></exclusion></exclusions></dependency><!-- 重新导入tomcat --><dependency><groupId>org.springframework.boot</groupId><artifactId>spring-boot-starter-tomcat</artifactId><!-- 提供编译,但是打包的时候不加入到项目的libs下面 --><scope>provided</scope></dependency></dependencies><!-- 暂时不知道有什么用 --><build><finalName>sec-kill</finalName></build>
