@qvbicfhdx
2015-07-03T06:46:32.000000Z
字数 14954
阅读 15523
IOS手机直播Demo技术简介
1.测试服务器的搭建
测试服务器基于(nginx+rtmp-modual)
1.下载nginx
2.下载nginx-rtmp-module
3.编译安装nginx:
/configure --add-module=/对应的目录/nginx-rtmp-modulemakemake install
nginx 默认安装在/usr/local/nginx 目录下,
可执行程序: /usr/local/nginx/sbin/nginx
nginx服务器配置文件在:/usr/local/nginx/conf/下
4.配置nginx
$ cd /usr/local/nginx/conf$ sudo vim nginx.conf
在文件后面加上rtmp协议的支持如下:
rtmp {server {listen 1935;application myapp {live on;#record keyframes;#record_path /tmp;#record_max_size 128K;#record_interval 30s;#record_suffix .this.is.flv;#on_publish http://localhost:8080/publish;#on_play http://localhost:8080/play;#on_record_done http://localhost:8080/record_done;}application hls {live on;hls on;hls_path /tmp/app;hls_fragment 5s;}}}
rtmp {server {listen 1935;application myapp {live on;#record keyframes;#record_path /tmp;#record_max_size 128K;#record_interval 30s;#record_suffix .this.is.flv;#on_publish http://localhost:8080/publish;#on_play http://localhost:8080/play;#on_record_done http://localhost:8080/record_done;}application hls {live on;hls on;hls_path /tmp/app;hls_fragment 5s;}## 标题 ##}}
5.启动nginx :
sudo /usr/local/nginx/sbin/nginx
打开 localhost 测试一下,有没有启动成功
成功的界面如下:

sudo /usr/local/nginx/sbin/nginx
打开 localhost 测试一下,有没有启动成功
成功的界面会显示 welecome nginx 等信息
2.编译ffmpeg库
1.下载并编译libx264
编译脚本:
#!/bin/shCONFIGURE_FLAGS="--enable-static --enable-pic --disable-cli"ARCHS="arm64 armv7s x86_64 i386 armv7"# directoriesSOURCE="x264"FAT="x264-iOS"SCRATCH="scratch-x264"# must be an absolute pathTHIN=`pwd`/"thin-x264"# the one included in x264 does not work; specify full path to working oneGAS_PREPROCESSOR=/usr/local/bin/gas-preprocessor.plCOMPILE="y"LIPO="y"if [ "$*" ]thenif [ "$*" = "lipo" ]then# skip compileCOMPILE=elseARCHS="$*"if [ $# -eq 1 ]then# skip lipoLIPO=fififiif [ "$COMPILE" ]thenCWD=`pwd`for ARCH in $ARCHSdoecho "building $ARCH..."mkdir -p "$SCRATCH/$ARCH"cd "$SCRATCH/$ARCH"if [ "$ARCH" = "i386" -o "$ARCH" = "x86_64" ]thenPLATFORM="iPhoneSimulator"CPU=if [ "$ARCH" = "x86_64" ]thenSIMULATOR="-mios-simulator-version-min=7.0"HOST=elseSIMULATOR="-mios-simulator-version-min=5.0"HOST="--host=i386-apple-darwin"fielsePLATFORM="iPhoneOS"if [ $ARCH = "armv7s" ]thenCPU="--cpu=swift"elseCPU=fiSIMULATOR=if [ $ARCH = "arm64" ]thenHOST="--host=aarch64-apple-darwin"elseHOST="--host=arm-apple-darwin"fifiXCRUN_SDK=`echo $PLATFORM | tr '[:upper:]' '[:lower:]'`CC="xcrun -sdk $XCRUN_SDK clang -Wno-error=unused-command-line-argument-hard-error-in-future -arch $ARCH"CFLAGS="-arch $ARCH $SIMULATOR"CXXFLAGS="$CFLAGS"LDFLAGS="$CFLAGS"CC=$CC $CWD/$SOURCE/configure \$CONFIGURE_FLAGS \$HOST \$CPU \--extra-cflags="$CFLAGS" \--extra-ldflags="$LDFLAGS" \--prefix="$THIN/$ARCH"mkdir extrasln -s $GAS_PREPROCESSOR extrasmake -j3 installcd $CWDdonefiif [ "$LIPO" ]thenecho "building fat binaries..."mkdir -p $FAT/libset - $ARCHSCWD=`pwd`cd $THIN/$1/libfor LIB in *.adocd $CWDlipo -create `find $THIN -name $LIB` -output $FAT/lib/$LIBdonecd $CWDcp -rf $THIN/$1/include $FATfi
2.下载并编译libfdk-aac
版本:fdk-aac-0.1.4
Fdk-aac编译脚本:
#!/bin/bashSDKVERSION="8.3"LIB_PATH="fdk-aac-0.1.4"#ARCHS="armv7 armv7s i386"ARCHS="i386 armv7s armv7"#OUTPUTDIR="dependencies/lib_fdkaac"OUTPUTDIR="$LIB_PATH/build-ios/master"OLD_DEVELOPER_PATH="/Developer"NEW_DEVELOPER_PATH="/Applications/Xcode.app/Contents/Developer"# Get the install pathif [ -d "$NEW_DEVELOPER_PATH" ]thenDEVELOPER="$NEW_DEVELOPER_PATH"elseDEVELOPER="$OLD_DEVELOPER_PATH"fiCurrentPath=$(cd "$(dirname "$0")"; pwd)LIB_PATH="$CurrentPath/$LIB_PATH"OUTPUTDIR="$CurrentPath/$OUTPUTDIR"cd $LIB_PATHfor ARCH in ${ARCHS}doif [ "${ARCH}" == "i386" ];thenPLATFORM="iPhoneSimulator"elsePLATFORM="iPhoneOS"fiPLATFORM_SDK="${DEVELOPER}/Platforms/${PLATFORM}.platform/Developer/SDKs/${PLATFORM}${SDKVERSION}.sdk"MIN_VERSION_FLAG="-miphoneos-version-min=${SDKVERSION}"HOST="${ARCH}-apple-darwin"export CC="${DEVELOPER}/Toolchains/XcodeDefault.xctoolchain/usr/bin/clang"export CFLAGS="${MIN_VERSION_FLAG} -arch ${ARCH}"export LDFLAGS="${MIN_VERSION_FLAG} -arch ${ARCH} -isysroot ${PLATFORM_SDK}"export LIBS="-L${PLATFORM_SDK}/usr/lib"export CXXFLAGS="${MIN_VERSION_FLAG} -arch ${ARCH} -I${PLATFORM_SDK}/usr/include"mkdir -p "${OUTPUTDIR}/${ARCH}"make cleanecho "** CC=${CC}"echo "** CFLAGS=${CFLAGS}"echo "** LDFLAGS=${LDFLAGS}"echo "** LIBS=${LIBS}"echo "** CXXFLAGS=${CXXFLAGS}"./configure --prefix="${OUTPUTDIR}/${ARCH}" --host="${HOST}" --with-sysroot="${PLATFORM_SDK}"make && make install && make cleandonemkdir -p "${OUTPUTDIR}/universal/lib"cd "${OUTPUTDIR}/armv7/lib"for file in *.adocd "${OUTPUTDIR}"xcrun -sdk iphoneos lipo -output universal/lib/$file -create -arch armv7 armv7/lib/$file -arch armv7s armv7s/lib/$file -arch i386 i386/lib/$fileecho "Universal $file created."donecp -r ${OUTPUTDIR}/armv7/include ${OUTPUTDIR}/universal/echo "Done."
3.下载并编译librtmp
下载好,直接运行
cd 到librtmp-iOS目录运行 ./build-librtmp.sh
4.下载并编译ffmpeg
ffmpeg版本:2.0.2
编译shell脚本:
#!/bin/bash############################################################################ Choose your ffmpeg version and your currently-installed iOS SDK version:#VERSION="2.0.2" #指定对应ffmpeg的版本号SDKVERSION=""############################################################################### Don't change anything under this line!############################################################################# No need to change this since xcode build will only compile in the# necessary bits from the libraries we createARCHS="armv7 armv7s i386"DEVELOPER=`xcode-select -print-path`cd "`dirname \"$0\"`"REPOROOT=$(pwd)# Where we'll end up storing things in the endOUTPUTDIR="${REPOROOT}/dependencies"mkdir -p ${OUTPUTDIR}/includemkdir -p ${OUTPUTDIR}/libmkdir -p ${OUTPUTDIR}/binBUILDDIR="${REPOROOT}/build"mkdir -p $BUILDDIR# where we will keep our sources and build from.SRCDIR="${BUILDDIR}/src"mkdir -p $SRCDIR# where we will store intermediary buildsINTERDIR="${BUILDDIR}/built"mkdir -p $INTERDIR########################################cd $SRCDIR# Exit the script if an error happensset -eif [ ! -e "${SRCDIR}/ffmpeg-${VERSION}.tar.bz2" ]; thenecho "Downloading ffmpeg-${VERSION}.tar.bz2"curl -LO http://ffmpeg.org/releases/ffmpeg-${VERSION}.tar.bz2elseecho "Using ffmpeg-${VERSION}.tar.bz2"fitar jxf ffmpeg-${VERSION}.tar.bz2 -C $SRCDIRcd "${SRCDIR}/ffmpeg-${VERSION}"set +e # don't bail out of bash script if ccache doesn't existCCACHE=`which ccache`if [ $? == "0" ]; thenecho "Building with ccache: $CCACHE"CCACHE="${CCACHE} "elseecho "Building without ccache"CCACHE=""fiset -e # back to regular "bail out on error" modefor ARCH in ${ARCHS}doif [ "${ARCH}" == "i386" ];thenPLATFORM="iPhoneSimulator"ETRA_CONFIG="--arch=i386 --disable-asm --enable-cross-compile --target-os=darwin --cpu=i386"EXTRA_CFLAGS="-arch i386"EXTRA_LDFLAGS="-I/Applications/Xcode.app/Contents/Developer/Platforms/${PLATFORM}.platform/Developer/SDKs/${PLATFORM}${SDKVERSION}.sdk/usr/lib -mfpu=neon"elsePLATFORM="iPhoneOS"EXTRA_CONFIG="--arch=arm --target-os=darwin --enable-cross-compile --cpu=cortex-a9 --disable-armv5te"EXTRA_CFLAGS="-w -arch ${ARCH} -mfpu=neon"EXTRA_LDFLAGS="-mfpu=neon"fimkdir -p "${INTERDIR}/${ARCH}"echo "platform is ${PLATFORM}"./configure --prefix="${INTERDIR}/${ARCH}" --sysroot="${DEVELOPER}/Platforms/${PLATFORM}.platform/Developer/SDKs/${PLATFORM}${SDKVERSION}.sdk" --cc="/Applications/Xcode.app/Contents/Developer/Toolchains/XcodeDefault.xctoolchain/usr/bin/clang" --as='/usr/local/bin/gas-preprocessor.pl' --extra-cflags="${EXTRA_CFLAGS} -miphoneos-version-min=${SDKVERSION} -I${OUTPUTDIR}/include" --extra-ldflags="-arch ${ARCH} ${EXTRA_LDFLAGS} -isysroot /Applications/Xcode.app/Contents/Developer/Platforms/${PLATFORM}.platform/Developer/SDKs/${PLATFORM}${SDKVERSION}.sdk -miphoneos-version-min=${SDKVERSION} -L${OUTPUTDIR}/lib" ${EXTRA_CONFIG} --extra-cxxflags="$CPPFLAGS -I${OUTPUTDIR}/include -isysroot /Applications/Xcode.app/Contents/Developer/Platforms/${PLATFORM}.platform/Developer/SDKs/${PLATFORM}${SDKVERSION}.sdk" \--enable-cross-compile \--disable-doc \--disable-ffmpeg \--disable-ffplay \--disable-ffprobe \--disable-ffserver \--disable-asm \--disable-debug \--disable-symver \--disable-avdevice \--disable-avfilter \--disable-encoders \--disable-muxers \--disable-filters \--disable-devices \--disable-swscale \--disable-everything \--enable-protocol=librtmp \--enable-protocol=file \--enable-decoder=h264 \--enable-decoder=aac \--enable-decoder=nellymoser \--enable-decoder=mp3 \--enable-encoder=aac \--enable-encoder=libfdk_aac \--enable-encoder=libx264 \--enable-demuxer=h264 \--enable-demuxer=aac \--enable-demuxer=flv \--enable-demuxer=mp3 \--enable-muxer=flv \--enable-filter=aresample \--enable-hwaccel=h264_vaapi \--enable-hwaccel=h264_vda \--enable-hwaccel=h264_vdpau \--enable-version3 \--enable-librtmp \--enable-nonfree \--enable-gpl \--enable-libfdk-aac \—extra-cflags=-I$(pwd)/librtmp/include \—extra-ldflags=-L$(pwd)/librtmp/lib \—extra-cflags=-I$(pwd)/fdk-aac-0.1.4/build-ios/master/universal/include \—extra-ldflags=-L$(pwd)/fdk-aac-0.1.4/build-ios/master/universal/lib\—extra-cflags=-I$(pwd)/include \—extra-ldflags=-L$(pwd)/lib \echo "prepare to make!!!"make && make install && make cleandonemkdir -p "${INTERDIR}/universal/lib"cd "${INTERDIR}/armv7/lib"for file in *.adocd ${INTERDIR}xcrun -sdk iphoneos lipo -output universal/lib/$file -create -arch armv7 armv7/lib/$file -arch armv7s armv7s/lib/$file -arch i386 i386/lib/$fileecho "Universal $file created."donecp -r ${INTERDIR}/armv7/include ${INTERDIR}/universal/echo "Done."
3.采集音视频
1.ios音频采集:
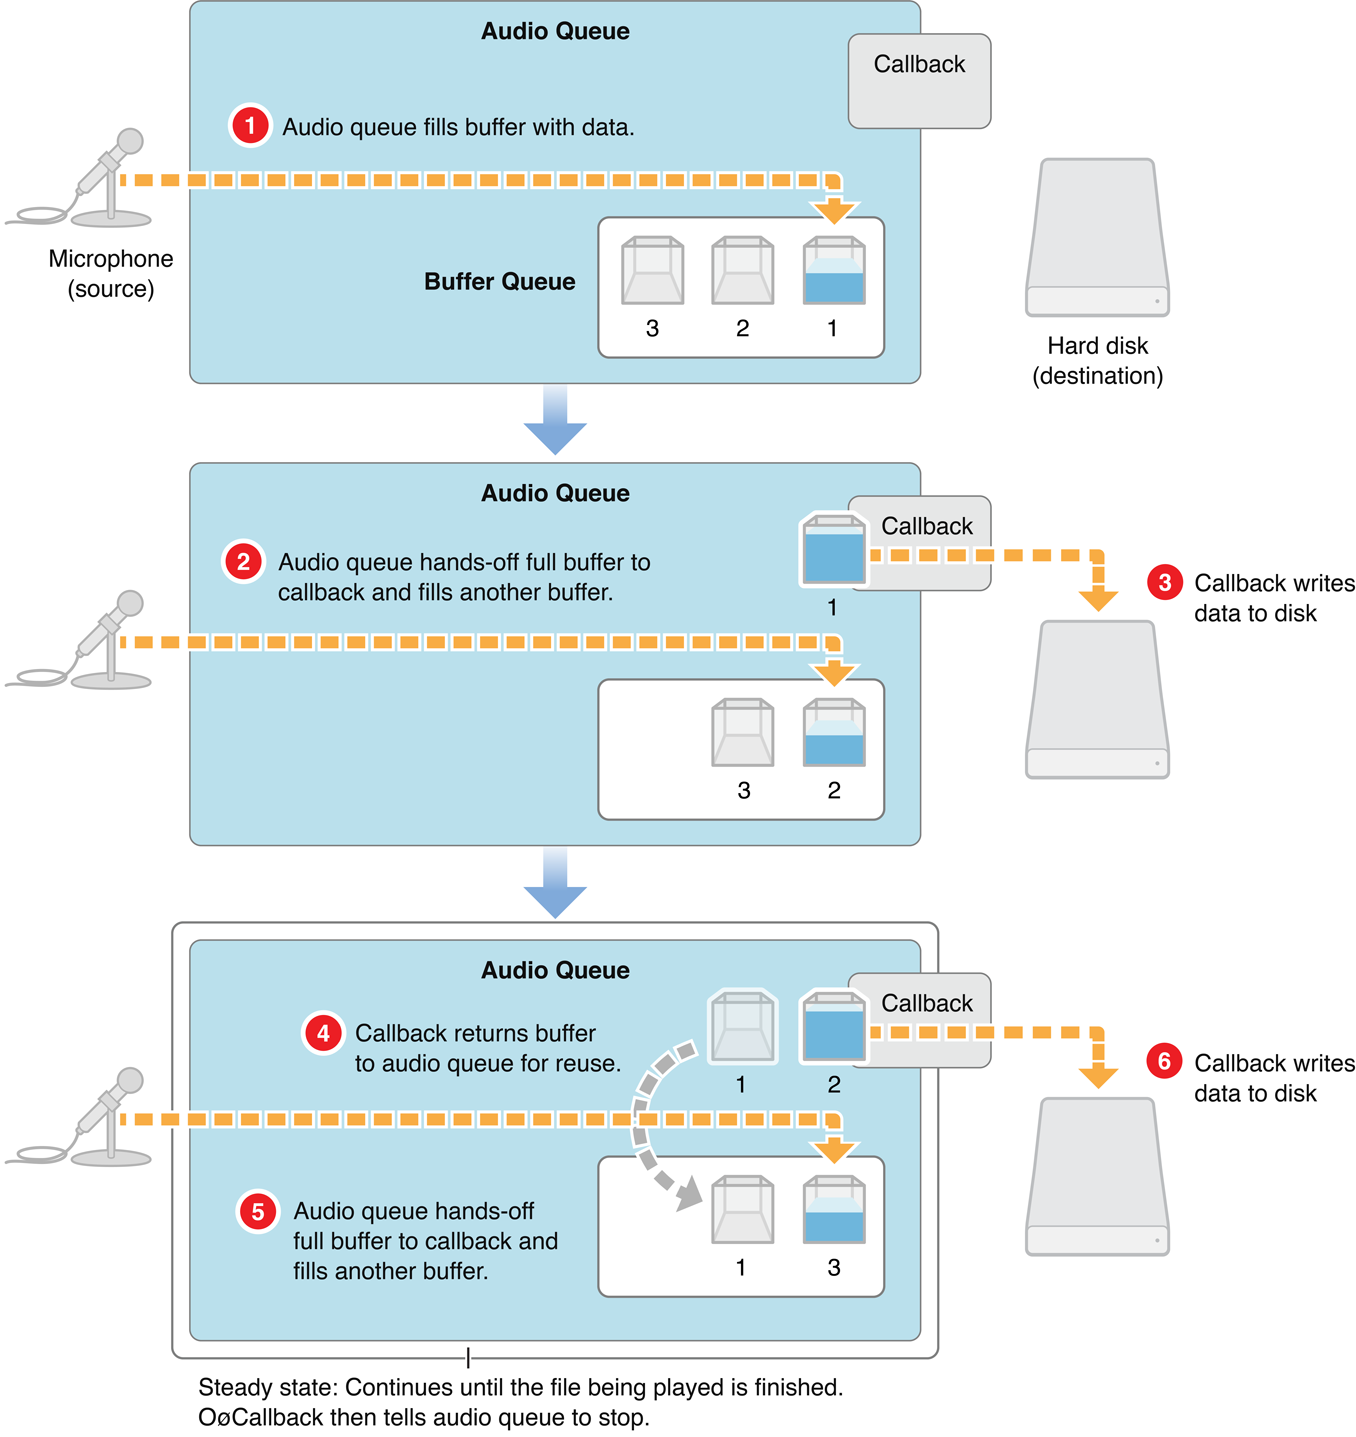
使用AudioQueue进行音频的录制,引用苹果官方文档的一张图说明一下:
使用AudioQueue进行音频的录制,引用苹果官方文档的一张图说明一下:
#define kNumberRecordBuffers 3@protocol AudioRecordDelegate// 音频回调委托,返回录制的PCM数据-(void)AudioDataOutputBuffer:(uint8_t *)audioBuffer bufferSize:(int)size;@end@interface AudioRecoder : NSObject{AudioQueueRef mQueue;AudioQueueBufferRef mBuffers[kNumberRecordBuffers];AudioStreamBasicDescription mRecordFormat;}@property id<AudioRecordDelegate> outDelegate;-(id)initWIthSampleRate:(int)sampleRate; //通过采样率生成一个实例-(void)setAudioRecordDelegate:(id<AudioRecordDelegate>)delegate;-(void)startRecord; // 开启录音-(void)stopRecord; // 暂停录音@end核心的方法,只要在音频回调里:void MyInputBufferHandler(void * inUserData,AudioQueueRef inAQ,AudioQueueBufferRef inBuffer,const AudioTimeStamp * inStartTime,UInt32 inNumPackets,const AudioStreamPacketDescription* inPacketDesc){AudioRecoder* audioRecord = (__bridge AudioRecoder *)(inUserData);if(audioRecord.outDelegate) {// 通过委托将音频回调给代理使用[audioRecord.outDelegate AudioDataOutputBuffer:(uint8_t *)inBuffer->mAudioData bufferSize:inBuffer->mAudioDataByteSize];}AudioQueueEnqueueBuffer(inAQ, inBuffer, 0, NULL);}
2.ios视频录制
因为我们需要获取视频的原始数据,所以视频录制使用AVCaptureVideoDataOutput这个类
@class CamerRecordViewController;@protocol CamerRecordViewControllerDelegate <NSObject>// 录制的视频原始数据,kCVPixelFormatType_420YpCbCr8BiPlanarVideoRange 格式- (void)videoOutPut:(uint8_t *)rawData dataSize:(size_t)bufferSize;@end@interface CamerRecordViewController : UIViewController@property (nonatomic,assign) id<CamerRecordViewControllerDelegate> delegate;@end
核心的方法,视频回调:
#pragma mark - 视频输出代理- (void)captureOutput:(AVCaptureOutput *)captureOutput didOutputSampleBuffer:(CMSampleBufferRef)sampleBuffer fromConnection:(AVCaptureConnection *)connection{// 为媒体数据设置一个CMSampleBuffer的Core Video图像缓存对象CVImageBufferRef imageBuffer = CMSampleBufferGetImageBuffer(sampleBuffer);// 锁定pixel buffer的基地址if (kCVReturnSuccess == CVPixelBufferLockBaseAddress(imageBuffer, 0)) {// 得到pixel buffer的基地址uint8_t *bufferPtr = (uint8_t *)CVPixelBufferGetBaseAddressOfPlane(imageBuffer,0);uint8_t *uvPtr = (uint8_t *)CVPixelBufferGetBaseAddressOfPlane(imageBuffer, 1);size_t bufferSize = CVPixelBufferGetDataSize(imageBuffer);NSLog(@"=== buffsize : %zu",bufferSize);bool isPlanar = CVPixelBufferIsPlanar(imageBuffer);if (isPlanar) {int planeCount = CVPixelBufferGetPlaneCount(imageBuffer);NSLog(@"=== planeCount : %d \n ",planeCount);}size_t ysize = 640*480;uint8_t *newbuffer = (uint8_t *)malloc(ysize*1.5);memcpy(newbuffer, bufferPtr, ysize*1.5);// if (self.delegate && [self.delegate respondsToSelector:@selector(videoOutPut:dataSize:)]) {//// [self.delegate videoOutPut:(uint8_t *)newbuffer dataSize:bufferSize];//// }[self videoOutPut:newbuffer dataSize:bufferSize];free(newbuffer);// 解锁pixel bufferCVPixelBufferUnlockBaseAddress(imageBuffer,0);}}
4.编码(AAC,H264)
编码分两步,一是AAC编码,二是H264的编码,两者都是基于FFMPEG库函数进行编码
AAC编码
引用网上的一张图进行说明编码的一个过程:
demo对应循环编码的函数如下:

demo对应循环编码的函数如下:
int encoderAAC(BOBOAACEncoder *encoder,uint8_t *inputBuffer,int inputSize,char *outputBuffer,int *outSize){/* AVFrame表示一祯原始的音频数据,因为编码的时候需要一个AVFrame,,在这里创建一个AVFrame,用来填充录音回调传过来的inputBuffer.里面是数据格式为PCM调用FFMPEG的编码函数 avcodec_encode_audio2()后,将PCM-->AAC编码压缩为AAC格式,并保存在AVPacket中。再调用 av_interleaved_write_frame我们将它写入到指定的推流地址上,FFMPEG将发包集成在它内部实现里*/// pthread_mutex_lock(&encoder->mutex);AVFrame *frame = avcodec_alloc_frame();frame->nb_samples = encoder->pCodeCtx->frame_size;frame->format = encoder->pCodeCtx->sample_fmt;frame->sample_rate = encoder->pCodeCtx->sample_rate;frame->channels = encoder->pCodeCtx->channels;frame->pts = frame->nb_samples*frameIndex;av_init_packet(&encoder->packet);int gotFrame = 0;int ret = avcodec_fill_audio_frame(frame, encoder->pCodeCtx->channels, AV_SAMPLE_FMT_S16, (uint8_t*)inputBuffer, encoder->buffer_size, 0);if (ret<0) {printf("avcodec_fill_audio_frame error !\n");av_frame_free(&frame);av_free_packet(&encoder->packet);return -1;}encoder->packet.data = NULL;encoder->packet.size = 0;ret = avcodec_encode_audio2(encoder->pCodeCtx, &encoder->packet, frame, &gotFrame);frameIndex++;if (ret < 0) {printf("encoder error! \n");av_frame_free(&frame);av_free_packet(&encoder->packet);// pthread_mutex_unlock(&encoder->mutex);return -1;}if (gotFrame == 1) {encoder->packet.stream_index = encoder->pStream->index;encoder->packet.pts = frame->pts;ret = av_interleaved_write_frame(encoder->pFormatCtx, &encoder->packet);printf("[AAC]: audio encoder %d frame success \n",frameIndex);}av_frame_free(&frame);av_free_packet(&encoder->packet);// pthread_mutex_unlock(&encoder->mutex);return 1;}
H264编码
编码过程与AAC一样,注意H264编码时,需要将源数据转换为YUV420P的格式,编码函数如下:
int encoderH264(BOBOAACEncoder *encoder,uint8_t *inputBuffer,size_t bufferSize){AVFrame *frame = avcodec_alloc_frame();frame->pts = picFrameIndex;// int ysize = encoder->pVideoCodecCtx->width *encoder->pVideoCodecCtx->height;av_init_packet(&encoder->videoPacket);int gotPicture = 0;//将原数据填充到AVFrame结构里,便于进行编码avpicture_fill((AVPicture *)frame, inputBuffer, encoder->pVideoCodecCtx->pix_fmt, encoder->pVideoCodecCtx->width, encoder->pVideoCodecCtx->height);encoder->videoPacket.data = NULL;encoder->videoPacket.size = 0;// 进行H264编码int ret = avcodec_encode_video2(encoder->pVideoCodecCtx, &encoder->videoPacket, frame, &gotPicture);picFrameIndex++;if (ret < 0) {printf("avcodec_fill_video_frame error !\n");av_frame_free(&frame);av_free_packet(&encoder->videoPacket);return -1;}// 成功编码一祯数据if (gotPicture == 1) {encoder->videoPacket.stream_index = encoder->pVideoStrem->index;encoder->videoPacket.pts = frame->pts;//写入到指定的地方 由encoder->pFormatCtx 保存着输出的路径ret = av_interleaved_write_frame(encoder->pFormatCtx, &encoder->videoPacket);}av_frame_free(&frame);av_free_packet(&encoder->videoPacket);return 1;}
5.RTMP推送
目前基于FFMPEG做为推流器,RTMP连接及推送音视频包都在其内部实现了,主要在函数
//指定输出格式为FLV,Path这里传个RTMP://XXXX/XXXret = avformat_alloc_output_context2(&ofmt_ctx, NULL, "flv", path);// 这个函数进行了URL的映射 ,比如我们PATH 为RTMP协议的,FFMPEG内部将使用librtmp里面的握手连接等函数。if (avio_open(&ofmt_ctx->pb, path,AVIO_FLAG_WRITE) < 0 ) {printf("failed to open output file \n");return NULL;}
目前这个Demo还有一些问题没有处理好,H264编码出来的数据播放后呈黑白(估计在IOS录制时,UV数据没有转换好)后续处理会弃用FFMPEG进行推流,直接使用Librtmp进行推送数据包。这样程序便于控制流传输的各个状态,及错误捕捉。
