@mrz1
2018-01-16T10:28:19.000000Z
字数 12740
阅读 2238
2017-1-10课程笔记(DHCP PXE cobbler)
笔记
DHCP
DHCP服务
网络配置静态指定动态获取: bootp:boot protocol MAC与IP一一静态对应dhcp:增强的bootp,动态DHCP: (Dynamic Host Configuration Protocol)动态主机配置协议局域网协议,UDP协议主要用途:用于内部网络和网络服务供应商自动分配IP地址给用户用于内部网络管理员作为对所有电脑作集中管理的手段使用场景自动化安装系统解决IPV4资源不足问题
DHCP共有八种报文
- DHCP DISCOVER:客户端到服务器
- DHCP OFFER :服务器到客户端
- DHCP REQUEST:客户端到服务器
- DHCP ACK :服务器到客户端
- DHCP NAK:服务器到客户端,通知用户无法分配合适的IP地址
- DHCP DECLINE :客户端到服务器,指示地址已被使用
- DHCP RELEASE:客户端到服务器,放弃网络地址和取消剩余的租约时间
- DHCP INFORM:客户端到服务器,客户端如果需要从DHCP服务器端获取更为详细的配置信息,则发送Inform报文向服务器进行请求,极少用到

续租
- 50% :租赁时间达到50%时来续租,刚向DHCP服务器发向新的DHCPREQUEST请求。如果dhcp服务没有拒绝的理由,则回应DHCPACK信息。当DHCP客户端收到该应答信息后,就重新开始新的租用周期
- 87.5%:如果之前DHCP Server没有回应续租请求,等到租约期的7/8时,主机会再发送一次广播请求
DHCP服务简介
同网段多DHCP服务(广播机制)DHCP服务必须基于本地先到先得的原则相关协议Arprarp跨网段RFC 1542 Compliant Routersdhcrelay: 中继代理
DHCP实现
Linux DHCP协议的实现程序:dhcp, dnsmasq(dhcp,dns)Dhcp Server/usr/sbin/dhcpd/etc/dhcp/dhcpd.conf--> /etc/rc.d/init.d/dhcpd/etc/dhcp/dhcpd6.conf--> /etc/rc.d/init.d/dhcpd6/usr/sbin/dhcrelay/etc/rc.d/init.d/dhcrelaydhcp server:67/udpdhcp client: 68/udpdhcpv6 client:546/udpDhcp clientdhclient自动获取的IP信息:/var/lib/dhclient
DHCP配置文件
/etc/dhcp/dhcpd.conf:帮助参考:man 5 dhcpd.conf全局配置subnet {...}host {}地址分配记录/var/lib/dhcpd/dhcpd.leases
dhcpd.conf示例
option domain-name "magedu.com";option domain-name-servers 192.168.0.1,8.8.8.8;default-lease-time 86400;max-lease-time 86400;subnet 192.168.100.0 netmask 255.255.255.0 {range 192.168.100.1 192.168.100.200;option routers 192.168.100.1;}
搭建DHCP实验
yum install dhcprpm -ql dhcp //找到这两个/etc/dhcp/dhcpd.conf/usr/share/doc/dhcp-4.2.5/dhcpd.conf.examplecp /usr/share/doc/dhcp-4.2.5/dhcpd.conf.example /etc/dhcp/dhcpd.conf //因为/etc/dhcp/dhcpd.conf是空的编写/etc/dhcp/dhcpd.conf文件[root@centos7 ~]#cat /etc/dhcp/dhcpd.confoption domain-name "zhangqifei.com";option domain-name-servers 114.114.114.114,8.8.8.8; //DNS解析option routers 192.168.109.1;//全局默认网关default-lease-time 84600; //有效期max-lease-time 84600; //特殊要求最大有效期log-facility local7;subnet 192.168.109.0 netmask 255.255.255.0 { //网段range 192.168.109.100 192.168.109.200; //分配ip范围 如果这里写网关,就是这些范围ip,外面的网关是全局的这里不设置网关会是全局网关filename "pxelinux.0";/文件名网络中启动程序的文件名next-server 192.168.100.100;(tftp)//程序的文件名地址}host fantasia { //绑定mac地址,分配默认iphardware ethernet 08:00:07:26:c0:a5;fixed-address 192.168.109.101;这里网关和DNS都可以单独设置}启动服务 systemctl start dhcpd查看端口 ss -ntlup //服务器端udp67端口,客户端udp68端口查看网关 route -n查看DNS cat /etc/resolv.confdhcp数据库 /var/lib/dhcpd/dhcpd.leases[root@centos7 ~]#cat /var/lib/dhcpd/dhcpd.leases //发放地址的#lease 192.168.109.100 {starts 6 2018/01/13 06:41:45;ends 0 2018/01/14 06:11:45;tstp 0 2018/01/14 06:11:45;cltt 6 2018/01/13 06:41:45;binding state active;next binding state free;rewind binding state free;hardware ethernet 00:0c:29:12:6c:bc;}[root@centos7 ~]#cat /var/lib/dhclient/dhclient-eth0.leases //接受地址的数据库 可以看到从哪里获取的多有信息
DHCP配置文件
- 其它配置选项:
- filename: 指明引导文件名称
- next-server:提供引导文件的服务器IP地址
- 示例:
- filename "pxelinux.0";
- next-server 192.168.100.100;(tftp)
- 检查语法
- service dhcpd configtest(centos6)
轻量级的DNS、DHCP(rpm -qi dnsmasq)
PXE介绍
- PXE:Preboot Excution Environment 预启动执行环境
- Intel公司研发
- 基于Client/Server的网络模式,支持远程主机通过网络从远端服务器下载映像,并由此支持通过网络启动操作系统
- PXE可以引导和安装Windows,linux等多种操作系统
PXE工作原理
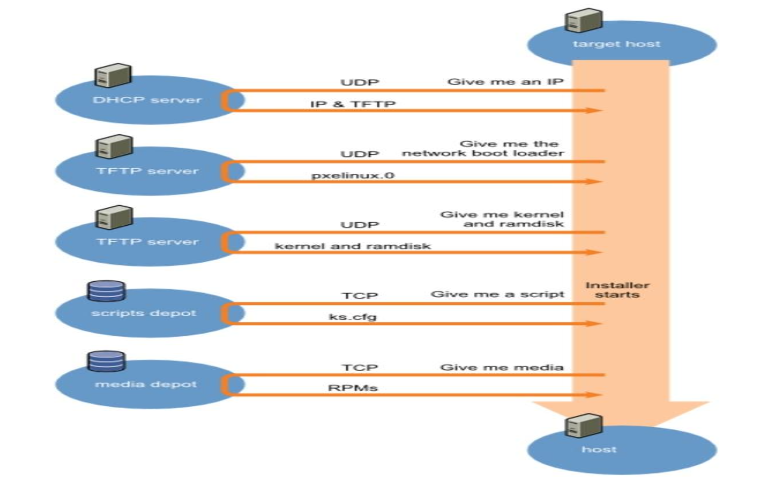
- Client向PXE Server上的DHCP发送IP地址请求消息,DHCP检测Client是否合法(主要是检测Client的网卡MAC地址),如果合法则返回Client的IP地址,同时将启动文件pxelinux.0的位置信息一并传送给Client
- Client向PXE Server上的TFTP发送获取pxelinux.0请求消息,TFTP接收到消息之后再向Client发送pxelinux.0大小信息,试探Client是否满意,当TFTP收到Client发回的同意大小信息之后,正式向Client发送pxelinux.0
- Client执行接收到的pxelinux.0文件
- Client向TFTP Server发送针对本机的配置信息文件(在TFTP 服务的pxelinux.cfg目录下),TFTP将配置文件发回Client,继而Client根据配置文件执行后续操作。
- Client向TFTP发送Linux内核请求信息,TFTP接收到消息之后将内核文件发送给Client
- Client向TFTP发送根文件请求信息,TFTP接收到消息之后返回Linux根文件系统
- Client启动Linux内核
- Client下载安装源文件,读取自动化安装脚本
PXE自动化安装CentOS 7
安装前准备:关闭防火墙和SELINUX,DHCP服务器静态IP安装软件包httpd tftp-server dhcp syslinux system-config-kickstart配置文件共享服务:systemctl enable httpdsystemctl start httpdmkdir /var/www/html/centos/7mount /dev/sr0 /var/www/html/centos/7准备kickstart文件/var/www/html/ks/centos7.cfg 注意:权限配置tftp服务systemctl enable tftp.socketsystemctl start tftp.socket配置DHCP服务vim /etc/dhcp/dhcpd.confoption domain-name "example.com";default-lease-time 600;max-lease-time 7200;subnet 192.168.100.0 netmask 255.255.255.0 {range 192.168.100.1 192.168.100.200;filename "pxelinux.0";next-server 192.168.100.100;}systemctl enable dhcpdsystemctl start dhcpd准备相关文件mkdir /var/lib/tftpboot/pxelinux.cfg/cp /usr/share/syslinux/{pxelinux.0,menu.c32} /var/lib/tftpboot/cp /misc/cd/isolinux/{vmlinuz,initrd.img} /var/lib/tftpboot/cp /misc/cd/isolinux/isolinux.cfg /var/lib/tftpboot/pxelinux.cfg/default文件列表如下:/var/lib/tftpboot/├──initrd.img├──menu.c32├──pxelinux.0├──pxelinux.cfg└──default├──vmlinuz准备启动菜单Vim /var/lib/tftpboot/pxelinux.cfg/defaultdefault menu.c32timeout 600menu title PXE INSTALL MENUlabel automenu label Auto Install CentOS 7kernel vmlinuzappend initrd=initrd.img ks=http://192.168.100.100/ks/centos7.cfg label manualmenu label Manual Install CentOS 7kernel vmlinuzappend initrd=initrd.img inst.repo=http://192.168.100.100/centos/7label localmenu defaultmenu label ^Boot from local drivelocalboot 0xffff
PXE自动化安装CentOS 6
安装前准备:关闭防火墙和SELINUX,DHCP服务器静态IP安装相应软件包1.yum install dhcp httpd tftp-server syslinux2.chkconfig httpd onchkconfig dhcpd onchkconfig tftp on (因为tftp受xinetd管理所以xinetd也许启动)chkconfig xinetd on 或者修改/etc/xinetd.d/tftp文件中disable=noservice httpd startservice xneted start3.准备yum 源和相关目录mkdir -pv /var/www/html/centos/{6,ks}mount /dev/sr0 /var/www/html/centos/64.准备kickstart文件/var/www/html/centos/ks/centos6.cfg注意权限:chmod 644 /var/www/html/centos/ks/centos6.cfg5.准备相关的启动文件cp /usr/share/syslinux/pxelinux.0 /var/lib/tftpboot/cp /misc/cd/isolinux/{vmlinuz,initrd.img} /var/lib/tftpboot/mkdir /var/lib/tftpboot/pxelinux.cfg/cp /misc/cd/isolinux/isolinux.cfg /var/lib/tftpboot/pxelinux.cfg/defaultcp /misc/cd/isolinux/{vesamenu.c32,boot.msg,splash.jpg} /var/lib/tftpboot/6.[root@centos7 ~]#Vim /var/lib/tftpboot/pxelinux.cfg/default(准备启动菜单文件)default vesamenu.c32timeout 60display boot.msgmenu background splash.jpgmenu title Welcome to CentOS 6!menu color border 0 #ffffffff #00000000menu color sel 7 #ffffffff #ff000000menu color title 0 #ffffffff #00000000menu color tabmsg 0 #ffffffff #00000000menu color unsel 0 #ffffffff #00000000menu color hotsel 0 #ff000000 #ffffffffmenu color hotkey 7 #ffffffff #ff000000menu color scrollbar 0 #ffffffff #00000000menu title PXE INSTALL CentOS 6label desktopmenu label ^Install desktop CentOS 7kernel vmlinuzappend initrd=initrd.img ks=http://192.168.109.143/ksdir/ks6-pxe.cfglabel minimenu label install ^Mini CentOS 6kernel vmlinuzappend initrd=initrd.img ks=http://192.168.109.143/ksdir/ks6-mini.cfglabel localmenu defaultmenu label Boot from ^local drivelocalboot 0xffffCentOS 6目录结构如下[root@centos7 tftpboot]#tree.├── boot.msg├── splash.jpg├── initrd.img├── pxelinux.0├── vesamenu.c32├── pxelinux.cfg│ └── default└── vmlinuz配置dhcp服务[root@centos7 ~]#vim /etc/dhcp/dhcpd.conf //编写这个文件option domain-name "zhangqifei.com";option domain-name-servers 114.114.114.114,8.8.8.8; //DNS解析option routers 192.168.109.1;//全局默认网关default-lease-time 84600; //有效期max-lease-time 84600; //特殊要求最大有效期log-facility local7;subnet 192.168.109.0 netmask 255.255.255.0 { //网段range 192.168.109.100 192.168.109.200; //分配ip范围 如果这里写网关,就是这些范围ip,外面的网关是全局的这里不设置网关会是全局网关filename "pxelinux.0";/文件名网络中启动程序的文件名next-server "192.168.109.143";(tftp)//程序的文件名地址}例也可以这样:host fantasia { //绑定mac地址,分配默认iphardware ethernet 08:00:07:26:c0:a5;fixed-address 192.168.109.101;这里网关和DNS都可以单独设置}
cobbler介绍
Cobbler:
- 快速网络安装linux操作系统的服务,支持众多的Linux发行版:Red Hat、Fedora、CentOS、Debian、Ubuntu和SuSE,也可以支持网络安装windows
- PXE的二次封装,将多种安装参数封装到一个菜单
- Python编写
- 提供了CLI和Web的管理形式
cobbler 工作流程

cobbler 介绍
安装包cobbler基于EPEL源cobbler 服务集成(不需要可以不安装)PXEDHCPrsyncHttpDNSKickstartIPMI 电源管理检查cobbler环境cobbler check
cobbler 相关术语
- 发行版:
- 表示一个操作系统版本,它承载了内核和initrd 的信息,以及内核参数等其他数据
- 配置文件:
- 包含一个发行版、一个kickstart 文件以及可能的存储库,还包含更多特定的内核参数等其他数据
- 系统:
- 表示要配置的主机,它包含一个配置文件或一个镜像,还包含IP 和MAC 地址、电源管理(地址、凭据、类型)以及更为专业的数据等信息
- 存储库:
- 保存一个yum 或rsync 存储库的镜像信息
- 镜像:
- 可替换一个包含不属于此类别的文件的发行版对象(例如,无法分为内核和initrd 的对象)
cobbler 各种配置目录说明
安装:yum install cobbler dhcp配置文件目录/etc/cobbler/etc/cobbler/settings : cobbler 主配置文件/etc/cobbler/iso/: iso模板配置文件/etc/cobbler/pxe: pxe模板文件/etc/cobbler/power: 电源配置文件/etc/cobbler/user.conf: web服务授权配置文件/etc/cobbler/users.digest: web访问的用户名密码配置文件/etc/cobbler/dhcp.template: dhcp服务器的的配置末班/etc/cobbler/dnsmasq.template: dns服务器的配置模板/etc/cobbler/tftpd.template: tftp服务的配置模板/etc/cobbler/modules.conf: 模块的配置文件
cobbler 目录介绍
数据目录/var/lib/cobbler/config/: 用于存放distros,system,profiles 等信息配置文件/var/lib/cobbler/triggers/: 用于存放用户定义的cobbler命令/var/lib/cobbler/kickstart/: 默认存放kickstart文件/var/lib/cobbler/loaders/: 存放各种引导程序镜像目录/var/www/cobbler/ks_mirror/: 导入的发行版系统的所有数据/var/www/cobbler/images/ : 导入发行版的kernel和initrd镜像用于远程网络启动/var/www/cobbler/repo_mirror/: yum 仓库存储目录日志目录/var/log/cobbler/installing: 客户端安装日志/var/log/cobbler/cobbler.log : cobbler日志
cobbler 命令介绍
systemctl enable cobblerdcobbler commands介绍cobbler check 核对当前设置是否有问题cobbler list 列出所有的cobbler元素cobbler report 列出元素的详细信息cobbler sync 同步配置到数据目录,更改配置最好都要执行下cobbler reposync 同步yum仓库cobbler distro 查看导入的发行版系统信息cobbler system 查看添加的系统信息cobbler profile 查看配置信息cobbler remove 删除对应列表 --name=名字先删除 profile 在删除distro 列表名cobbler profile rename --help 查看帮助cobbler profile rename --name=原名字 --newname=新名字
cobbler 重要的参数
/etc/cobbler/settings中重要的参数设置default_password_crypted: "$1$gEc7ilpP$pg5iSOj/mlxTxEslhRvyp/"manage_dhcp:1manage_tftpd:1pxe_just_once:1 下次在重装默认不会安装(怕覆盖你系统)next_server:< tftp服务器的IP 地址>server:<cobbler服务器的IP 地址>
cobbler 环境检查
[root@centos7 ~]#cobbler checkhttpd does not appear to be running and proxying cobbler, or SELinux is in the way. Original traceback:Traceback (most recent call last): //这种重启httpd服务[root@centos7 ~]#systemctl restart httpd[root@centos7 ~]#systemctl status httpd执行Cobbler check命令会报如下异常[root@centos7 ~]#cobbler checkThe following are potential configuration items that you may want to fix:1 : The 'server' field in /etc/cobbler/settings must be set to something other than localhost, or kickstarting features will not work. This should be a resolvable hostname or IP for the boot server as reachable by all machines that will use it.2 : For PXE to be functional, the 'next_server' field in /etc/cobbler/settings must be set to something other than 127.0.0.1, and should match the IP of the boot server on the PXE network.3 : change 'disable' to 'no' in /etc/xinetd.d/tftp4 : Some network boot-loaders are missing from /var/lib/cobbler/loaders, you may run 'cobbler get-loaders' to download them, or, if you only want to handle x86/x86_64 netbooting, you may ensure that you have installed a *recent* version of the syslinux package installed and can ignore this message entirely. Files in this directory, should you want to support all architectures, should include pxelinux.0, menu.c32, elilo.efi, and yaboot. The 'cobbler get-loaders' command is the easiest way to resolve these requirements.5 : enable and start rsyncd.service with systemctl6 : debmirror package is not installed, it will be required to manage debian deployments and repositories7 : The default password used by the sample templates for newly installed machines (default_password_crypted in /etc/cobbler/settings) is still set to 'cobbler' and should be changed, try: "openssl passwd -1 -salt 'random-phrase-here' 'your-password-here'" to generate new one8 : fencing tools were not found, and are required to use the (optional) power management features. install cman or fence-agents to use themRestart cobblerd and then run 'cobbler sync' to apply changes.
cobbler 报错解决
执行Cobbler check报错解决方式1. 修改/etc/cobbler/settings文件中的server参数的值为提供cobbler服务的主机相应的IP地址或主机名(自己的ip 384行)2. 修改/etc/cobbler/settings文件中的next_server参数的值为提供PXE服务的主机相应的IP地址(自己的ip 272行)3.change 'disable' to 'no' in /etc/xinetd.d/tftp centos7不用管4. 如果当前节点可以访问互联网,执行“cobbler get-loaders”命令即可;否则,需要安装syslinux程序包,而后复制/usr/share/syslinux/{pxelinux.0,memu.c32}等文件至/var/lib/cobbler/loaders/目录中5 enable and start rsyncd.service with systemctl 用不到不用管6 debian系统 不用管7. 执行"openssl passwd -1"生成密码,并用其替换/etc/cobbler/settings文件中default_password_crypted参数的值8.也不用管 集群相关
流程:
修改 /etc/cobbler/dhcp.tempplate 网段地址范围等 变量不用动执行cobbler sync 同步一下就行 默认dhcp启动生成yum源 先挂载两张centos6、7盘在复制两张盘cobbler import --path=/mnt/centos7/ --name=Centos-7.4cobbler import --path=/mnt/centos6/ --name=Centos-6.9复制完成就可以安装了之后自己修改根据自己的需求配置应答文件url --url=$tree 这里使用变量
cobbler 相关管理
下载启动菜单:联网:cobbler get-loaders不联网:cp/usr/share/syslinux/{pxelinux.0,menu.c32} /var/lib/tftpboot管理distrocobbler import --name=centos-6.9-x86_64 --path=/media/cdrom--arch=x86_64管理profilecobbler profile add --name=centos-6.9-x86_64-basic--distro=centos-6.9-x86_64 --kickstart= /var/lib/cobbler/kickstarts/centos-6.9-x86_64.cfg
cobbler 命令
查看profilescobbler profile list //安装列表cobbler distro list //yum源列表查看引导文件cat /var/lib/tftpboot/pxelinux.cfg/default同步cobbler配置cobbler sync多系统引导方案cobbler import --name=CentOS-7-x86_64 --path=/media/cdromcobbler distro listcobbler profile listcobbler sync
cobbler 实现步骤
- 安装包,并设置服务
- 检查配置
- 根据上面提示修改配置
- 下载启动相关文件菜单
- 配置DHCP服务
- 分别导入centos的安装源,并查看
- 准备kickstart文件并导入cobbler
- 测试
cobbler的web管理实现
cobbler-web提供cobbler的基于web管理界面,epel源yum install cobbler-web认证方式认证方法配置文件:/etc/cobbler/modules.conf支持多种认证方法:authn_configfileauthn_pam
cobbler的web管理实现
使用authn_configfile模块认证cobbler_web用户vim /etc/cobbler/modules.conf[authentication]module=authn_configfile创建其认证文件/etc/cobbler/users.digest,并添加所需的用户htdigest -c /etc/cobbler/users.digest Cobbler admin注意:添加第一个用户时,使用“-c”选项,后续添加其他用户时不要再使用,cobbler_web的realm只能为Cobbler
使用authn_pam模块认证cobbler_web用户vim /etc/cobbler/modules.conf[authentication]module =authn_pam创建cobbler用户:useradd -s /sbin/nologin cobblerecho magedu |passwd --stdin cobblervim /etc/cobbler/users.conf[admins]admin = "cobbler"Web访问cobbler重启cobblerd服务通过https://cobblerserver/cobbler_web访问
