@dodola
2019-02-15T02:47:40.000000Z
字数 22441
阅读 2039
VirtualAPK 资源篇
概述
VitrualAPK 是滴滴开源的一款插件化框架
VirtualAPK 地址:https://github.com/didi/VirtualAPK
前两天鸿洋分析了插件的四大组件启动流程,这里针对一些具体的点分析一下。
本篇先从资源下手分析。VirtualAPK的插件资源加载分为两种方式:
一种是插件存在一份独立的 Resources 自己使用,一种是COMBINE_RESOURCES模式,将插件的资源全部添加到宿主的 Resources 里
首先我们要先看一下系统是如何加载资源的。
Android 资源加载
此处简单探讨一下Android系统里资源加载查找的过程,这是插件加载资源的理论基础。
Resources对象的生成
从下向上一直可以追溯到生成Resources对象的地方
class ContextImpl extends Context {//...private ContextImpl(ContextImpl container, ActivityThread mainThread,LoadedApk packageInfo, IBinder activityToken, UserHandle user, boolean restricted,Display display, Configuration overrideConfiguration) {//....Resources resources = packageInfo.getResources(mainThread);//....}//...}
这里不去关注packageInfo是如何生成的,直接跟踪到下面去.
public final class LoadedApk {private final String mResDir;public LoadedApk(ActivityThread activityThread, ApplicationInfo aInfo,CompatibilityInfo compatInfo, ClassLoader baseLoader,boolean securityViolation, boolean includeCode, boolean registerPackage) {final int myUid = Process.myUid();aInfo = adjustNativeLibraryPaths(aInfo);mActivityThread = activityThread;mApplicationInfo = aInfo;mPackageName = aInfo.packageName;mAppDir = aInfo.sourceDir;mResDir = aInfo.uid == myUid ? aInfo.sourceDir : aInfo.publicSourceDir;// 注意一下这个sourceDir,这个是我们宿主的APK包在手机中的路径,宿主的资源通过此地址加载。// 该值的生成涉及到PMS,暂时不进行分析。// Full path to the base APK for this application.//....}//....public Resources getResources(ActivityThread mainThread) {if (mResources == null) {mResources = mainThread.getTopLevelResources(mResDir, mSplitResDirs, mOverlayDirs,mApplicationInfo.sharedLibraryFiles, Display.DEFAULT_DISPLAY, null, this);}return mResources;}//....}
进入到ActivityThread.getTopLevelResources()的逻辑中
public final class ActivityThread {Resources getTopLevelResources(String resDir, CompatibilityInfo compInfo) {//我们暂时只关注下面这一段代码AssetManager assets = new AssetManager();if (assets.addAssetPath(resDir) == 0) { //此处将上面的mResDir,也就是宿主的APK在手机中的路径当做资源包添加到AssetManager里,则Resources对象可以通过AssetManager查找资源,此处见(老罗博客:Android应用程序资源的查找过程分析)return null;}// 创建Resources对象,此处依赖AssetManager类来实现资源查找功能。r = new Resources(assets, metrics, getConfiguration(), compInfo);}}
从上面的代码中我们知道了我们常用的Resources是如何生成的了,那么理论上插件也就按照如此方式生成一个Resources对象给自己用就可以了。下面从VirtualAPK的代码里看一下对资源的处理
VirtualAPK 资源加载
在VirtualAPK里插件所有相关的内容都被封装到LoadedPlugin里,插件的加载行为一般都在这个类的构造方法的实现里,我们这里只关注与资源相关部分的代码
LoadedPlugin(PluginManager pluginManager, Context context, File apk) throws PackageParser.PackageParserException {//需要注意context是宿主的Context//apk 指的是插件的路径this.mResources = createResources(context, apk);this.mAssets = this.mResources.getAssets();}private static AssetManager createAssetManager(Context context, File apk) {try {//这里参照系统的方式生成AssetManager,并通过反射将插件的apk路径添加到AssetManager里//这里只适用于资源独立的情况,如果需要调用宿主资源,则需要插入到宿主的AssetManager里AssetManager am = AssetManager.class.newInstance();ReflectUtil.invoke(AssetManager.class, am, "addAssetPath", apk.getAbsolutePath());return am;} catch (Exception e) {e.printStackTrace();return null;}}@WorkerThreadprivate static Resources createResources(Context context, File apk) {if (Constants.COMBINE_RESOURCES) {//如果插件资源合并到宿主里面去的情况,插件可以访问宿主的资源Resources resources = new ResourcesManager().createResources(context, apk.getAbsolutePath());ResourcesManager.hookResources(context, resources);return resources;} else {//插件使用独立的Resources,不与宿主有关系,无法访问到宿主的资源Resources hostResources = context.getResources();AssetManager assetManager = createAssetManager(context, apk);return new Resources(assetManager, hostResources.getDisplayMetrics(), hostResources.getConfiguration());}}
如果将宿主和插件隔离,我们只需要生成一个独立的Resources对象给插件使用,如果要调用宿主资源则需要将宿主的APK和插件的APK一起添加到同一个AssetManager里。进入到ResourcesManager的逻辑里
public static synchronized Resources createResources(Context hostContext, String apk) {// hostContext 为宿主的ContextResources hostResources = hostContext.getResources();//获取到宿主的Resources对象Resources newResources = null;AssetManager assetManager;try {//-----begin---//这块的代码涉及到的内容比较多,详情见①if (Build.VERSION.SDK_INT < Build.VERSION_CODES.LOLLIPOP) {assetManager = AssetManager.class.newInstance();ReflectUtil.invoke(AssetManager.class, assetManager, "addAssetPath", hostContext.getApplicationInfo().sourceDir);} else {assetManager = hostResources.getAssets();}//------end----//------begin---ReflectUtil.invoke(AssetManager.class, assetManager, "addAssetPath", apk);List<LoadedPlugin> pluginList = PluginManager.getInstance(hostContext).getAllLoadedPlugins();for (LoadedPlugin plugin : pluginList) {ReflectUtil.invoke(AssetManager.class, assetManager, "addAssetPath", plugin.getLocation());}//------end----//-----begin-----//此处针对机型的兼容代码是可以避开的,详情见③if (isMiUi(hostResources)) {newResources = MiUiResourcesCompat.createResources(hostResources, assetManager);} else if (isVivo(hostResources)) {newResources = VivoResourcesCompat.createResources(hostContext, hostResources, assetManager);} else if (isNubia(hostResources)) {newResources = NubiaResourcesCompat.createResources(hostResources, assetManager);} else if (isNotRawResources(hostResources)) {newResources = AdaptationResourcesCompat.createResources(hostResources, assetManager);} else {// is raw android resourcesnewResources = new Resources(assetManager, hostResources.getDisplayMetrics(), hostResources.getConfiguration());}//-----end-----} catch (Exception e) {e.printStackTrace();}return newResources;}public static void hookResources(Context base, Resources resources) {if (Build.VERSION.SDK_INT >= 24) {return;}try {ReflectUtil.setField(base.getClass(), base, "mResources", resources);Object loadedApk = ReflectUtil.getPackageInfo(base);ReflectUtil.setField(loadedApk.getClass(), loadedApk, "mResources", resources);Object activityThread = ReflectUtil.getActivityThread(base);Object resManager = ReflectUtil.getField(activityThread.getClass(), activityThread, "mResourcesManager");Map<Object, WeakReference<Resources>> map = (Map<Object, WeakReference<Resources>>) ReflectUtil.getField(resManager.getClass(), resManager, "mActiveResources");Object key = map.keySet().iterator().next();map.put(key, new WeakReference<>(resources));} catch (Exception e) {e.printStackTrace();}}
①:此处针对系统版本的区分涉及到资源加载时候的兼容性问题
由于资源做过分区,则在Android L后直接将插件包的apk地址addAssetPath之后就可以,但是在Android L之前,addAssetPath只是把补丁包加入到资源路径列表里,但是资源的解析其实是在很早的时候就已经执行完了,问题出现在这部分代码:
const ResTable* AssetManager::getResTable(bool required) const{ResTable* rt = mResources;if (rt) {return rt;}//....}
mResources指向的是一个ResTable对象,如果它的值不等于NULL,那么就说明当前应用程序已经解析过它使用的资源包里面的resources.arsc文件,因此,这时候AssetManager类的成员函数getResources就可以直接将该ResTable对象返回给调用者。如果还没有初始化 mResources 则按照一定步骤遍历当前应用所使用的每个资源包进而生成 mResources 。
具体的初始化过程见老罗的博客
由于有系统资源的存在,mResources 的初始化在很早就初始化了,所以我们就算通过addAssetPath方法将 apk 添加到mAssetPaths里,在查找资源的时候也不会找到这部分的资源,因为在旧的 mResources 里没有这部分的 id。
所以在 Android L 之前是需要想办法构造一个新的AssetManager里的 mResources 才行,这里有两种方案,VirtualAPK 用的是类似 InstantRun 的那种方案,构造一个新的 AssetManager,将宿主和加载过的插件的所有 apk 全都添加一遍,然后再调用hookResources方法将新的 Resources 替换回原来的,这样会引起两个问题,一个是每次加载新的插件都会重新构造一个 AssetManger 和 Resources,然后重新添加所有资源,这样涉及到很多机型的兼容(因为部分厂商自己修改了 Resources 的类名),一个是需要有一个替换原来Resources的过程,这样就需要涉及到很多地方,从hookResources的实现里看,替换了四处地方,在尽量少的 hook 原则下这样的情况还是尽量避免的。
另外一种方案在淘宝发布的《深入探索 Android 热修复技术原理》的文档里有说明,这里引用过来介绍一下。
在 AssetManager 里有一个方法叫做destroy方法
public final class AssetManager {//....private native final void destroy();//....}
对应的 native 代码如下
static void android_content_AssetManager_destroy(JNIEnv* env, jobject clazz){AssetManager* am = (AssetManager*)(env->GetIntField(clazz, gAssetManagerOffsets.mObject));ALOGV("Destroying AssetManager %p for Java object %p\n", am, clazz);if (am != NULL) {delete am;env->SetIntField(clazz, gAssetManagerOffsets.mObject, 0);}}
这里直接 delete am ,会导致调用 AssetManager 的析构函数
AssetManager::~AssetManager(void){int count = android_atomic_dec(&gCount);//ALOGI("Destroying AssetManager in %p #%d\n", this, count);delete mConfig;delete mResources;// don't have a String class yet, so make sure we clean updelete[] mLocale;delete[] mVendor;}
这里delete mResources了
现在我们可以通过调用他的init方法,重新初始化
static void android_content_AssetManager_init(JNIEnv* env, jobject clazz){AssetManager* am = new AssetManager();if (am == NULL) {jniThrowException(env, "java/lang/OutOfMemoryError", "");return;}am->addDefaultAssets();ALOGV("Created AssetManager %p for Java object %p\n", am, clazz);env->SetIntField(clazz, gAssetManagerOffsets.mObject, (jint)am);}
此时在资源查找的时候发现 mResources 没有初始化就将所有的资源 add 一遍。
实现代码如下:
public static synchronized Resources createResources(Context hostContext, String apk) {Resources hostResources = hostContext.getResources();try {AssetManager assetManager = hostResources.getAssets();if (Build.VERSION.SDK_INT < Build.VERSION_CODES.LOLLIPOP) {//我们需要将应用原来加载的地址取出来,详情见①List<String> cookieNames = new ArrayList<>();int stringBlockCount =(int) ReflectUtil.invoke(AssetManager.class, assetManager, "getStringBlockCount");Method getCookieNameMethod = AssetManager.class.getDeclaredMethod("getCookieName", Integer.TYPE);getCookieNameMethod.setAccessible(true);for (int i = 0; i < stringBlockCount; i++) {String cookieName =(String) getCookieNameMethod.invoke(assetManager, new Object[] {i + 1});cookieNames.add(cookieName);}ReflectUtil.invoke(AssetManager.class, assetManager, "destroy");ReflectUtil.invoke(AssetManager.class, assetManager, "init");ReflectUtil.setField(AssetManager.class, assetManager, "mStringBlocks", null);//②//将原来的assets添加进去,有了此步骤就不用刻意添加sourceDir了for (String path : cookieNames) {ReflectUtil.invoke(AssetManager.class, assetManager, "addAssetPath", path);}//插入插件的资源地址ReflectUtil.invoke(AssetManager.class, assetManager, "addAssetPath", apk);List<LoadedPlugin> pluginList = PluginManager.getInstance(hostContext).getAllLoadedPlugins();for (LoadedPlugin plugin : pluginList) {ReflectUtil.invoke(AssetManager.class, assetManager, "addAssetPath", plugin.getLocation());}ReflectUtil.invoke(AssetManager.class, assetManager, "ensureStringBlocks");//③hostResources.updateConfiguration(hostResources.getConfiguration(), hostResources.getDisplayMetrics());//此行代码非常重要④} else {ReflectUtil.invoke(AssetManager.class, assetManager, "addAssetPath", apk);List<LoadedPlugin> pluginList = PluginManager.getInstance(hostContext).getAllLoadedPlugins();for (LoadedPlugin plugin : pluginList) {ReflectUtil.invoke(AssetManager.class, assetManager, "addAssetPath", plugin.getLocation());}}//省去了兼容性的验证// if (isMiUi(hostResources)) {// newResources = MiUiResourcesCompat.createResources(hostResources, assetManager);// } else if (isVivo(hostResources)) {// newResources = VivoResourcesCompat.createResources(hostContext, hostResources,// assetManager);// } else if (isNubia(hostResources)) {// newResources = NubiaResourcesCompat.createResources(hostResources, assetManager);// } else if (isNotRawResources(hostResources)) {// newResources = AdaptationResourcesCompat.createResources(hostResources, assetManager);// } else {// is raw android resources// newResources =// new Resources(assetManager, hostResources.getDisplayMetrics(), hostResources// .getConfiguration());// }} catch (Exception e) {e.printStackTrace();}return hostResources;}
注:上面的代码我测试了几款手机,Mi3(4.4.4)、坚果Pro(7.1.1)、Nubia(6.0.0)、Nexus 6P(8.0),(4.2-5.0)模拟器均表现正常,但待深度实验测试
①:取出原assets地址
由于我们将host的AssetManager已经destroy后,需要还原原来的地址,否则就会发生找不到资源的情况,此时需要提前将host加载的资源路径全部取出来,理论上,这个过程系统是做了一部分的,当我们调用init方法的时候:
static void android_content_AssetManager_init(JNIEnv* env, jobject clazz){AssetManager* am = new AssetManager();if (am == NULL) {jniThrowException(env, "java/lang/OutOfMemoryError", "");return;}am->addDefaultAssets();//注意这行代码ALOGV("Created AssetManager %p for Java object %p\n", am, clazz);env->SetIntField(clazz, gAssetManagerOffsets.mObject, (jint)am);}
static const char* kSystemAssets = "framework/framework-res.apk";bool AssetManager::addDefaultAssets(){const char* root = getenv("ANDROID_ROOT");LOG_ALWAYS_FATAL_IF(root == NULL, "ANDROID_ROOT not set");String8 path(root);path.appendPath(kSystemAssets);//framework/framework-res.apkreturn addAssetPath(path, NULL);}
但是此处只添加了framework-res.apk,还有宿主的apk需要添加,而且如果之前添加了其他的apk此处如果自己没有记录的话就会漏掉,所以还是从原来的AssetManager里取出来比较稳妥
之前想的方案是通过JNI找到AssetManager对象的实例,从里面取出mAssetPaths传递给Java层使用
AssetManager* assetManagerForJavaObject(JNIEnv* env, jobject obj){AssetManager* am = (AssetManager*)env->GetIntField(obj, gAssetManagerOffsets.mObject);if (am != NULL) {return am;}jniThrowException(env, "java/lang/IllegalStateException", "AssetManager has been finalized!");return NULL;}
但此方法相对比较复杂一些,通过AssetManager的代码我们可以找到一些其他的方法。看下面这个方法,在第一次查找资源的时候
const ResTable* AssetManager::getResTable(bool required) const{ResTable* rt = mResources;if (rt) {return rt;}// Iterate through all asset packages, collecting resources from each.AutoMutex _l(mLock);if (mResources != NULL) {return mResources;}if (required) {LOG_FATAL_IF(mAssetPaths.size() == 0, "No assets added to AssetManager");}if (mCacheMode != CACHE_OFF && !mCacheValid)const_cast<AssetManager*>(this)->loadFileNameCacheLocked();const size_t N = mAssetPaths.size();for (size_t i=0; i<N; i++) {Asset* ass = NULL;ResTable* sharedRes = NULL;bool shared = true;const asset_path& ap = mAssetPaths.itemAt(i);MY_TRACE_BEGIN(ap.path.string());Asset* idmap = openIdmapLocked(ap);ALOGV("Looking for resource asset in '%s'\n", ap.path.string());if (ap.type != kFileTypeDirectory) {if (i == 0) {// The first item is typically the framework resources,// which we want to avoid parsing every time.sharedRes = const_cast<AssetManager*>(this)->mZipSet.getZipResourceTable(ap.path);}//......if ((ass != NULL || sharedRes != NULL) && ass != kExcludedAsset) {if (rt == NULL) {mResources = rt = new ResTable();updateResourceParamsLocked();}ALOGV("Installing resource asset %p in to table %p\n", ass, mResources);if (sharedRes != NULL) {ALOGV("Copying existing resources for %s", ap.path.string());rt->add(sharedRes);//注意} else {ALOGV("Parsing resources for %s", ap.path.string());rt->add(ass, (void*)(i+1), !shared, idmap);//注意}if (!shared) {delete ass;}}if (idmap != NULL) {delete idmap;}MY_TRACE_END();}if (required && !rt) ALOGW("Unable to find resources file resources.arsc");if (!rt) {mResources = rt = new ResTable();}return rt;}
从上面的代码可以看到,在初始化ResTable的时候,遍历了一下mAssetPaths,将每个地址解析后add到ResTable里,看一下这几个add方法
status_t ResTable::add(const void* data, size_t size, void* cookie, bool copyData,const void* idmap){return add(data, size, cookie, NULL, copyData, reinterpret_cast<const Asset*>(idmap));}status_t ResTable::add(Asset* asset, void* cookie, bool copyData, const void* idmap){const void* data = asset->getBuffer(true);if (data == NULL) {ALOGW("Unable to get buffer of resource asset file");return UNKNOWN_ERROR;}size_t size = (size_t)asset->getLength();return add(data, size, cookie, asset, copyData, reinterpret_cast<const Asset*>(idmap));}status_t ResTable::add(ResTable* src){mError = src->mError;for (size_t i=0; i<src->mHeaders.size(); i++) {mHeaders.add(src->mHeaders[i]);//注意}for (size_t i=0; i<src->mPackageGroups.size(); i++) {PackageGroup* srcPg = src->mPackageGroups[i];PackageGroup* pg = new PackageGroup(this, srcPg->name, srcPg->id);for (size_t j=0; j<srcPg->packages.size(); j++) {pg->packages.add(srcPg->packages[j]);}pg->basePackage = srcPg->basePackage;pg->typeCount = srcPg->typeCount;mPackageGroups.add(pg);}memcpy(mPackageMap, src->mPackageMap, sizeof(mPackageMap));return mError;}status_t ResTable::add(const void* data, size_t size, void* cookie,//注意此处的cookie值Asset* asset, bool copyData, const Asset* idmap){if (!data) return NO_ERROR;Header* header = new Header(this);header->index = mHeaders.size();header->cookie = cookie;if (idmap != NULL) {const size_t idmap_size = idmap->getLength();const void* idmap_data = const_cast<Asset*>(idmap)->getBuffer(true);header->resourceIDMap = (uint32_t*)malloc(idmap_size);if (header->resourceIDMap == NULL) {delete header;return (mError = NO_MEMORY);}memcpy((void*)header->resourceIDMap, idmap_data, idmap_size);header->resourceIDMapSize = idmap_size;}mHeaders.add(header);//注意//...}
每次add 都会添加到mHeaders中,可以认为每个地址对应一个Header,mHeaders的数量就是mAssetPath地址的数量,这样我们就可以得出已经添加了多少个资源进去
size_t ResTable::getTableCount() const{return mHeaders.size();}
回溯到android_util_AssetManager.cpp代码中可以发现
static jint android_content_AssetManager_getStringBlockCount(JNIEnv* env, jobject clazz){AssetManager* am = assetManagerForJavaObject(env, clazz);if (am == NULL) {return 0;}return am->getResources().getTableCount();}
很明显我们可以通过java里的AssetManager.getStringBlockCount()获得资源数量
得到数量就需要取出这些地址,从AssetManager.cpp的代码中看它是对外提供了一个获取地址的方法:
String8 AssetManager::getAssetPath(void* cookie) const{AutoMutex _l(mLock);const size_t which = ((size_t)cookie)-1;if (which < mAssetPaths.size()) {return mAssetPaths[which].path;}return String8();}
然后通过搜索发现一个可以调用到的地方
static jstring android_content_AssetManager_getCookieName(JNIEnv* env, jobject clazz,jint cookie){AssetManager* am = assetManagerForJavaObject(env, clazz);if (am == NULL) {return NULL;}String8 name(am->getAssetPath((void*)cookie));if (name.length() == 0) {jniThrowException(env, "java/lang/IndexOutOfBoundsException", "Empty cookie name");return NULL;}jstring str = env->NewStringUTF(name.string());return str;}
很明显,我们知道了数量,遍历的时候从 i+1 到 count依次取出就可以。
②③引用:它记录了之前加载过的所有资源包中的String Pool,很多时候访问字符串是从此处来的,如果不重新构造就会导致崩溃。
④:过程中很重要的一步,因为后面在资源查找的时候是需要通过一个ResTable_config来获取当前手机的一些配置从而获取到准确的资源,如果不进行初始化则会出现找不到资源的崩溃
public class Resources {private final Configuration mConfiguration = new Configuration();public void updateConfiguration(Configuration config,DisplayMetrics metrics) {synchronized (mTmpValue) {//....mAssets.setConfiguration(mConfiguration.mcc, mConfiguration.mnc,locale, mConfiguration.orientation,mConfiguration.touchscreen,(int)(mMetrics.density*160), mConfiguration.keyboard,keyboardHidden, mConfiguration.navigation, width, height,mConfiguration.screenLayout, mConfiguration.uiMode, sSdkVersion);//...}}}
最终调用到
static void android_content_AssetManager_setConfiguration(JNIEnv* env, jobject clazz, jint mcc, jint mnc, jstring locale, jint orientation, jint touchscreen, jint density, jint keyboard, jint keyboardHidden, jint navigation, jint screenWidth, jint screenHeight, jint screenLayout, jint uiMode, jint sdkVersion){AssetManager* am = assetManagerForJavaObject(env, clazz);if (am == NULL) {return;}ResTable_config config;memset(&config, 0, sizeof(config));const char* locale8 = locale != NULL ? env->GetStringUTFChars(locale, NULL) : NULL;config.mcc = (uint16_t)mcc;config.mnc = (uint16_t)mnc;config.orientation = (uint8_t)orientation;config.touchscreen = (uint8_t)touchscreen;config.density = (uint16_t)density;config.keyboard = (uint8_t)keyboard;config.inputFlags = (uint8_t)keyboardHidden;config.navigation = (uint8_t)navigation;config.screenWidth = (uint16_t)screenWidth;config.screenHeight = (uint16_t)screenHeight;config.screenLayout = (uint8_t)screenLayout;config.uiMode = (uint8_t)uiMode;config.sdkVersion = (uint16_t)sdkVersion;config.minorVersion = 0;am->setConfiguration(config, locale8);if (locale != NULL) env->ReleaseStringUTFChars(locale, locale8);}
具体查找资源时候是如何使用这个config的请看老罗的博客
Activity 启动过程中对资源的处理
上面介绍了插件资源创建的过程,下面看一些在启动过程中需要对资源这部分做的特殊处理
@Overridepublic Activity newActivity(ClassLoader cl, String className, Intent intent) throws InstantiationException, IllegalAccessException, ClassNotFoundException {try {cl.loadClass(className);} catch (ClassNotFoundException e) {LoadedPlugin plugin = this.mPluginManager.getLoadedPlugin(intent);String targetClassName = PluginUtil.getTargetActivity(intent);Log.i(TAG, String.format("newActivity[%s : %s]", className, targetClassName));if (targetClassName != null) {Activity activity = mBase.newActivity(plugin.getClassLoader(), targetClassName, intent);activity.setIntent(intent);try {// for 4.1+ReflectUtil.setField(ContextThemeWrapper.class, activity, "mResources", plugin.getResources());//注意此处的代码} catch (Exception ignored) {// ignored.}return activity;}}return mBase.newActivity(cl, className, intent);}这部分的处理在很多插件框架中都有存在,原来系统的代码只是做了这个操作`cl.loadClass(className);` 并没有做针对资源的处理,这里对资源做了一次赋值的缘由需要探讨一下。跟踪到新建Activity对象的地方,也就是出现问题的地方,这里通过4.4的代码解释一下,后面版本的代码虽然变化大但也会出现问题,追溯到底的原因是一样的。private Activity performLaunchActivity(ActivityClientRecord r, Intent customIntent) {//.....Activity activity = null;try {java.lang.ClassLoader cl = r.packageInfo.getClassLoader();activity = mInstrumentation.newActivity(cl, component.getClassName(), r.intent);StrictMode.incrementExpectedActivityCount(activity.getClass());r.intent.setExtrasClassLoader(cl);if (r.state != null) {r.state.setClassLoader(cl);}} catch (Exception e) {if (!mInstrumentation.onException(activity, e)) {throw new RuntimeException("Unable to instantiate activity " + component+ ": " + e.toString(), e);}}try {Application app = r.packageInfo.makeApplication(false, mInstrumentation);if (localLOGV) Slog.v(TAG, "Performing launch of " + r);if (localLOGV) Slog.v(TAG, r + ": app=" + app+ ", appName=" + app.getPackageName()+ ", pkg=" + r.packageInfo.getPackageName()+ ", comp=" + r.intent.getComponent().toShortString()+ ", dir=" + r.packageInfo.getAppDir());if (activity != null) {Context appContext = createBaseContextForActivity(r, activity);//出现问题的地点CharSequence title = r.activityInfo.loadLabel(appContext.getPackageManager());Configuration config = new Configuration(mCompatConfiguration);if (DEBUG_CONFIGURATION) Slog.v(TAG, "Launching activity "+ r.activityInfo.name + " with config " + config);activity.attach(appContext, this, getInstrumentation(), r.token,r.ident, app, r.intent, r.activityInfo, title, r.parent,r.embeddedID, r.lastNonConfigurationInstances, config);if (customIntent != null) {activity.mIntent = customIntent;}r.lastNonConfigurationInstances = null;activity.mStartedActivity = false;int theme = r.activityInfo.getThemeResource();if (theme != 0) {activity.setTheme(theme);}activity.mCalled = false;mInstrumentation.callActivityOnCreate(activity, r.state);//此处调用了onCreate方法,如果不进行资源处理则在此出现找不到资源的crashif (!activity.mCalled) {throw new SuperNotCalledException("Activity " + r.intent.getComponent().toShortString() +" did not call through to super.onCreate()");}......return activity;}private Context createBaseContextForActivity(ActivityClientRecord r,final Activity activity) {ContextImpl appContext = new ContextImpl();appContext.init(r.packageInfo, r.token, this);appContext.setOuterContext(activity);Context baseContext = appContext;return baseContext;}
系统在创建完Activity对象后,紧接着创建Activity所附着的Context,从最上面的创建Resources 一部分内容可知,在createBaseContextForActivity 方法中创建出来的ContextImpl appContext 使用的是宿主的Resources,如果不进行处理紧接着Activity会走入onCreate的生命周期中,此时插件加载资源的时候还是使用的宿主的资源,而不是我们特意为插件所创建出来的Resources对象,则会发生找不到资源的问题,这里用了一个很机智的方式解决这个问题。
@Overridepublic Resources getResources() {if (mResources != null) {//我们提前设置了mResources 所以不会走到下面去return mResources;}if (mOverrideConfiguration == null) {mResources = super.getResources();return mResources;} else {Context resc = createConfigurationContext(mOverrideConfiguration);mResources = resc.getResources();return mResources;}}
我们调用getResources方法的时候会走进这里,由于我们提前设置了mResources对象,所以系统所创建的Resources对象其实是用不到的。
另:如果采用上述所说的AssetManager销毁的方法,则无需在创建Activity后设置Resources对象,因为此处全局都是宿主+插件的资源。
插件调用宿主的资源
在宿主开启了COMBINE_RESOURCES模式下,插件是可以调用宿主的资源的,理论上也是可以调用其他插件资源的(需要修改打包),但是不推荐这么做。这个问题可以看一下Replugin踩过的坑。
此处需要注意两个问题,如果宿主升级那么需要保证原来插件调用的资源id不能改变,否则宿主升级后,加载的插件还是拿取的旧版本资源id,可能会导致资源找不到和错乱情况,所以宿主要从使用插件起保证每个版本被插件所使用的资源不能变化id。
这里用官方例子做一个简单的例子说明一下如何调用宿主资源。
首先我们需要将能被插件访问到的资源提取到一个公共模块中去
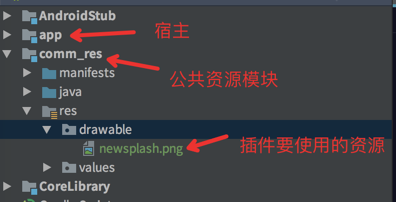
然后修改配置,将
comm_res这个模块引用到宿主模块中
切回我们的插件模块,将
common_res也引用到插件模块中
这样就可以在插件直接引用这个资源了,我直接在一个Activity中引用了这个资源
   <ImageView android:layout_width="wrap_content"
                 android:layout_height="wrap_content"
                 android:src="@drawable/newsplash"
      />
打包验证,调用插件可以看到这个图片是被引用到了

验证资源是否来自宿主中,首先先看一下插件里是否存在这个图片的资源
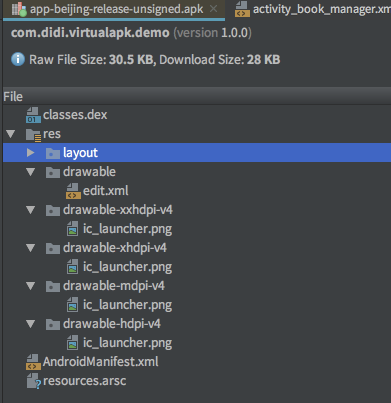
可以看到,插件里并没有打包到插件里,下一步看一下此资源的id是否和宿主中的资源id一致
插件里的id

宿主里的id
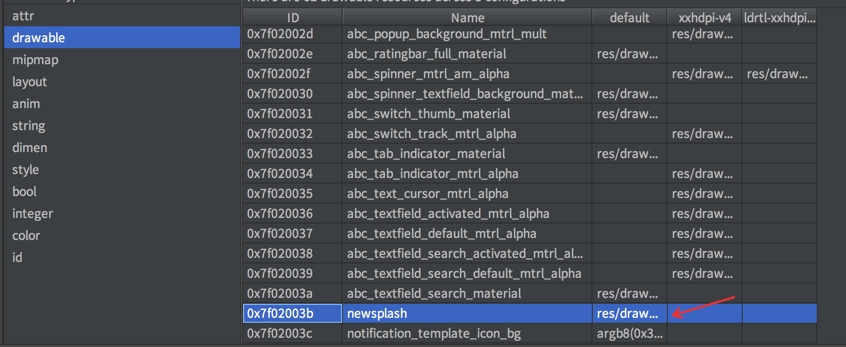
验证通过
此处验证一下公共资源的增加和变动是否会引起旧版本的插件调用资源错误
验证方式比较简单,增加几张图片

然后重新打包宿主,运行,发现此时运行旧的插件,已经发生错误了

查一下宿主的资源id,发现此时已经发生资源变更

要解决这个问题,需要注意两个地方,1,旧的资源不能删除,2,需要保持旧版本资源的id不变,具体见Tinker的实现
